-
Welcome to our new sponsor Lecatona, a brand dedicated to enhancing performance for VAG group sports cars, including SEAT, Audi, Volkswagen and Škoda. Specializing in High Pressure Fuel Pump (HPFP) upgrades.
You are using an out of date browser. It may not display this or other websites correctly.
You should upgrade or use an alternative browser.
You should upgrade or use an alternative browser.
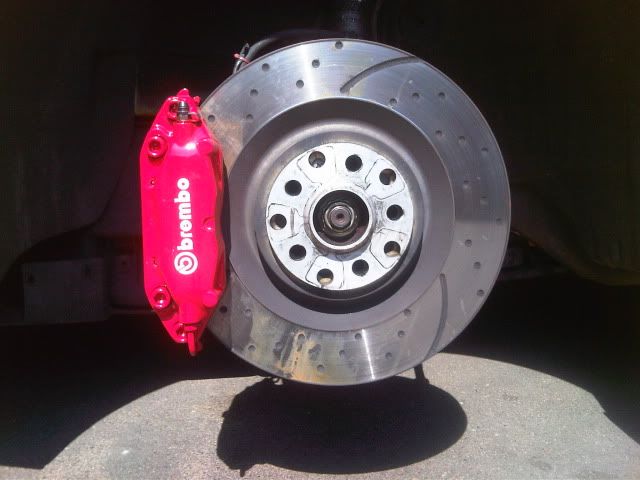
No I didn't you fool, do you read left to right or right to left?! haha! I think you might have put yours on wrong in that case, you might even win an award like Pyro and his FMIC setup  . The base of the letters are meant to face the inner part of the disc, not outer edge.


...and plenty more: http://www.google.co.uk/search?rlz=...&source=og&sa=N&hl=en&tab=wi&biw=1345&bih=535


...and plenty more: http://www.google.co.uk/search?rlz=...&source=og&sa=N&hl=en&tab=wi&biw=1345&bih=535
Last edited:
it reads down not up lol.and i even checked before i did mine.
Mine read down too
They've come up really well Jason! Can I ask what paint did you use (make and where from) and would you recommend it? Also, where did you get those decals from? Are they a transfer that was put on before being lacquered? The info would be greatly appreciated.
James.
James.
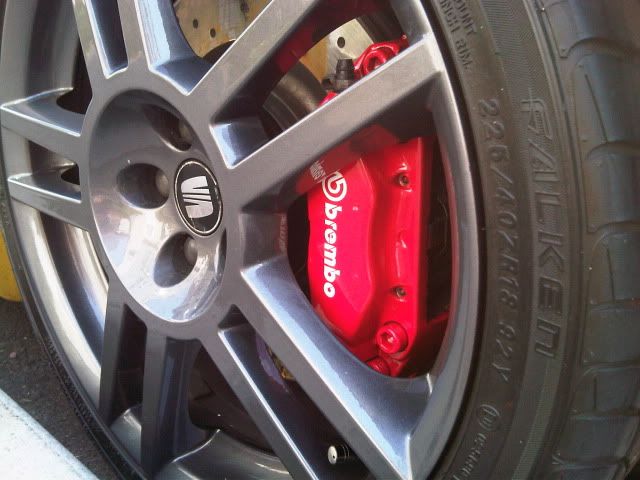
Well I put the decals on the same way that the OE ones were & presumably when the car left the factory, this was their first repaint and I've never seen an LCR with them different to how I have mine  . Mine face the same way as Ronin & Tyrer say. Meh, Brembo's is Brembo's
  .
.
Hi James, thanks for the feedback, they're certainly very red now! I've done both calipers now and left them both to dry until today. The paint has hardened and toned down a little but they look great, very pleased and I will get some on car pics tomorrow after it has had its weekly wash.
I used Hammerite Smooth Red spray paint as it's high temp, a nice colour and resitant to the elements. It also doesn't need laquering if you don't want to but it's best to have one coat to seal the Brembo decal in, well that's how I think anyway. You can buy this in any Halfords for about £10 a can which should do you front and rear calipers although I am ignoring the rears as I don't like them to stand out so much being dull and all but they've had a laquer refurb.
I got the decals here: http://cgi.ebay.co.uk/ws/eBayISAPI.dll?ViewItem&item=220711321934&ssPageName=STRK:MEWNX:IT
They're not 3M but they're 7yr high temp sign vinyl. For the price you get 6 stickers so that either allows you to screw up three times each side or 21yrs supply . They're transfer sticky vinyl, good quality from what I can tell too and I applied them onto dry paint 1 day after spraying but before a coat of lacquer. I have heard of people not using laquer on these though and being fine. Note that these stickers are a little larger than the OE ones but IMO look a bit better.
Hope this helps & pics to follow tomorrow.
 . Mine face the same way as Ronin & Tyrer say. Meh, Brembo's is Brembo's
 They've come up really well Jason! Can I ask what paint did you use (make and where from) and would you recommend it? Also, where did you get those decals from? Are they a transfer that was put on before being lacquered? The info would be greatly appreciated.
James.
Hi James, thanks for the feedback, they're certainly very red now! I've done both calipers now and left them both to dry until today. The paint has hardened and toned down a little but they look great, very pleased and I will get some on car pics tomorrow after it has had its weekly wash.
I used Hammerite Smooth Red spray paint as it's high temp, a nice colour and resitant to the elements. It also doesn't need laquering if you don't want to but it's best to have one coat to seal the Brembo decal in, well that's how I think anyway. You can buy this in any Halfords for about £10 a can which should do you front and rear calipers although I am ignoring the rears as I don't like them to stand out so much being dull and all but they've had a laquer refurb.
I got the decals here: http://cgi.ebay.co.uk/ws/eBayISAPI.dll?ViewItem&item=220711321934&ssPageName=STRK:MEWNX:IT
They're not 3M but they're 7yr high temp sign vinyl. For the price you get 6 stickers so that either allows you to screw up three times each side or 21yrs supply
Hope this helps & pics to follow tomorrow.
Last edited:
Brembo Repaint Complete
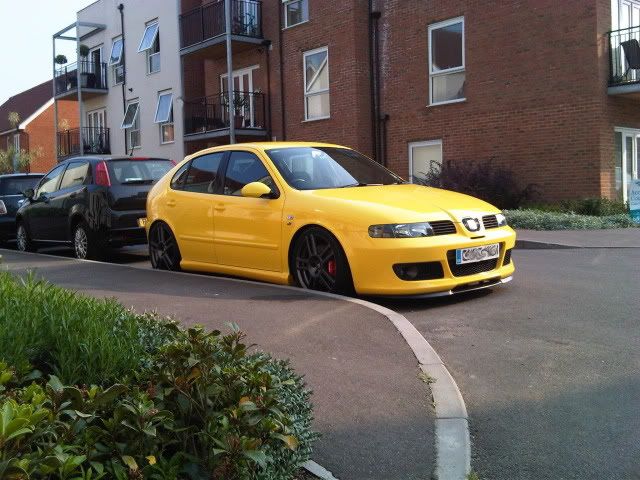
Well here are the finished calipers, pics of the prep work can be found in post #698 here: http://www.seatcupra.net/forums/showpost.php?p=3454514&postcount=698. You can see that they stand out a lot more than the OE coloured ones but they're not OTT. I also had to commit myself to another full detail on the car today after it has attracted some kind of fallout that stuck to the paint which wouldn't wash off with shampoo. So, out with the clay bar, glaze etc and here we have it. I know you can't tell from the pic but this is probably my best job so far, the paint is like crystal .
.


I used the following tools and materials:
- Hammerite Smooth Red Spray Paint
- Brembo Decals (http://cgi.ebay.co.uk/ws/eBayISAPI.dll?ViewItem&item=220711321934&ssPageName=STRK:MEWNX:IT)
- 1200 Grade Wet & Dry Sand Paper
- Washing up liquid (degreaser)
- Brake cleaner (Degreaser)
The rest were just the tools for jacking the car up and removing a wheel.
Quick Guide:
- Untighten wheel nuts.
- Jack up car.
- Remove wheel nuts and wheel.
- Wash the caliper with washing up liquid and a sponge, then dry with a towel.
- Spray the whole caliper in brake cleaner, you'll see the stubborn brake dust start to vanish.
- Mask off the areas around that which you are spraying, all of the suspension parts also. I recommend masking off the whole side of the car that you are doing and as far as half of the bonnet also, this is to prevent overspray which you WILL get if there is a breeze.
- Mask off the bleed nipple and also the two brake pad pins.
- Sand back the caliper with the wet & dry until the caliper feels rough and the Brembo decal starts to come off.
- Spray 4 or 5 coats of Hammerite onto the caliper using 15min or 20min intervals between coats.
- Replace the wheel 15mins after the last coat and leave to dry over night.
- Come back 24hrs later and check the the paint has dried solid, sand back lightly any imperfections (if any) and add another coat. Then again leave to dry for a period until the paint has hardened.
- Line up the sticker on the caliper and smooth it onto it, leaving one edge of the sticker backing loose so that you can peel it off easily.
- Remove the sticker backing, check it's straight and then it's done
- Quickly mask off the area again and spray 1 or 2 coats of lacquer if you so choose.
Well here are the finished calipers, pics of the prep work can be found in post #698 here: http://www.seatcupra.net/forums/showpost.php?p=3454514&postcount=698. You can see that they stand out a lot more than the OE coloured ones but they're not OTT. I also had to commit myself to another full detail on the car today after it has attracted some kind of fallout that stuck to the paint which wouldn't wash off with shampoo. So, out with the clay bar, glaze etc and here we have it. I know you can't tell from the pic but this is probably my best job so far, the paint is like crystal


I used the following tools and materials:
- Hammerite Smooth Red Spray Paint
- Brembo Decals (http://cgi.ebay.co.uk/ws/eBayISAPI.dll?ViewItem&item=220711321934&ssPageName=STRK:MEWNX:IT)
- 1200 Grade Wet & Dry Sand Paper
- Washing up liquid (degreaser)
- Brake cleaner (Degreaser)
The rest were just the tools for jacking the car up and removing a wheel.
Quick Guide:
- Untighten wheel nuts.
- Jack up car.
- Remove wheel nuts and wheel.
- Wash the caliper with washing up liquid and a sponge, then dry with a towel.
- Spray the whole caliper in brake cleaner, you'll see the stubborn brake dust start to vanish.
- Mask off the areas around that which you are spraying, all of the suspension parts also. I recommend masking off the whole side of the car that you are doing and as far as half of the bonnet also, this is to prevent overspray which you WILL get if there is a breeze.
- Mask off the bleed nipple and also the two brake pad pins.
- Sand back the caliper with the wet & dry until the caliper feels rough and the Brembo decal starts to come off.
- Spray 4 or 5 coats of Hammerite onto the caliper using 15min or 20min intervals between coats.
- Replace the wheel 15mins after the last coat and leave to dry over night.
- Come back 24hrs later and check the the paint has dried solid, sand back lightly any imperfections (if any) and add another coat. Then again leave to dry for a period until the paint has hardened.
- Line up the sticker on the caliper and smooth it onto it, leaving one edge of the sticker backing loose so that you can peel it off easily.
- Remove the sticker backing, check it's straight and then it's done
- Quickly mask off the area again and spray 1 or 2 coats of lacquer if you so choose.
Last edited:
Thanks for the above information and guidance Jason; it's greatly appreciated. I'll be right behind Darren in the queue for some decals, and at 1.89, they're cheap as chips. Both the shade of red and size of decal look very suiting. The callipers sit really well against the shade of grey of your alloys. Top work!
Had any more thoughts about the way in which you might go in achieving greater engine performance (tubby wise)?
James.
Had any more thoughts about the way in which you might go in achieving greater engine performance (tubby wise)?
James.
Thanks James, I hope the guide helps you  . It's a pretty easy job but you just need patience and a careful hand. If you mess up at any stage of painting, get paint run etc then just leave it to dry over night and continue the next day, you'll make it worse if you try to make corrections with wet paint.
Well I'm still not sure at the moment, I'm just about to order an intercooler and then get Stage 2 mapped ASAP, I'll see where I am at then. The car is brutal right now, 226g/s of airflow which the is roughly 285bhp on Stage 1 but it really needs to have the mods mapped in to make it run at its best. This Stage 1 code is the same that I had put on the car when it was standard so the ECU must be freaking out in places . I got the 3" exhaust done to future proof the car for hybrid or BT but I'll see, I've been given a nice project to work on this year in my career and completion could lead to a decent promotion (touch wood), I promised myself a new 335i if that happened...would love to keep the LCR as a project though.
Well I'm still not sure at the moment, I'm just about to order an intercooler and then get Stage 2 mapped ASAP, I'll see where I am at then. The car is brutal right now, 226g/s of airflow which the is roughly 285bhp on Stage 1 but it really needs to have the mods mapped in to make it run at its best. This Stage 1 code is the same that I had put on the car when it was standard so the ECU must be freaking out in places
Thanks for the compliments guys.
Jay, I know you miss your Leon but your Ibiza is some machine. The Leon has been a little upset recently and last time we met she had a failing MAF, Temp Sensor and misaligned throttle body. All have been sorted now and it's running well but I suspect a boost leak somewhere, just have this feeling that it's holding back in some places where it once didn't but it's about time with all the OE hoses I still have in the bay. Anyway, other than a few local trips this weekend it's off the road again waiting for my FMIC to arrive .
.
Jay, I know you miss your Leon but your Ibiza is some machine. The Leon has been a little upset recently and last time we met she had a failing MAF, Temp Sensor and misaligned throttle body. All have been sorted now and it's running well but I suspect a boost leak somewhere, just have this feeling that it's holding back in some places where it once didn't but it's about time with all the OE hoses I still have in the bay. Anyway, other than a few local trips this weekend it's off the road again waiting for my FMIC to arrive
Thanks for the compliments guys.
Jay, I know you miss your Leon but your Ibiza is some machine. The Leon has been a little upset recently and last time we met she had a failing MAF, Temp Sensor and misaligned throttle body. All have been sorted now and it's running well but I suspect a boost leak somewhere, just have this feeling that it's holding back in some places where it once didn't but it's about time with all the OE hoses I still have in the bay. Anyway, other than a few local trips this weekend it's off the road again waiting for my FMIC to arrive.
Oh yes i do miss the Leon, but the ibiza is keeping me very busy at the moment. New turbo on the cards
Have you checked your actuator? if it's not holding boost properly the spring will be very loose. Reach round the back and give it a tug, if it's pulls with ease it's time to change!
Similar threads
- Replies
- 41
- Views
- 10K
- Replies
- 159
- Views
- 70K
- Replies
- 52
- Views
- 21K


