• Guest would you be interested in CUPRA or SEAT valve caps? let us know in the poll

  • Welcome to our new sponsor Lecatona, a brand dedicated to enhancing performance for VAG group sports cars, including SEAT, Audi, Volkswagen and Škoda. Specializing in High Pressure Fuel Pump (HPFP) upgrades.

HELP! Rear wheel bearing stuck on

everson38

Active Member
May 15, 2017
470
35
walsall
One other I'll add here, for anyone that is interested, is, on all normal VW Group cars, using wheel bolts that end up projecting any more than 17.5mm from the rear face of any wheels or any wheels + spacers is just not correct as these bolts are M15 so full strength bolt to hub, is reached easily by this point and that includes adding 2.5mm to cover for lead in both on the bolts and the fixing holes in the hubs.

This is a safe general statement as it includes both VW Group wheels along with VW Group bolts with spherical seats, or aftermarket wheels with any spherical seats, or aftermarket with taper seat bolts.

Aftermarket wheel suppliers are usually a bit lazy so only list and supply maybe 3 bolt lengths to cover maybe 7 bolt "needs".

Unless you have done a lot of checking both at the front hubs and the rear hubs, you are only guessing what "bolt projection length" is always safe for both front and rear instals. Finding out that came from me needing to check if the bolts supplied for use with aftermarket wheels were okay, the other issue is, if you have a longer than necessary section of wheel bolt sticking out from the back of the hubs, but still keeping clear of any other parts when the wheel is rotating, they will get even more nasty curd building u on them, and that extra curd being forced back through the hub fixing holes is only going to lead to more frustration and maybe extra wear on these hub fixing holes when you get a puncture and that is the only time you ever remove wheels.
The issue with aftermarket or these one anyways is that I don't know the information on them. Now prior to me changing any brake shoes and drum there was definitely no fouling and they were using the same bolts as in the pictures below. It is only the one side that started having the bolts foul on the brake shoe hardware internals after I changed the shoe, hence me thinking it is more of an issue my end rather than the bolts them selves. I believe the bolts are within the OEM specifications you mentioned earlier.
248ed7a56a16775027a0b62034ad8805.jpg
3921fbc31b44793a835876edc9cb1c87.jpg


Sent from my moto g(8) plus using Tapatalk
 

everson38

Active Member
May 15, 2017
470
35
walsall
UPDATE: So I managed to get the race of for a second time using a gear puller.

Upon inspecting the spindle there is some scoring on the spindle and a nick in the front face of the spindle.

So u don't got crazy (if possible) what is the best way to even of the surfaces and get a good clean finish? Specific grits etc .

@Crossthreaded @RUM4MO

Thanks alot
fd4289913208b4a8e20cfd63609445f3.jpg


Sent from my moto g(8) plus using Tapatalk
ca138dd1fd9f0a0c9d64357503c338fb.jpg
a3a681fe1d18d68747d87458005a546b.jpg
21b341aa1948d9ae45e32b1ff60d8bf1.jpg
 

Woody_72

Active Member
May 10, 2020
502
252
Northwest England
I wouldn't overly worry about some light scoring. If you have any new green kitchen scouring pads (Americans call them Scotchbrite pads) you could squeeze one around the axle as hard as you can and rotate it around the axles a few times. This will smooth it off nicely.
 
  • Like
Reactions: everson38

Crossthreaded

Active Member
Apr 16, 2019
546
150
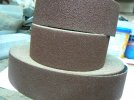
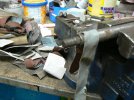
I'm sure there will be those who raise howls of derision over what I'm going to say now but I have 3 large rolls of Emery (see picture) which I tend to use for all these sorts of "fettling" tasks. Look at the first picture below. The top roll is P60 grit the middle one is P80 and the bottom one is P100. In this instance your pictures show pretty light damage to the axle so first I'd run my fingers over the suspect areas and if the marks are bad enough to be appreciably noticeable to your fingers I'd "kiss" the raised area down with a smooth file and then take a length of the P100 loop it round the shaft in a "U" shape and lightly burnish the shaft all round with that. Look at the second picture and try to imagine that that old Mini radius arm shaft is your axle and you're going to "see saw" the abrasive strip by holding on to the ends whilst pulling down lightly on it. If you look in the background you can see some of my old "pre used" bits of emery and wet and dry. I tend to keep these until they are totally worn out because if you want a less aggressive cutting action you can just use a part worn piece. Looking at your pictures it's going to take a matter of minutes only. When it was all looking and feeling nice and smooth give it a wipe down with a rag to remove all trace of abrasive and trial fit the bearing. (if you've got an undamaged old inner race why not use that.) If it slips on nicely then clean if very carefully again - maybe use some brake cleaner - because you don't want carborundum grit getting anywhere near your nice new bearings - and you're done!

The howls of derision may come from those who say "P100? far to rough! I'd use something much less aggressive like P240 maybe" Ok the P100 will not leave a chrome smooth surface finish - it'll still look nice and shiny though - but if you're going to use a very fine grit then you'd better have a lot of time as it will remove material very slowly.

So, that's what I'd do. But this is your job and your responsibility for how you handle it, so your decision as to how you're going to tackle it. Good luck and do keep us informed as to how you get on won't you?
 

Attachments

  • P1090847.JPG
    P1090847.JPG
    667 KB · Views: 141
  • P1090848.JPG
    P1090848.JPG
    554.2 KB · Views: 135

everson38

Active Member
May 15, 2017
470
35
walsall
I'm sure there will be those who raise howls of derision over what I'm going to say now but I have 3 large rolls of Emery (see picture) which I tend to use for all these sorts of "fettling" tasks. Look at the first picture below. The top roll is P60 grit the middle one is P80 and the bottom one is P100. In this instance your pictures show pretty light damage to the axle so first I'd run my fingers over the suspect areas and if the marks are bad enough to be appreciably noticeable to your fingers I'd "kiss" the raised area down with a smooth file and then take a length of the P100 loop it round the shaft in a "U" shape and lightly burnish the shaft all round with that. Look at the second picture and try to imagine that that old Mini radius arm shaft is your axle and you're going to "see saw" the abrasive strip by holding on to the ends whilst pulling down lightly on it. If you look in the background you can see some of my old "pre used" bits of emery and wet and dry. I tend to keep these until they are totally worn out because if you want a less aggressive cutting action you can just use a part worn piece. Looking at your pictures it's going to take a matter of minutes only. When it was all looking and feeling nice and smooth give it a wipe down with a rag to remove all trace of abrasive and trial fit the bearing. (if you've got an undamaged old inner race why not use that.) If it slips on nicely then clean if very carefully again - maybe use some brake cleaner - because you don't want carborundum grit getting anywhere near your nice new bearings - and you're done!

The howls of derision may come from those who say "P100? far to rough! I'd use something much less aggressive like P240 maybe" Ok the P100 will not leave a chrome smooth surface finish - it'll still look nice and shiny though - but if you're going to use a very fine grit then you'd better have a lot of time as it will remove material very slowly.

So, that's what I'd do. But this is your job and your responsibility for how you handle it, so your decision as to how you're going to tackle it. Good luck and do keep us informed as to how you get on won't you?
Yeah thanks for this information, I have ordered some emrery cloth and will probably start fine grit to get a feel and see how I get on hopefully won't have too many issues but will keep all informed as I'm sure my it won't be end of the tale lol.

Sent from my moto g(8) plus using Tapatalk
 
  • Like
Reactions: Crossthreaded

RUM4MO

Active Member
Jun 4, 2008
7,963
1,059
South Scotland
@everson38 , I've been away today so that is why I did not answer wrt the wheel bolts, they seem to be okay, the acid test is how far they protrude out the inner side of the alloys really, if they are quite close to what I advised then all is okay. As you said it was only this side that caused an issue fouling the yoke, so maybe the yoke was on back to front or wrong side, I've never ended up needing to check if that is even possible as I don't really like drum brakes. That information was just to get you to check while a wheel was still off, so insert a bolt and press it into the wheel hole seating it centrally, and check what the length of protruding thread is.

Emery cloth is also handy to "dress" the friction material on pads, lie it on a flat surface and wipe the pads across it, if you have never used or had emery cloth, you can easily rip it up into strips, or if you end up buying a square sheet, just grab it and rip a strip maybe 3" wide off it and use it as crossthreaded advised.
 

Crossthreaded

Active Member
Apr 16, 2019
546
150
@everson38 , I've been away today so that is why I did not answer wrt the wheel bolts, they seem to be okay, the acid test is how far they protrude out the inner side of the alloys really, if they are quite close to what I advised then all is okay. As you said it was only this side that caused an issue fouling the yoke, so maybe the yoke was on back to front or wrong side, I've never ended up needing to check if that is even possible as I don't really like drum brakes. That information was just to get you to check while a wheel was still off, so insert a bolt and press it into the wheel hole seating it centrally, and check what the length of protruding thread is.

Emery cloth is also handy to "dress" the friction material on pads, lie it on a flat surface and wipe the pads across it, if you have never used or had emery cloth, you can easily rip it up into strips, or if you end up buying a square sheet, just grab it and rip a strip maybe 3" wide off it and use it as crossthreaded advised.
I think we've discussed disc vs drum rear brakes before, I certainly have with someone. Although rear discs make a standard service easier to perform for the garage in that the friction material is easy to see without even removing the road wheel and it's quick to give the wheel a spin whilst watching and listening for problems - My experience is that the average workshop will not dismantle a caliper and clean up and lubricate guides etc unless the brake is observed to have a problem. With a drum you've really got to remove the wheel and drum and clean out the dust then examine the thickness of the friction material and the cylinder for leaks. Quite a bit more work. However that's about where I see the advantages ending. Drum brakes usually provide a much more secure hand brake. On discs, because they do so little work, they often corrode quickly and need to be renewed long before a drum brake packs in. Discs have very exposed handbrake mechanisms which can and do seize up readily. As many will testify, when the time comes for the pads to be renewed it can often be a real struggle to wind the piston back and, ultimately, should a new caliper be needed the cost is several times what it would be to overhaul a drum brake and fit a new cylinder. I could probably go on some more but suffice it to say I'm firmly on the side of drum brakes as long as the vehicle is not a high performance or very heavy one where the ability of the disc to shed heat may be an advantage the drum brake can't match.

Regarding "dressing" down pads with emery cloth. I have a medium sized - a bit over a foot square - piece of quarter inch thick plate glass (plate glass being known for it's exceptional flatness) I place a sheet of something like 100 grit emery (depends what's lying about at the time) face up on the glass and rub the friction side of the pad on it, rotating the pad about a third of a turn every 3 or 4 "rubs" to keep it all nice and even. Works a treat!
 

RUM4MO

Active Member
Jun 4, 2008
7,963
1,059
South Scotland
@Crossthreaded , yes my views on drums V disc rear brakes are based entirely on how easy disc brake systems are to keep in good working order by the interested DIYer. Also yes the bad thing about rear disc brakes that they end up under worked and so suffer from corrosion sooner, but I must say, the while the rear discs on my wife's August 2015 Polo at 34K miles are discoloured they are still useable/legal, MOT seem to allow them to get really bad before failing them, obviously based on braking performance as well as visually nasty. I usually get one set of pads out of a set of discs and I can see that change coming up next summer. Incidentally I tend to find Pagid discs suffer less from "under worked induced corrosion" than the original factory fit product from Audi -VW-SEAT. Though if I'm honest this "under worked induced corrosion" was also an issue with the front discs on my old 2000 VW Passat 4Motion as it was mainly used to commute especially in winter months - the inner surface on the fronts got quite nasty after 6 years. I inherited a block of accurately machined steel that was used as a jacking spacer on a surface table, so I use that as my flat surface to dress brake pads. It was either a case of me taking that when we moved sites or it would go into a skip as it was no longer required and everything needed to fight for space!
 
  • Like
Reactions: Crossthreaded

everson38

Active Member
May 15, 2017
470
35
walsall
UPDATE: So guys it is finally all done, it has been a slog and tiring, but learnt alot, really want to thank everyone who offered me ideas and took the time to help.

So what happene

1) The Drum brakes / shoes: So after finding out about pagids (@RUM4MO) aka Euro car parts parts catalogue (brakebook) I Tried to find the schematics for my brake shoe kit, to try find a part number of some sort to try match to the mismatched packaging / imagery the ECP website gave me for my orders. Annoyingly even the parts catalogue had no matching numbers corresponding to the boxes or on the actual brake shoes. The only thing was the measurements where one was 19.5mm and the other set 20.5mm (due to best guess) I went with the 19.5mm simply because the website offers a 17mm bore or a 19mm and since it was close to 19mm. But it again this doesn't explain the 17mm ones offered on the website as the two you get if you order both is nowhere near, so again bad information. But that meant I had to take the brake shoes off and put on the other set.

This did seem to resolve my issue of the fouling wheel bolts, it seems the black brake shoes I had in first, when fitted the yolk petrudes out more than the second set, this is all very had to see with human eye as I measured everything and all seemed to match, in the end I used a screw driver and had one set brake pad set on each wheel and used a screw driver to test clearance between bearing and yolk and the first pair was tighter (see pic). I did also think it may have been the wheel cylinders as these posed their own issue as comoare each set to the old originals, they both had an attribute that matched the old OEM ones, so again I was like which one, but I tested the wheels without the wheel cylinders on and the fouling was still happening in the first set and not the second.

2) Stuck on wheel bearing race: So in the end, I bought a gear puller and this popped of the race with such ease, great little tool.

3) Getting new bearing on stub axle:. So I tried what @Crossthreaded said and used emery cloth, I went with 609 grit to get a feel and low risk of messing up, and that help a bit, but it was clear I would need a rougher grit, again going down what is the safest route I then tried @Woody_72 tip of wheel bearing in Hot water in a bag and using freeze spray on the axle and WOW it worked a treat, I was like Jesse from breaking bad when it work "Yes, SCIENCE!!" Tip for anyone else, I also used my heat gun at a distance to keep the water as hot as possible until the last minute of pulling it out. I initially tested with an old inner race I pulled off to avoid damaging another bearing.

4) What have I Learnt: Learn to stop, the forum was a god send, use science (I will be doing this when ever fitting a new bearing). I am now a VW brake shoe pro. Learnt hot to grind off a race and how to use flame torch

5) If you need to buy brakes shoes from ecp: I would advise to by both sets and compare and contrast but it seems you need the "golden" coloured ones (ECP part No:122440038 - although it says it's for "without abs) (see pic) and not the other "black" ones offered. I also remembered a cousin of mine owns a seat Ibiza , it's a 1.4 2009 sports coupe but his reg only brought up the "golden".

Still not out of woods as need to do a road test, but I honestly did not see this end coming at all, a new stub axle would have been £130ish from SEAT with a 2 day order time.
32bd97bfe8819c7819496b10effc919f.jpg
a3e657a991ee40dd8fd769e2716fd370.jpg
669fb708833d5ef64ec05a6b1f9fb559.jpg
2e9c84dc5b879ad5f7b6d39341d22137.jpg
fa71e2b25b4f3ad8db2faf73c1a5a418.jpg
c0d50737da0ca62f1ae62b107defa7a7.jpg


Sent from my moto g(8) plus using Tapatalk
 

RUM4MO

Active Member
Jun 4, 2008
7,963
1,059
South Scotland
Good that it did all work out in the end!

I was a bit confused when I used the reg number for my daughter's old 2009 Ibiza 1.4 SC and one offering was the same as the choice you were getting from using that car's reg - horrible situation to end up in.

Age more than anything has turned me into becoming more risk averse than I could be, okay saves me making even the slightest mistake, but it does mean wasting a lot of time "thinking or over thinking" what - iffs!!

I still have a set of brake shoes bought "just in case" for that 2009 Ibiza SC, they are the strawish coloured versions, when I bought them ECP had no Pagid rear brake shoes in their parts catalogue just something like SCP or SBP or some similar named supplier - which was annoying as I had become used to turning to the parts manufacturer's web cats for proper info - doing that saved lots of time and money on return trips to my local ECP. Invariably the Eastern European front desk guy would select the correct part (that was in the days when the best plan seemed to be turn up at the ECP front desk and let/make them do all the work), then the power crazed English manager or senior sales person would use his brains to prove that guy wrong and I'd end up with what used to turn out to be the wrong parts!! How f'ng hard does it have to be!
 

Crossthreaded

Active Member
Apr 16, 2019
546
150
Thanks for telling us how it all panned out. A great relief, but also a great sense of achievement I'm sure.

The problems you've highlighted with parts supplied being wrong is one we've all had to contend with I'm sure. I tend to order from make specific suppliers where I feel there may be doubt and some times from my local Factor (5 minutes away in the car) because I can so easily nip round to him with the old parts for a match if I need to.
 
  • Like
Reactions: everson38

everson38

Active Member
May 15, 2017
470
35
walsall
Thanks for telling us how it all panned out. A great relief, but also a great sense of achievement I'm sure.

The problems you've highlighted with parts supplied being wrong is one we've all had to contend with I'm sure. I tend to order from make specific suppliers where I feel there may be doubt and some times from my local Factor (5 minutes away in the car) because I can so easily nip round to him with the old parts for a match if I need to.
O yes for sure the sense of achievement was pretty great. I have a few local motor factors, but I usually find its about convenience for me,getting it delivered, getting cashback on my purchases. Whilst I will be looking outside the box more after this ordeal.

Sent from my moto g(8) plus using Tapatalk
 
  • Like
Reactions: Crossthreaded
SEATCUPRA.NET Forum merchandise