MIB2 Glovebox connections 5QA035858

mattsonthebeach

Active Member
Aug 30, 2021
7
3
Hi All, I've got the above glovebox unit after swapping to a MIB2 unit, however the DAB reception has been getting on my nerves for some time, so I have bought an aftermarket aerial and just need to confirm which are the connections for DAB, FM and GPS on the pic below please? I've searched and searched, but can't find anything listed
 

Attachments

  • 490976046_1081068863852527_5108563228642502337_n.jpg
    490976046_1081068863852527_5108563228642502337_n.jpg
    109.2 KB · Views: 37

mattsonthebeach

Active Member
Aug 30, 2021
7
3
I fitted it on the weekend, but haven't been anywhere in the car yet. I've got to go where the signal dropped out for ages on Friday, so will let you know if it's better afterwards
 

mattsonthebeach

Active Member
Aug 30, 2021
7
3
Did your aftermarket dab aerial sort out the dab problem? I’ve noticed the dab signal is terrible especially for everything on D1 (global, radio X etc). Not convinced that replacing with another standard one will fix it.
Sorry for the delay in replying, I bought an Eightwood sharkfin aerial from AliExpress first and that was worse than the original. So looked at other options and chose this one https://celsusice.co.uk/digital-radio-dab-shark-fin-antenna and fitted that on Sunday. I am now happy to report that I had no dropouts at all on the way to work this morning and all appears to be good so far as I normally have various points along the way with no signal. I just went for the DAB version as I don't use FM, but they do one with FM and another with FM and GPS if you wanted to change everything
 
  • Like
Reactions: Lancashire Lad

mattsonthebeach

Active Member
Aug 30, 2021
7
3
Yes I did and it's not too bad to do. Although I can see why companies charge £200+ to do it.

On my ST, to remove the lining, firstly, you need to unscrew the 2 side panels (2 screws in each) with seat releases in, that gives you access to remove the rear pillar on each side. There is one screw in each one at the base and the rest is clipped in. From there, there are 2 clips either side of the centre on the back of the bar at the rear under the lining. Then you just need a small flat screwdriver to remove the 3 roof handles and that will then enable you to drop the lining down enough to gain access. I used a a small drill bit to make a guide hole and then a step drill to make the hole big enough for the new aerial mount. The aerial has a 22mm socket to attach it to the roof.

The hardest part was trying to keep the aerial pointing forward when tightening the nut up. My suggestion to make life easier would be to get someone to hold the aerial in position while you tighten it up from below. I bought cables for the live and for the DAB plus connectors for the live to feed through the lining, down the A pillar and into the glovebox.

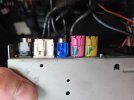
If you look at the wiring guide for the dashcam, it's the same thing and then used a piggy back fuse connector to add the live to the fuse for the 12v sockets (no 40). You'll also need to have fakra cable(s) running from the aerial through the roof to the back of the glovebox unit. I used electrical tape along the whole length to keep both cables together.
 
Last edited:

Lancashire Lad

Active Member
Mar 6, 2011
382
28
Penwortham
www.seatcupra.net
Thanks for your reply. I’ll price it all up and add it to my list of mods to do (rain sensor, splitter, spoiler, paint calipers, remap and interior wrapping stuff). I couldn’t find a car nearby with all this stuff already done when I bought the car.
 
Nimbus hosting - Based solely in the UK.