Rear Shocks replaced some pics..

MartinThorn

Active Member
Feb 28, 2024
77
26
I think that there is a lesson to learn here for anyone that feels the need to try to be helpful and place a guide to "how it is done" on to a public forum - make sure that all you write is spot on and will make sure that the work carried when following your guide to the letter ends up with a safe working period while doing that task, and a safe car to drive at the end of it.

I seem to remember advising caution to someone years ago, that seemed to be a new member and new to VW Group products, who started creating "how to do it" guides which were not quite fit for public consumption.
Where did I write the phrase 'how it is done'?

It is what I did and so far it is working *for me* and I will follow up the post in 6m to a year to let you know if there's a "told you so". But as I don't rag it and go down bumpy farm tracks I'm confident it will be fine *for me* but we'll see.

If you or anyone else wants to spend more on tools and do it exactly as per Haynes or VAG workshop guide, be my guest and go ahead!
 
  • Like
Reactions: Stringster

MartinThorn

Active Member
Feb 28, 2024
77
26
Just to add - I'm not trying to belittle the OP - the guide is still a good one.

I have worked in the industrial fastening business for 20+ years.

We work with the manufacturers when creating fastening strategies for assemblies.

Thanks, I'm fully aware that this is an amateur effort and not a 'how to' guide and thought I'd made that clear in my write up. Some people though can't resist criticism.

Your comments will help the next time they need doing (10yrs if they last as long as the originals), but somehow I suspect the car will be sold or at the scrappie by then..
 
  • Like
Reactions: Mo_86

SuperV8

Active Member
May 30, 2019
1,623
743
Hi - MOT failed due to rear shocks with 'serious fluid leak'. I was a bit skeptical and when they said £400 I said no almost before they finished saying the word 'pounds'!

In the end the job turned out to be quite easy and of course cheaper..

edit - to be clear this post is to show how easy replacing the rear shocks was for me using non-workshop amateur methods gleaned from here and Youtube - it is not a how-to guide as was kindly pointed out in the replies :) Hopefully my posts and the replies (even the critical one) help others save a few quid too!
Nice job, How any miles had you done?
I did my rear socks after several years of MOT advisories on 'misting shocks' - and found both my shocks were knackered - literally no damping - I had done 100k miles at the time.
The trickiest part for me was getting the rear liners out - after years of crud filling the small torx screws, needing a small pick to clean out each.

The reason you slightly jack up the hub before you undo the damper is to take the strain of the damper.
The damper is effectively the limit stop when the suspension is in full droop - and will retain some spring preload. If it didn't the spring would fall out at full droop. The amount of preload varies on model, but you slightly jack up the hub and then you can remove the damper safely.

When re-assembling you obviously need to jack up the hub to get the bolts in but also before tightening the lower bolt, the hub needs to be jacked up to normal ride height so you are not winding up the bonded rubber bush.
 
  • Like
Reactions: MartinThorn

MartinThorn

Active Member
Feb 28, 2024
77
26
Nice job, How any miles had you done?
I did my rear socks after several years of MOT advisories on 'misting shocks' - and found both my shocks were knackered - literally no damping - I had done 100k miles at the time.
The trickiest part for me was getting the rear liners out - after years of crud filling the small torx screws, needing a small pick to clean out each.

The reason you slightly jack up the hub before you undo the damper is to take the strain of the damper.
The damper is effectively the limit stop when the suspension is in full droop - and will retain some spring preload. If it didn't the spring would fall out at full droop. The amount of preload varies on model, but you slightly jack up the hub and then you can remove the damper safely.

When re-assembling you obviously need to jack up the hub to get the bolts in but also before tightening the lower bolt, the hub needs to be jacked up to normal ride height so you are not winding up the bonded rubber bush.
About 95k miles done so in hindsight not that surprising to have to replace them both.

Agreed, had a few wheelarch torx screws hidden behind crud..

Thanks for confirming jacking up the hub was the right thing to do for the detailed reasons you gave: good stuff!
 

SuperV8

Active Member
May 30, 2019
1,623
743
About 95k miles done so in hindsight not that surprising to have to replace them both.

Agreed, had a few wheelarch torx screws hidden behind crud..

Thanks for confirming jacking up the hub was the right thing to do for the detailed reasons you gave: good stuff!
Did your dampers have any gas pressure left?
Our dampers are gas pressurised - which means on a good damper, there should be some fairly strong force extending the damper out.
On my old dampers, I could easily push the damper in and it would stay in - meaning I had no gas pressure left (it had all escaped).
The gas is there to enable the oil to do the damping correctly - and limit oil cavitation which can give a poor ride quality.
 

MartinThorn

Active Member
Feb 28, 2024
77
26
Did your dampers have any gas pressure left?
Our dampers are gas pressurised - which means on a good damper, there should be some fairly strong force extending the damper out.
On my old dampers, I could easily push the damper in and it would stay in - meaning I had no gas pressure left (it had all escaped).
The gas is there to enable the oil to do the damping correctly - and limit oil cavitation which can give a poor ride quality.
Didn't specifically check, but my last photo of the two old dampers against the wall tends to suggest not much extending force..
 

G.P

Active Member
Sep 3, 2011
1,275
41
Worcestershire
My 2019 suffered a rear shock misting when it was 12 months old, and again when it was 2 years 11 months, both replaced by Seat dealer.

This year again one was misting, wich I could feel both driving and rocking the car, so seemed pointless fitting Seat (Sachs) shocks again so went for two Bilstein as similar price to the KYB's, so far the handling is improved over the original's, the tech managed to fit both sides without removing the wheel arch cover, but did take some time as was working blind.

All good except an annoying rattle since..
 

MartinThorn

Active Member
Feb 28, 2024
77
26
My 2019 suffered a rear shock misting when it was 12 months old, and again when it was 2 years 11 months, both replaced by Seat dealer.

This year again one was misting, wich I could feel both driving and rocking the car, so seemed pointless fitting Seat (Sachs) shocks again so went for two Bilstein as similar price to the KYB's, so far the handling is improved over the original's, the tech managed to fit both sides without removing the wheel arch cover, but did take some time as was working blind.

All good except an annoying rattle since..
Rattle? Check all wheel nuts have been tightened as one or more might have been forgotten!!
 

moriarty

Active Member
Apr 6, 2015
99
17
Edinburgh
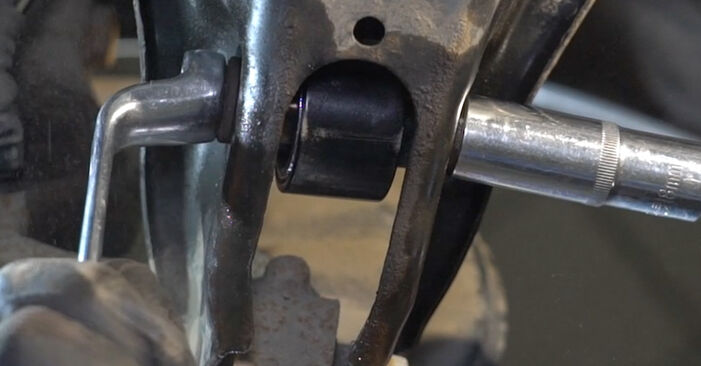
Looking at Autodoc instructions it says tightened the bottom bolt to 70 Nm plus 180 degrees. Is that correct as getting an extra 180 degree must be massive torque?
Looks like the design in their guide is slightly different as it is not a captive nut, which looks to be difference from Torsion to Multi Link rear axle.

Step 43
Replacing Shock Absorber on Seat León Mk3 2022 2.0 TDI by yourself

Tighten the lower fastener of the shock absorber. Use a combination spanner #18. Use a drive socket #18. Use a torque wrench. Tighten it to 70 Nm torque.+180°
 
Last edited:

DEAN0

Old Git
Feb 1, 2006
5,378
362
Preston - UK
Looking at Autodoc instructions it says tightened the bottom bolt to 70 Nm plus 180 degrees. Is that correct as getting an extra 180 degree must be massive torque?
Looks like the design in their guide is slightly different as it is not a captive nut, which looks to be difference from Torsion to Multi Link rear axle.

Step 43
Replacing Shock Absorber on Seat León Mk3 2022 2.0 TDI by yourself

Tighten the lower fastener of the shock absorber. Use a combination spanner #18. Use a drive socket #18. Use a torque wrench. Tighten it to 70 Nm torque.+180°
The book confirms 70nm +180deg
1735386959953.png
 
SEATCUPRA.NET Forum merchandise