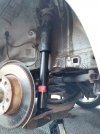
A couple of comments, probably too late for you now, I wouldn't use any lub on bolts that have a self locking nuts, that ends up making a mockery of the torque you tightened these bolts to and probably also the effectiveness of the self locking nuts - though after being used once they should get replaced, so, all these fasteners should have been replaced, it sounds like you only replaced the self locking nut on the end of the damper piston rod, finally, as you can see on your picture at the end, the end of the damper piston rod has a couple of flats - they are there so that you can either fit a special tool to them to hold the piston rod from turning, or just use a small adjustable spanner to stop the piston rod turning.
What is annoying, at least for me, is that VW Group factory fitted and spares rear damper top nut is 16mm AF and the aftermarket replacements are 17mm AF, also the dimensions of the "flat end" of the original damper and the new aftermarket dampers are different! If you just use a small adjustable spanner this is not an issue, but I finally made the effort to buy the correct "socket" to stop the piston turning, using that and a Vortex socket set made that part of the job easy - but back to the small adjustable spanner for fitting the new aftermarket damper!.
Compressing the rear spring(s) is aimed at getting the position of the hub back to its natural position before tightening the bottom bolt as there is a bonded rubber mounting at the lower end of that damper, and that can not rotate so just gets flexed when the suspension moves up and down, so the plan with these bonded mountings is to ALWAYS have the suspension at its "unladen" or natural position BEFORE tightening fixing bolts, as that will mean these bonded mounts last instead of failing early due to being permanently distorted.
I'm sure that I even swopped over the "top plate" from the old dampers onto the new dampers as it was a different shape/type, also removed the cheap soft nasty semi-springish steel C-clip from the top of the piston rods on the new Sachs dampers and replaced them with the proper spring steel C-clips from the original dampers.

") Hopefully my posts and the replies (even the critical one) help others save a few quid too!
Hopefully my posts and the replies (even the critical one) help others save a few quid too!