Auto Gauge boost gauge. How to wire up correctly!!!!

godber225r

T15 PJG
Sep 6, 2008
893
0
Whiteley, Hampshire
Seen lots of threads on here about wanting to know how to wire up the halfords auto gauge boost gauge. lots of people wanting to know what wire goes where so here it goes!!!:)

This is a guide on the correct way to fit/wire it up so you get it to light up and save the setting you last had it on, This does work as its the way i wired it up to my car and it works how it should.

1. Get some silicone 4mm inner diameter pipe about 3 metres worth.
2. T it from the FPR.
3. Drill hole in the grommet hole next to the main wiring loom under the scuttle panel but dont push the drill in too deep pearce your way through the foam with a screwdriver carefully
4. Push pipe trough hole and retrieve from the inside ( this takes alot of time and patience!!!) put a big blob of silicone around the pipe going into the car.
5. feed it up to your pillar pod and push into gauge.

Wiring THE CORRECT WAY.

Obviously extend all the wires from the gauge!!

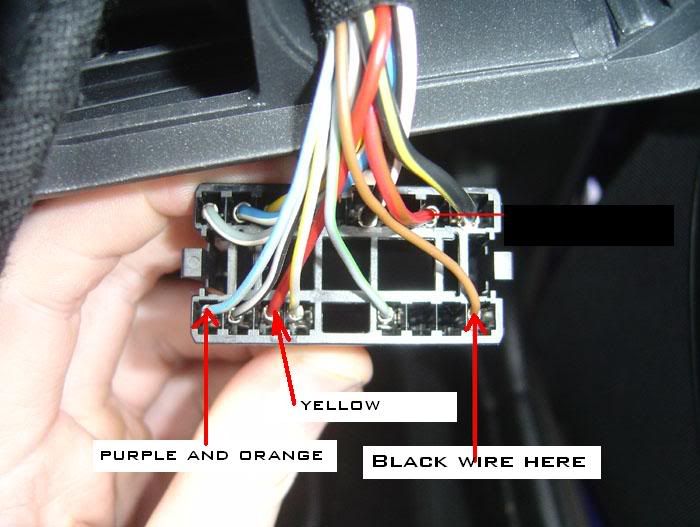
6. join the black gauge wire (earth) to the brown wire on the light switch block
7. Join the purple and orange gauge wire(switched live) together and then join it to the grey wire with blue tracer on on switch block
8. join the yellow gauge wire (positive) to the fat red wire on the light switch block.

The gauge will light up when you put the ignition on. It will also dim when you use the dimmer.:)

The gauge readings (for a standard map 225) were 14 psi or 1 bar peak and 20 inhg

Hope this helps and clears things up for people?:D

Comments as usual are welcome?!
 

J0N

Defected!
Thats a good guide godber225r. I'd like to add the wiring for the oil temp and if someone wants to use the info to make a sticky feel free.

This is for the Auto-Gauge (Halfords) oil temp gauge.

Gauge Lighting. (These wires are on the back of the gauge).
Thick Yellow - Permanent Live 12v,
Thick Purple and Thick Orange - Twist them together and connect to a switched live. (One that becomes live when you switch your lights on.)
Thick Black - A Good Earth.

Gauge reading. (These wires are also on the back of the gauge).
Thin Black - A Good Earth. (Twist together with the thick black).
Thin Green - To the Red (or sometimes it's white) Wire on your sender.
Thin Red - To a Permanent Live 12v (Twist together with the Thick Yellow).

The Sender. (These wires are on the actual sender).
Red (Or Sometimes White) - To the Thin Green Wire as mentioned above.
Black - I connected mine directly to the battery negative (-).


It's especially important that you connect the thin red to a permanent live, if you connect it to the switched live from your lights it will read slightly lower than normal and the needle will go up and down with your dimmer switch.
Do all of this correctly and the gauge should remember what colour it was when you switched your ignition off (although these Halfords gauges don't always remember no matter how you wire them up) and the temperature needle should still read with the engine/ignition off.

Hope this helps, worked for me but if your car catches fire I cannot be held responsible.
If anyone thinks I've got it wrong please let me know, we don't want any disasters do we?

The electrical wiring for the boost gauge will be the same colours as the oil temp and I just wired them in together.
 

godber225r

T15 PJG
Sep 6, 2008
893
0
Whiteley, Hampshire
Cheers guys thought i might as well do a guide for it as it saves allot of time and confusion. I had a oil temp gauge as well from auto gauge but decided not to fit it but it had exactly the same colour wires coming out of it so probably wire it up the same as boost gauge.
 

AdamRoutley

Use The Force!!
Feb 22, 2007
1,827
1
Walsall
www.myspace.com
so to accompany your write up, this is how you connected the following cables?

switchedlive2.jpg
 

CupraUK

Pushing on
Aug 15, 2005
1,350
0
Bedfordshire
When you say the "grommet" next to the wiring loom, do you mean the plastic circle to the left of the wiring loom that looks like an optional piece of kit?
 

tatepie

Guest
Seen lots of threads on here about wanting to know how to wire up the halfords auto gauge boost gauge. lots of people wanting to know what wire goes where so here it goes!!!:)

This is a guide on the correct way to fit/wire it up so you get it to light up and save the setting you last had it on, This does work as its the way i wired it up to my car and it works how it should.

1. Get some silicone 4mm inner diameter pipe about 3 metres worth.
2. T it from the FPR.
3. Drill hole in the grommet hole next to the main wiring loom under the scuttle panel but dont push the drill in too deep pearce your way through the foam with a screwdriver carefully
4. Push pipe trough hole and retrieve from the inside ( this takes alot of time and patience!!!) put a big blob of silicone around the pipe going into the car.
5. feed it up to your pillar pod and push into gauge.

Wiring THE CORRECT WAY.

Obviously extend all the wires from the gauge!!

6. join the black gauge wire (earth) to the brown wire on the light switch block
7. Join the purple and orange gauge wire(switched live) together and then join it to the grey wire with blue tracer on on switch block
8. join the yellow gauge wire (positive) to the fat red wire on the light switch block.

The gauge will light up when you put the ignition on. It will also dim when you use the dimmer.:)

The gauge readings (for a standard map 225) were 14 psi or 1 bar peak and 20 inhg

Hope this helps and clears things up for people?:D

Comments as usual are welcome?!

Excuse my ignorance but how did you `T` it, and what and where is the FPR?
Will it be the same process on my Tdi?
Cheers
 
Nov 29, 2007
736
0
Mansfield, Notts
Good guide mate.... will use this to fit my boost guage in a few weeks. I'll have to look for the wiring loom hole as I thought most people took the pipe through the boot release wire gromet.