
Handbrake button fell off!
- Thread starter stu_m
- Start date
You are using an out of date browser. It may not display this or other websites correctly.
You should upgrade or use an alternative browser.
You should upgrade or use an alternative browser.
Yeah mine does it every once in a while, sometimes the tension on the spring fires it across the cabin.
Not yet found a solution that works but one thing I can tell you NOT to do is to try and superglue it as a fix. The glue runs due to the angle of the handbrake and it WILL fix solid which means you can't release the handbrake.....
Not yet found a solution that works but one thing I can tell you NOT to do is to try and superglue it as a fix. The glue runs due to the angle of the handbrake and it WILL fix solid which means you can't release the handbrake.....

I took a look when the wife got home tonight and it appears that there is a tab on the central pin thats broken!
Maybe epoxy resin would work
Maybe epoxy resin would work
Superglue mixed with baking soda to rebuild the broken pin, wait for it to dry, shape it roughly as the original was, try to refit.
I'm sure Gorilla Glue would do the job, i've used it on quite a few things successfully.I took a look when the wife got home tonight and it appears that there is a tab on the central pin thats broken!
Maybe epoxy resin would work
The more I look at it the more glue looks a good option!!
You have to replace the full handbrake lever! which I think the centre console has to come out!
You have to replace the full handbrake lever! which I think the centre console has to come out!
I did glue one before, think it was on my MK1 Focus, needs to be held secure while setting. Probably a combination of Gorilla glue and Gorilla tape.The more I look at it the more glue looks a good option!!
You have to replace the full handbrake lever! which I think the centre console has to come out!
I did glue one before, think it was on my MK1 Focus, needs to be held secure while setting. Probably a combination of Gorilla glue and Gorilla tape.
Never used Gorilla glue but have heard good stuff
I need to make sure its not runny like superglue and stick everything together that doesn't need sticking
Never used Gorilla glue but have heard good stuff
I need to make sure its not runny like superglue and stick everything together that doesn't need sticking
Never used Gorilla glue but have heard good stuff
I need to make sure its not runny like superglue and stick everything together that doesn't need sticking
This is what i use quite a lot.


For anyone who is interested I ended up bodging my handbrake for now as the dealers are shut and working from home and said they wouldn't be able to get the parts!!
The handbrake button forms part of the workings of the handbrake it that its attached to the push rod and has a spring inside which hold the handbrake on the ratchet mechanism.
There is a tab on the push rod that holds the button on and this tab breaks off causing the button to come off rendering the handbrake pretty much useless.
As the spring fits over the push rod I used a washer and drilled it out to just slightly smaller than the push rod and forced it on which then holds the spring in place and grips the push rod which renders the button useless now and would just be cosmetic.
A bit of adjustment to the button to make it fit right as the washer makes it stick out more and a bit of glue to stick it on and you have a working handbrake again which is probably better than the original design.
I know its probably hard to visualise if you have never seen inside it but anyone with the problem will be able to figure it out.
Hi all,
My silver handbrake button is now doing the same thing. Has anyone tried and tested the best method to get it fixed? Is it a case of replacing just the button?
No the button is not the problem
There is a little clip under the pushrod that breaks and allows the button to pop off.
You have to replace the pushrod to fix it and guess what! you can't buy it individually! its a whole new handbrake mechanism
What I did is put the spring back over the pushrod and put a small washer on the pushrod to hold the spring but it must be a tight grip on the pushrod itself
Doing this will make the handbrake work again! its a bodge but it works
Thanks for this mate. What kind of washer was it, a metal or rubber?
So does the silver button actually just click in or are you saying the washer needs to fit into the hole on the silver button? Tight enough for it to hold and not pop out?
Cheers!
Thanks for this mate. What kind of washer was it, a metal or rubber?
So does the silver button actually just click in or are you saying the washer needs to fit into the hole on the silver button? Tight enough for it to hold and not pop out?
Cheers!
Its hard to explain without pics really! I will try and get pics
But in the meantime you need a washer where the hole goes on to the push rod and holds the spring
Forget the button for now as that will just sit over it
The washer needs to be a tight fit over the pushrod on the handbrake but big enough to hold the spring
Remember the spring goes on first then the washer over it
I had to use a socket to push the washer on as it needs to be a tight fit otherwise the spring will push it off
Thanks, much appreciated!
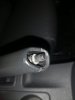
Sorry for the delay and the crap pic but hopefully you get the idea
The washer is tight over the pushrod so it can't be pushed off by the spring. The spring is the what actually holds your handbrake on by holding the pushrod in position
Attachments
-
 IMG_20210107_164628.jpg241.6 KB · Views: 2,328
Hi Stu_MThe wife has just rang me to say the handbrake button has fallen off!
I know this has happened to a few people but there has been no resolution to the problem that I can see!
Anyone know what parts I need? I have read various posts saying just a new button to a whole new handbrake!
So I've had the same issue with my MK3 recently and my wife and I tackled it yesterday. The "split pin" design (for want of a better description) for holding the silver button in place means that the plastic will inevitably break in the car's lifespan, but here is how we solved it.
Parts: new handbrake direct from Seat £77.75 (ordered May 2022) this was part only so it came with none of the trim, we kept ours from the original and re-fitted it to the new handbrake. You can choose to pay extra to have the sleeve, grip, button etc all new as well, I believe it was roughly £30-£50 more.
Tools: 13mm socket, Torx Screw drivers T20 and T10 (I might be wrong about those but I'll check and update), plastic trim removal tools like spudgers and plastic cards, flat head screwdrivers and Patience... lots of patience.
We were quoted around £400 for the job by our local Seat main dealer and other quotes were comparable but we decided to tackle it ourselves.
What we did: Prior to starting the repair we chocked all four wheels and put the car in gear to stop the car from rolling forwards you should do something similar even if working on a flat or level piece of ground.
We started with the centre console, while sitting in the back seat of the car we removed the centre section of the armrest which gave us a great view of the handbrake adjustment nut. Next, we removed the rear heating vent section, this is held on with clips so use a spudger or some plastic tools to help remove it without damaging it, once removed there is a smallish plastic adapter that connects to a lower vent section this is just held in place by some locating loops so will come out with ease. It should just come straight back towards the rear seat but take your time and be careful. Once that is removed there are two larger screws/bolts that secure the centre console, these are at the bottom of the area revealed by the removal of the vent section, remove these and while you are there on either side of the centre console (approximately 6 inches towards the front of the car) there are more screws/bolts securing the console further, you will need to move the front seats as far forward as possible to access them. Now for the front seat area.
Assuming that the button has popped off but everything else is in place you will need to remove the handbrake sleeve and grip, the sleeve clips into place with a plastic frame so carefully feel around and release it before sliding it over the grip, the grip is pressure fit so it'll be stubborn but will just slide off eventually (you might want to note how far the grip slides on as this will be important when fitting the grip to the new handbrake). There is a panel on each side of the front footwell, these are secured by a single screw on each side towards the front of the car, once removed they will just pull down to be able to remove them. Push the front seats as far back as they will go and you will see three screws on each side joining the centre console to the gearstick surround, remove these.
At this point, the whole middle section should be able to be lifted up from the rear (carpet covered the rear section so we had just pull it back slightly in order to lift it up). The 12v socket will need to be disconnected and the wiring which is taped into place will need to be freed. You will need to loosen off the handbrake adjustment nut in order to raise the handbrake as high as possible to help with the removal of the centre section, take your time as there are a variety of little loops and locating pieces of plastic that you will need to work around in order to lift it out completely.
Now you should have the whole centre console section removed and will be able to see the brake cables and handbrake mechanism.
Before doing anything else make sure that you have a way of preventing the cables from sliding back through the tubes that lead to the underside of the car as this will lead to a garage bill to put them back, we just removed the adjustment nut leaving the U shaped metal connector in place to help with this.
Now we removed the old handbrake and put the new one in place, there is a small electrical connector for the handbrake sensor on the passenger side of the handbrake so we removed this first before undoing the bolts that secure it in place. From this point we worked backwards putting back everything we removed and finally made sure that the handbrake is properly adjusted to secure the car, we chose the second click of the handbrake and tightened it accordingly but you can choose to tighten it to where you feel comfortable. We will also be getting it all checked by a mechanic to make sure that everything has been done correctly and that we are not invalidating our insurance.
All in it took us 2-3 hours to complete the repair which is similar to the garage quote however we had never done the repair before so we took plenty of time to make sure we weren't going to break anything, if you have done similar before you may end up doing it faster.
Disclaimer: We chose to do this ourselves and took several weeks to think about the complexity and difficulty of it, if you choose to try this repair yourself you do so at your own risk, we accept no responsibility or liability for damage to your or other peoples cars caused by your attempt to follow this repair if in doubt seek out advice from a garage to a mechanic who will know more than we do.
Similar threads
