Right basically been having a bit of a nightmare trying to find out information and pictures on the forum on how to remove the door cards inner and outer.. The information was there but was a little spread about so thought i would try write it all into one so that if you need to be behind there for what ever reason you can simply type in the search and this should come up.
Outer Door Card
First Step:
As everyone has explained when i did search to first remove the cards you need to pop off the handle covers using a flat blade screw driver.

Once the covers off on the drivers side you will be presented with ONE Phillips head. The other is behind the handle it self which you need to prize off. It comes off in one piece (window switches and whole handle) Once out undo the plug and remove the handle. You can now see one Phillip head the other is in the hole.

Second Step:
undo the two (or three, i only had two) torx screws under the door card.. then from where you have just undone them pull the card outwards stick a few fingers in and move them round to the back and you will feel the clips give. they dont brake if your gentle enough. i ordered new ones expecting these to be like cheese but they were fine

Third Step:
When all the clips have been undone the card will hang from the window seal.. You can easily just push upwards on the door card and the whole seal comes out still attached to the door card and comes away from the door. This makes it super easy for putting back.
You will notice the LED light at the top right in my car has a little plug you can undo that one first...
next undo the plugs that are plugged into the Door switch to lock and open the door, Also the Wing mirror switch.
Theses a cable for the door leaver just unhook this from the door leaver and unclip it from the door card. Pretty simple to work out.
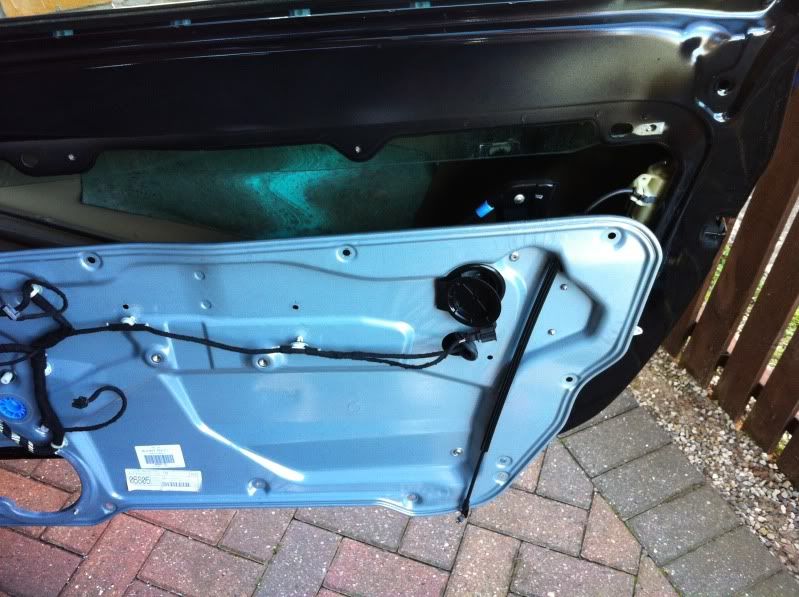
Door card should now be free and you will be presented with this but with a speaker and electric window motor attached i jumped a bit far ahead!

Now this is the outer door card removed to do what ever you need to do there.
Fourth Step
Assuming your doing the speakers and removing the inner panel you will need to drill off the rivet heads on the bottom speaker. using a screw driver prize it off as this is also stuck down with some adhesive. This will be a massive help for removing the inner panel also as you can get you hand in.

Inner Door Card
First Step:
Plug in the electric window switches that are on the handle... and open the two big black gromits that are at either end of the inner door card.
turn on the ignition and move the window down until you see two 10mm sockets (one in either gromit) This is the clamp for the window.

Second Step:
Undo these clamps a little bit just untill they go slack you can test by poking your finger through and seeing if the glass for the window lifts out. This is all you need the glass to do.
Secure the glass at the top with some strong tape the glass is fairly heavy and needs supporting for later.
Once thats bits out the way undo all the cable holders from the inner panel. You will find it near enough impossible to remove the panel with them still attached as seat as made the cable almost the perfect size. I found this out the hard way hence the guide..
also unplug all the plugs attached to the inner door card.
Next undo all the 10mm sockets around the edge of the inner panel not sure how many there is but there's a fair few.
Third Step:
Now comes the tricky part, grab hold of the bottom of the inner panel and gentle prize it away from the door. it will be stuck down since its got a rubber seal and over time it sort of melts it self to the door.
Once youve managed to prize it all off you will of noticed at the top right hand corner where the lock is that, that corner doesnt want to come away as easily. This is due to it been clipped in behind the inner panel into the door lock.
What you need to do is pull the left hand side (nearest the window motor) down so that you can remove the full track of the window away and out from the door. you will know what i mean when you start to do it. It just needs to be on other side of the door (outside). The window should just slide out of the clamp that you undone earlier as your doing this.
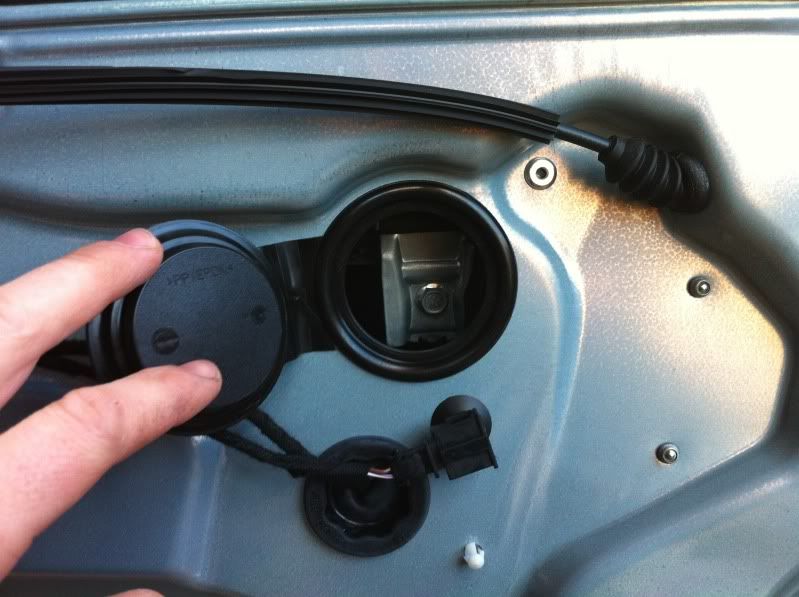
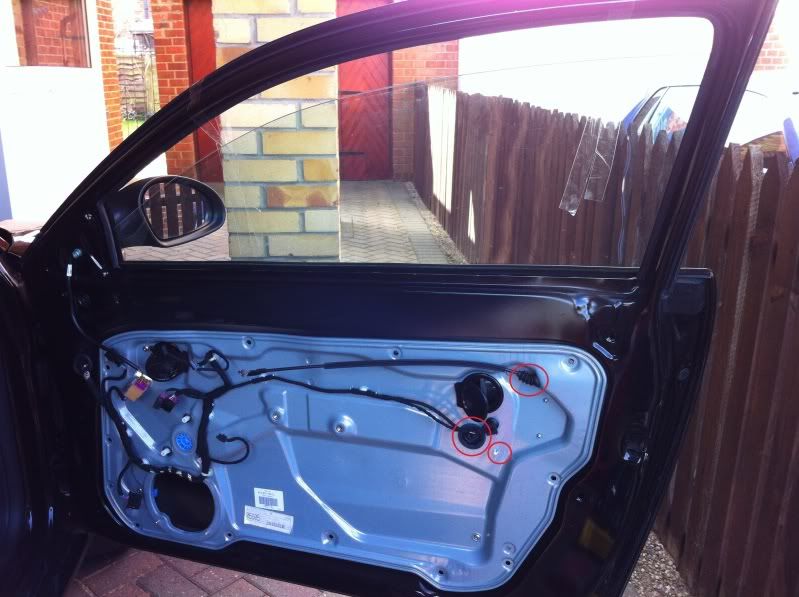
Once that tracks out push the gromit that supports the door handle cable through into the inside of the door. That stops you fighting with that later. Also the gromit just below that with a cable going through towards the lock needs to be pushed in as well. Last part to push in is a little plastic clip. This is holding a cable inside attached to lock plug. All three are circled

When there all undone hold the whole panel and move it towards the inside of the car. this should allow the plastic clip to unclip its self from the lock its Fairly hard as your fighting with a rubber seal and with the clip its self but it does come out and it didnt break for me just try and keep the inner card horizontal while doing it and wiggle it about.
You should now be left with

Fourth Step:
If you can unplug the plug thats behind the inner door card, attached to the lock then you will be able to remove that panel and sit it on the floor. I couldnt get it off for the life of me, far to stiff so i just left it on and with the amount of cable i left my self by undoing the plastic clips previously i was able to just sit it on the floor out the way.

You can see iv started with the sound deadening.. The green piece in the middle is all the seat has to offer as far as sound deadening goes.
Filth Step
Put it back together... Its just the reversal and it does go back together fairly easy.
Tweeter Removal
First Step
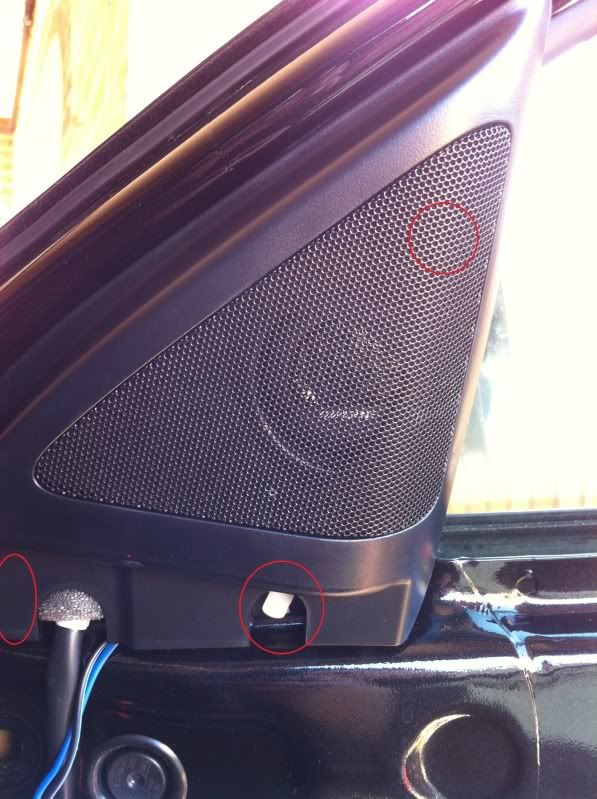
Pull the housing from the window side it unclips very easily and painless. Clips are circled apart from the bottom left hand side but you can see it when you have the card off its white and there's two.

Second Step
flip it over and remove the foam that's covering the tweeter and you will be able to see it.
i removed mine by simply sticking a screw driver under the only part where you can see a gap and prized it out came out perfect and left me with

Undone all the little metal tabs that were holding the metal grill on and noticed some foam in there as well. So i cut a hole out of it and stuck my custom tweeter holder in its place

Third step
put the grill back on making sure no foam is escaping from the sides and walla

Ready to push my alpine tweeter inside.. Perfect.
Fourth Step
putting it back on is just as easy. push it over the rubber first on the window other wise it wont clip in then once its over that a gentle push and it sits perfectly in place with the new alpine speaker in

Hope this helps someone and makes it a bit faster when someone wishes to find it. I will post pictures of how i fitted speakers etc. looks pretty tidy
Cheers Craig
Outer Door Card
First Step:
As everyone has explained when i did search to first remove the cards you need to pop off the handle covers using a flat blade screw driver.

Once the covers off on the drivers side you will be presented with ONE Phillips head. The other is behind the handle it self which you need to prize off. It comes off in one piece (window switches and whole handle) Once out undo the plug and remove the handle. You can now see one Phillip head the other is in the hole.

Second Step:
undo the two (or three, i only had two) torx screws under the door card.. then from where you have just undone them pull the card outwards stick a few fingers in and move them round to the back and you will feel the clips give. they dont brake if your gentle enough. i ordered new ones expecting these to be like cheese but they were fine

Third Step:
When all the clips have been undone the card will hang from the window seal.. You can easily just push upwards on the door card and the whole seal comes out still attached to the door card and comes away from the door. This makes it super easy for putting back.
You will notice the LED light at the top right in my car has a little plug you can undo that one first...
next undo the plugs that are plugged into the Door switch to lock and open the door, Also the Wing mirror switch.
Theses a cable for the door leaver just unhook this from the door leaver and unclip it from the door card. Pretty simple to work out.
Door card should now be free and you will be presented with this but with a speaker and electric window motor attached

Now this is the outer door card removed to do what ever you need to do there.
Fourth Step
Assuming your doing the speakers and removing the inner panel you will need to drill off the rivet heads on the bottom speaker. using a screw driver prize it off as this is also stuck down with some adhesive. This will be a massive help for removing the inner panel also as you can get you hand in.

Inner Door Card
First Step:
Plug in the electric window switches that are on the handle... and open the two big black gromits that are at either end of the inner door card.
turn on the ignition and move the window down until you see two 10mm sockets (one in either gromit) This is the clamp for the window.

Second Step:
Undo these clamps a little bit just untill they go slack you can test by poking your finger through and seeing if the glass for the window lifts out. This is all you need the glass to do.
Secure the glass at the top with some strong tape the glass is fairly heavy and needs supporting for later.
Once thats bits out the way undo all the cable holders from the inner panel. You will find it near enough impossible to remove the panel with them still attached as seat as made the cable almost the perfect size. I found this out the hard way hence the guide..
also unplug all the plugs attached to the inner door card.
Next undo all the 10mm sockets around the edge of the inner panel not sure how many there is but there's a fair few.
Third Step:
Now comes the tricky part, grab hold of the bottom of the inner panel and gentle prize it away from the door. it will be stuck down since its got a rubber seal and over time it sort of melts it self to the door.
Once youve managed to prize it all off you will of noticed at the top right hand corner where the lock is that, that corner doesnt want to come away as easily. This is due to it been clipped in behind the inner panel into the door lock.
What you need to do is pull the left hand side (nearest the window motor) down so that you can remove the full track of the window away and out from the door. you will know what i mean when you start to do it. It just needs to be on other side of the door (outside). The window should just slide out of the clamp that you undone earlier as your doing this.
Once that tracks out push the gromit that supports the door handle cable through into the inside of the door. That stops you fighting with that later. Also the gromit just below that with a cable going through towards the lock needs to be pushed in as well. Last part to push in is a little plastic clip. This is holding a cable inside attached to lock plug. All three are circled

When there all undone hold the whole panel and move it towards the inside of the car. this should allow the plastic clip to unclip its self from the lock its Fairly hard as your fighting with a rubber seal and with the clip its self but it does come out and it didnt break for me just try and keep the inner card horizontal while doing it and wiggle it about.
You should now be left with

Fourth Step:
If you can unplug the plug thats behind the inner door card, attached to the lock then you will be able to remove that panel and sit it on the floor. I couldnt get it off for the life of me, far to stiff so i just left it on and with the amount of cable i left my self by undoing the plastic clips previously i was able to just sit it on the floor out the way.

You can see iv started with the sound deadening.. The green piece in the middle is all the seat has to offer as far as sound deadening goes.
Filth Step
Put it back together... Its just the reversal and it does go back together fairly easy.
Tweeter Removal
First Step
Pull the housing from the window side it unclips very easily and painless. Clips are circled apart from the bottom left hand side but you can see it when you have the card off its white and there's two.

Second Step
flip it over and remove the foam that's covering the tweeter and you will be able to see it.
i removed mine by simply sticking a screw driver under the only part where you can see a gap and prized it out came out perfect and left me with

Undone all the little metal tabs that were holding the metal grill on and noticed some foam in there as well. So i cut a hole out of it and stuck my custom tweeter holder in its place

Third step
put the grill back on making sure no foam is escaping from the sides and walla

Ready to push my alpine tweeter inside.. Perfect.
Fourth Step
putting it back on is just as easy. push it over the rubber first on the window other wise it wont clip in then once its over that a gentle push and it sits perfectly in place with the new alpine speaker in

Hope this helps someone and makes it a bit faster when someone wishes to find it. I will post pictures of how i fitted speakers etc. looks pretty tidy
Cheers Craig

