DIY Heater Matrix Change - some teething problems but sorted in the end

MartinThorn

Active Member
Feb 28, 2024
52
16
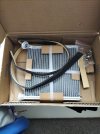
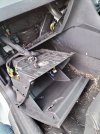
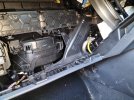
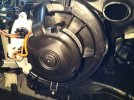
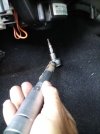
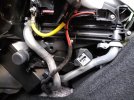
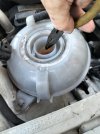
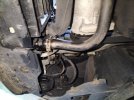
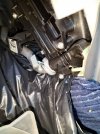
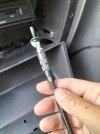
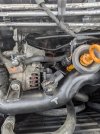
Hi, Just done a DIY heater matrix swap on my 2.0TDI FR (usual problem of gummed up matrix causing coolant loss and poor heat out of some vents).

I'll post some pics/info about that later this weekend..

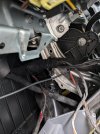
However finished putting it all back together and just as I was about to celebrate no leaks I realised the stereo wasn't switching on, an airbag warning came up on the dashboard and the vent lights are not working..

Have I been daft* - I didn't remove the battery ground terminal doing the heater matrix replacement - blown fuse or perhaps something worse?

At least I have hot air coming out of the vents (which won't be useful for a few months unlike the stereo!!) - doh!

Drives ok and coolant gradually stabilising in level as the air bleeds out of the system - likely to be topping it up for a few drives.

*Edit: yes, I had been daft and badly reconnected the glovebox head unit!
 
Last edited:

tracktoy

Active Member
Jun 11, 2023
546
376
Don't know the answer but do you have a scan device to see if there are any codes being thrown to help you diagnose the issue.

I have in the past removed part of the heating controls to fit a stop start memory module but because I left the battery connected it threw an airbag warning light, simple clear of the error and all was fine.
 
  • Like
Reactions: MartinThorn

MartinThorn

Active Member
Feb 28, 2024
52
16
Yes, I've got ODB11 and CarScannerPro so I'll give those a go in the morning - just thought I'd ask anyway in the meantime for ideas!

For this job I removed the glovebox (including the radio head unit in there) so there was quite a lot of fiddling around with disconnecting wires and of course it's near the fusebox anyway.. There was also a rather large ground wire in the way of removing the heater matrix which I had to disconnect (which is not in any of the Youtube videos on the topic!).

I can kind of understand an airbag warning, but struggling with the lack of lights at the airvents and the head unit (or the display) not turning on.
Oh well.. thought it was going too well - managed the matrix swap reasonably easily if slowly (probably 5 hours total with a pizza break).
 

MartinThorn

Active Member
Feb 28, 2024
52
16
(now I'm wondering whether I ever had lights at the airvents? I think the airbag is just because I switched the engine on to check for leaks before reconnecting the airbag glovebox connector - should be clearable with ODB11. As for the stereo display.. I'm hoping I've inadvertently pulled out the cable from the back of the display doing the work (when I removed the glove box). The reason this might be possible is that the connector in the back of the display has a purposely broken clip as it is bodged due to a display upgrade done a few months ago.. all will hopefully be clearer in the morning!)
 

MartinThorn

Active Member
Feb 28, 2024
52
16
Panic over - was rushing a bit to finish the job late at night and didn't connect up the head unit harness correctly inside the glovebox.
All working now (after clearing the airbag fault/warning in OBD11)!

(I really don't like getting at the two screws at the back of the glovebox and I also got annoyed at some small metal clips falling off the cd/head-unit surround and dissapearing for a while!)
 

MartinThorn

Active Member
Feb 28, 2024
52
16
Why DIY? - Well originally I asked a local independent garage to quote for the job and they came back with just over a grand saying that it was an all day job and the part was just over £200.. At that point I decided to go DIY.

Firstly I got the Nissens Heater Matrix off eBAy for just under £60 - this is not the OEM part but there are some reports it may be less prone to blocking up in the future (larger pipes) and it also appears more robust - no fragile vanes on the external sides that some are tempted to push on when it is being inserted. The Ebay seller said it didn't come with O-rings, but it actually did (I have some rings coming on Monday separately that I don't now need!).

The only other expense was the coolant - I got 8L of G12EVO from Eurocarparts (5L + 3x 1L), in the end I only needed 2/3rds of the 5L bottle.
https://www.eurocarparts.com/search/523772601. G12EVO is not the original coolant spec, but the internet tells me that this allows me to remove that evil bag of silica beads from my expansion header tank, which I did - no point fitting a nice new heater matrix just for the daft bag of beans to split a few months later.. (it's a 2014 car so the bag was a ticking time bomb!)

So the cost of parts/fluids was about £100 in the end and could have been less if I'd bought just 5L of coolant.

Tools/Bits needed - torx bits for screwdriver with a long ~10cm extension for some glovebox screws. Generic molegrips & large plumbing or adjustable spanner. Small 10mm spanner/hex socket for a ground wire. Axle stands or ramp (or dig an inspection pit!). Flathead screwdriver. Funnel and Tray for fluids. Rags/binliners for inside footwell and a tupperware box or plastic jug. Optional: Android OBD tool to clear airbag warning afterwards.
 

Attachments

  • IMG20240816151118.jpg
    IMG20240816151118.jpg
    807.4 KB · Views: 46
  • IMG20240817104622.jpg
    IMG20240817104622.jpg
    431.7 KB · Views: 47
Last edited:
  • Like
Reactions: DEAN0 and Mo_86

MartinThorn

Active Member
Feb 28, 2024
52
16
Method (for a Mk3 2014 Seat Leon ST - UK spec, I think things in the way of the matrix removal are different for LHD non-UK cars) - similar to youtube videos and a guide on here:

i) Remove Glovebox, disconnecting the harnesses for the head unit, small light, USB, Glovebox open detector & Airbag switch. This pretty straightforward except for the two screws at the back of the glovebox which need a long torx screwdriver to reach and then the screws are at risk of dropping down (into the glovebox or the footwell if you're lucky). My long torx driver isn't magnetic at the end which can be solved with.. ahem.. blu-tack!
ii) Remove the plastic tray under the fuse box/blower-fan area - easy, 3 torx screws (but they are low in the footwell so I was sitting outside the car on the floor!). There's a small harness to unclip for the footwell light
iii) Remove the footwell air-duct - this has one torx screw and then is also clipped to the Blower fan/motor unit.
iv) Remove the Blower fan motor which is below/right of the fuses - quite easy, 3 silver torx screws. Quite easy because the one at the back has limited space and you need a really short torx driver this time (or a right angle one).

edit: seems I need to hoover my footwell - embarrassingly dirty!
 

Attachments

  • IMG20240816161247.jpg
    IMG20240816161247.jpg
    768.7 KB · Views: 61
  • IMG20240816162525.jpg
    IMG20240816162525.jpg
    676.2 KB · Views: 54
  • IMG20240816162540.jpg
    IMG20240816162540.jpg
    458.7 KB · Views: 54
  • IMG20240816163319.jpg
    IMG20240816163319.jpg
    585.6 KB · Views: 57
Last edited:

MartinThorn

Active Member
Feb 28, 2024
52
16
edit: iv-and-a-half) Need to remove the center tunnel side trim covering the heater matrix - one torx screw only then it slides down and out.
v) This bit wasn't in any of the videos I saw on Youtube - now the heater matrix inlet/outlet pipes are clearly visible with the Fan motor removed.. But removal access is still limited by a electrical harness with a long/thin rectangular connector and also a very fat ground wire.. The harness connector unclips (need to depress a button with a flat head driver) but the large ground cable needs a 10mm hex/spanner. Can see the harness and the connector in the photo - the ground wire is completely blocking the exit/entry of the heater matrix..
 

Attachments

  • IMG20240816163805.jpg
    IMG20240816163805.jpg
    622.3 KB · Views: 51
Last edited:

MartinThorn

Active Member
Feb 28, 2024
52
16
vi) Now access is clear, it's time to change tack for an hour and jack up the car at the front (or ramp it). This is when I learnt (after several yrs of ownership!) that there are hidden jacking points under plastic covers near the sill jack points! One screw then these plastic covers slide off and reveal places for me to put the my old axle stands safely without worrying about damaging suspension or anything else!
 

Attachments

  • IMG20240816180206.jpg
    IMG20240816180206.jpg
    1.1 MB · Views: 42

MartinThorn

Active Member
Feb 28, 2024
52
16
vii) The undertray was then removed, the lowest large coolant pipe disconnected from the radiator and several liters of coolant drained.
viii) Then the bag of doom was removed!

Plumbing tools useful at this stage to carefully tease off the rubber hosing and the molegrips to undo the hoseclip temporarily whilst draining.
 

Attachments

  • IMG20240816182110.jpg
    IMG20240816182110.jpg
    511.6 KB · Views: 50
  • IMG20240816182753.jpg
    IMG20240816182753.jpg
    1.1 MB · Views: 45
  • IMG20240816182814.jpg
    IMG20240816182814.jpg
    616.4 KB · Views: 50

MartinThorn

Active Member
Feb 28, 2024
52
16
ix) Then back in the car to remove the old matrix and add in the new - In my case despite draining coolant at the front of the car, almost a liter of coolant came out of the lower matrix pipe (removed first) and the matrix - coolant had to be caught from both so be ready with a small plastic jug or tupperware of your choice. I also line the floor with an old rug and two bin liners - well worth doing that too!

Removing the pipes from the old matrix is quite easy once the clips are loosened (lower) or removed (upper). Once its stopped dribbling coolant then you can use the torx (smaller size this time) to remove 3 screws to get the matrix cover off. Once off, the old matrix should just slide out and replace with the new one.

x) Replace the O-rings

xi) Put the plastic matrix lid back on

xii) Push the pipes into the new matrix making sure the o-rings are firmly in - can use pliers to grip both the pipe and the flange to push them together - a leak here would be a real pain the ar$e! Then put the clips back on noting how they were on the old matrix.
 

Attachments

  • IMG20240816185234.jpg
    IMG20240816185234.jpg
    564.9 KB · Views: 48
  • IMG20240816184918.jpg
    IMG20240816184918.jpg
    537.5 KB · Views: 51

MartinThorn

Active Member
Feb 28, 2024
52
16
xiii) Now might be a good idea to fill up with some new coolant and briefly run the engine* to check for leaks before..
xiv) Reverse instructions and put it all back together, carefully (unlike my rushed job which meant the multimedia head unit wouldn't power up!)
xv) Did I mention the screws at the back of the glovebox are a b@stard!? Blu-tack is my friend!
xvi) Since I don't have a fancy VAG vacuum coolant flush system.. the system to start with has airlocks that gradually bleed/work their way out. I took the car for a few short drives and after the first few I had to add a lot of coolant as the level drops. I expect this to continue for a while until all the air is self-purged by the car - keeping 1L coolant bottle handy in the boot for a while.
xvii) All air vents have hot air! Ready for winter..

In summary - Heater Matrix replaced for about £100 (instead of £1000 at garage) BUT there's quite a few steps and it takes several hours if tackled at a relatively slow methodical pace. Recommend the Nissens matrix (p/n 73980 https://www.ebay.co.uk/itm/392844548460) so far as it looks sturdier than the original.

Any comments/questions let me know!

*Note: this will cause a dashboard airbag error since the switch is disconnected (glovebox off!) - needs to be cleared with an OBD tool.
 

Attachments

  • IMG20240817101238.jpg
    IMG20240817101238.jpg
    365.4 KB · Views: 43
Last edited:

RUM4MO

Active Member
Jun 4, 2008
7,933
1,046
South Scotland
Good stuff!
When I replaced the coolant in my 2011 Audi S4 6MT, I got various numbers for the volume of the cooling system, so played safe and bought 8 X 1ltre of G12evo from VW Van Centre - they accidentally sold me a sealed box of it thinking that it was 8 litres in a box, wrong it was 10 litres, I carefully gathered all the old coolant and measured it so that I had a better idea of how much I'd need to add back into the system, I think that the total volume collected was 6.5litres, I had gone to the trouble of buying a Draper Coolant Vac Refill kit, so used that to refill the system, this car of mine is a bit tricky as you can't get the charge cooler system pump to run using VCDS, and the supercharger bleed points are higher than the coolant reservoir, so that meant needing to buy another coolant reservoir cap and modify it so that I could fit a long extender tube above it, to artificially raise the level of the coolant reservoir above these bleed points. All good stuff maybe 2 years on, I've still got a bottle of new G12evo in the boot!
One thing that can be useful, as well as measuring the volume of coolant removed, is to check the coolant reservoir level change, when the engine is cold, at ambient pressure and after applying maybe 15PSI to the reservoir using a cooling system pressure test kit - very cheap from China. I didn't carry out that pressure test on my Audi S4 before starting to replace the coolant - but I really do wish I had! I've already done that on my wife's 2015 VW Polo and bought some extra G12evo to add to my original buy, so that I can replace it very soon! By the way, my plan with pressurising the coolant reservoir was to check to make sure that there was no more air trapped in the system as you can easily compress air, but not coolant, okay the hoses might expand a bit, but if you have carried out that test before dropping the coolant out, you still have a valid reference level change figure to work with.
 

MartinThorn

Active Member
Feb 28, 2024
52
16
Good stuff!
When I replaced the coolant in my 2011 Audi S4 6MT, I got various numbers for the volume of the cooling system, so played safe and bought 8 X 1ltre of G12evo from VW Van Centre - they accidentally sold me a sealed box of it thinking that it was 8 litres in a box, wrong it was 10 litres, I carefully gathered all the old coolant and measured it so that I had a better idea of how much I'd need to add back into the system, I think that the total volume collected was 6.5litres, I had gone to the trouble of buying a Draper Coolant Vac Refill kit, so used that to refill the system, this car of mine is a bit tricky as you can't get the charge cooler system pump to run using VCDS, and the supercharger bleed points are higher than the coolant reservoir, so that meant needing to buy another coolant reservoir cap and modify it so that I could fit a long extender tube above it, to artificially raise the level of the coolant reservoir above these bleed points. All good stuff maybe 2 years on, I've still got a bottle of new G12evo in the boot!
One thing that can be useful, as well as measuring the volume of coolant removed, is to check the coolant reservoir level change, when the engine is cold, at ambient pressure and after applying maybe 15PSI to the reservoir using a cooling system pressure test kit - very cheap from China. I didn't carry out that pressure test on my Audi S4 before starting to replace the coolant - but I really do wish I had! I've already done that on my wife's 2015 VW Polo and bought some extra G12evo to add to my original buy, so that I can replace it very soon! By the way, my plan with pressurising the coolant reservoir was to check to make sure that there was no more air trapped in the system as you can easily compress air, but not coolant, okay the hoses might expand a bit, but if you have carried out that test before dropping the coolant out, you still have a valid reference level change figure to work with.

Seems to be all operating fine so far without having to resort to those more formal techniques like a dedicated Draper Vac Refill kit and measuring exactly what came out and pressure testing (I just caught it in a big tray then put it in an old milk bottle - about 4L)! This is likely why it was <£100 for me and >£1000 at a garage.

But well done for doing it in a more robust (if not a bit more expensive) way and it sounds like that Audi has a different configuration anyway - supercharger for a start!

One thing I found out afterwards is my local council recycle center will take old engine coolant in a used supermarket milk container which was nice!
 

RUM4MO

Active Member
Jun 4, 2008
7,933
1,046
South Scotland
Yes, the problem with disposal! My local council recycling areas don't seem to have considered that anyone will be changing their car coolant and want to dispose of it correctly!

Getting rid of old brake fluid, for me, is to soak it up into sawdust and double bag it and put it in the general waste bin which gets fed into a furnace and produces electricity - or so the blurb goes!

My comments were probably more directed at anyone considering doing this job or changing the coolant in their car in the future, your way worked for you, I remember getting into a slight mess after replacing the coolant on a 2009 Ibiza 1.4 16V, it was only after consulting car forums that I found that that engine was a buggar to chase the air out of, so the plan for that engine was to remove the engine coolant temperature sensor and load in coolant until coolant escaped from that opening free of bubbles - a bit tricky when planning not to waste much coolant.
 

GORDYDJ

Active Member
Mar 9, 2024
89
11
v) This bit wasn't in any of the videos I saw on Youtube - now the heater matrix inlet/outlet pipes are clearly visible with the Fan motor removed.. But removal access is still limited by a electrical harness with a long/thin rectangular connector and also a very fat ground wire.. The harness connector unclips (need to depress a button with a flat head driver) but the large ground cable needs a 10mm hex/spanner. Can see the harness and the connector in the photo - the ground wire is completely blocking the exit/entry of the heater matrix..
That always seems to be the way when I'm looking on youtube. I have a 1.9 MK2 leon. Seen loads of people on here saying access to the matrix is through the glovebox. And so it is on the videos. well my 1.9 must be different to everyone else's. I can't even where the pipes go. Nevermind trying to reach the bolts holding the matrix. As for changing the thermostat without removing the alternator. Maybe, if you're double jointed. Then there's the hoes running across the engine which refuse to move.
 

Attachments

  • PXL_20240813_164736372.jpg
    PXL_20240813_164736372.jpg
    682.2 KB · Views: 36
  • PXL_20240731_152034452.jpg
    PXL_20240731_152034452.jpg
    528.8 KB · Views: 34
Last edited:
  • Like
Reactions: RUM4MO
Chris Knott Insurance - Competitive quotes for forum members