The VAG 850 series gearbox started life as a 4 speed in the Polo Then was upgraded to a 5 speed and one ended up in my 2001 Ibiza, mated to a 1.4 MPI engine. When I got it, It had a dreadful whine especially on the overrun. Checking all the Forums of VAG cars that use the 850 series of gearboxes, seemed to point to noise being caused by clutch release bearing or the gearbox output shaft bearing where it drives the Differential, sometimes referred to as the pinion bearing. This bearing takes a lot of stick and has proved to be the weak point in there. Combine the highly stressed bearing with the gear selector rod oil seal leaking OIL and there is your cause of trouble.
With the high price, scrapper (200)or refurbished (600) gearboxes. I decided to have a go.
Initial purchase Bearing (w311 405 625 n) £24.60 and a set of oil seals £13.60
I also put a request in the forum for any tips, and received some good advice. See:
http://www.seatcupra.net/forums/showthread.php?t=315295
Gearbox as removed
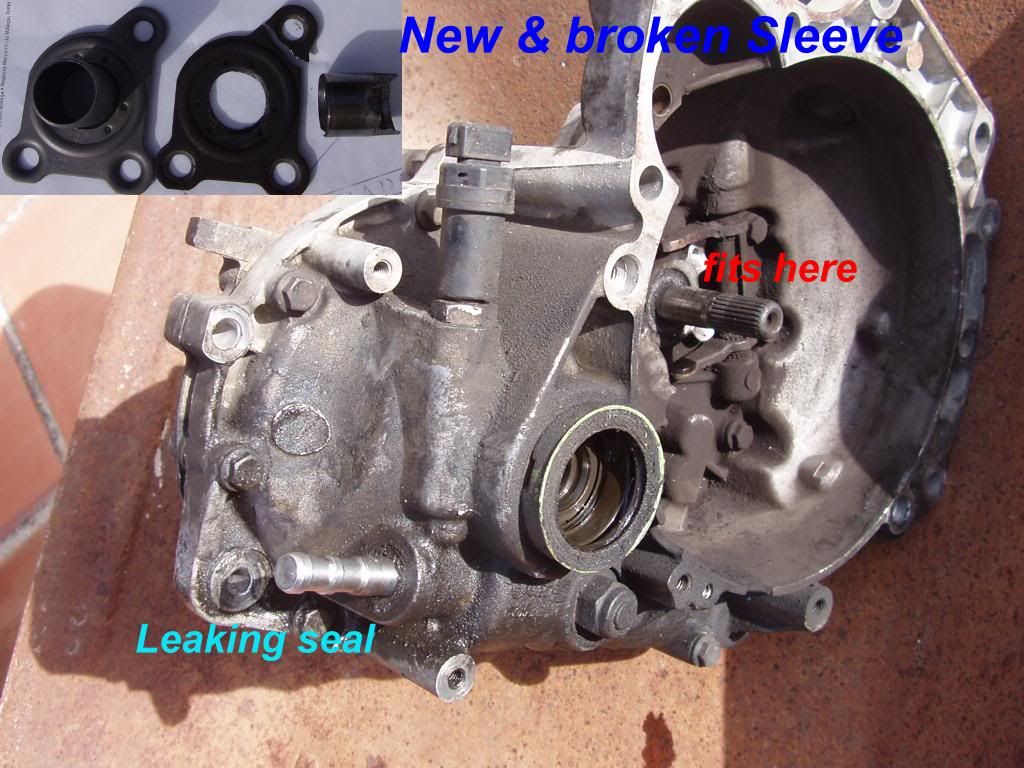
See how the gear selector shaft seal is leaking.
With the box removed is was obvious there was another problem the clutch kit needed replacement along with the release bearing guide sleeve.
When I got the replacement part I was first offered one that was too big this was from a diesel with a bigger clutch, so check with the old one as a guide.
Now to take the box apart: You should have drained oil previously.
First remove speedometer drive complete. Them slacken and remove all 13 bolts holdin the 2 halves together. Then tap all the way around with a mallet to separate, I used a hammer and a block of wood. Once I got a bit of movement by tapping on the mounting flanges it split apart surprisingly easily. Be prepared for some oil spillage at this point.
Innards
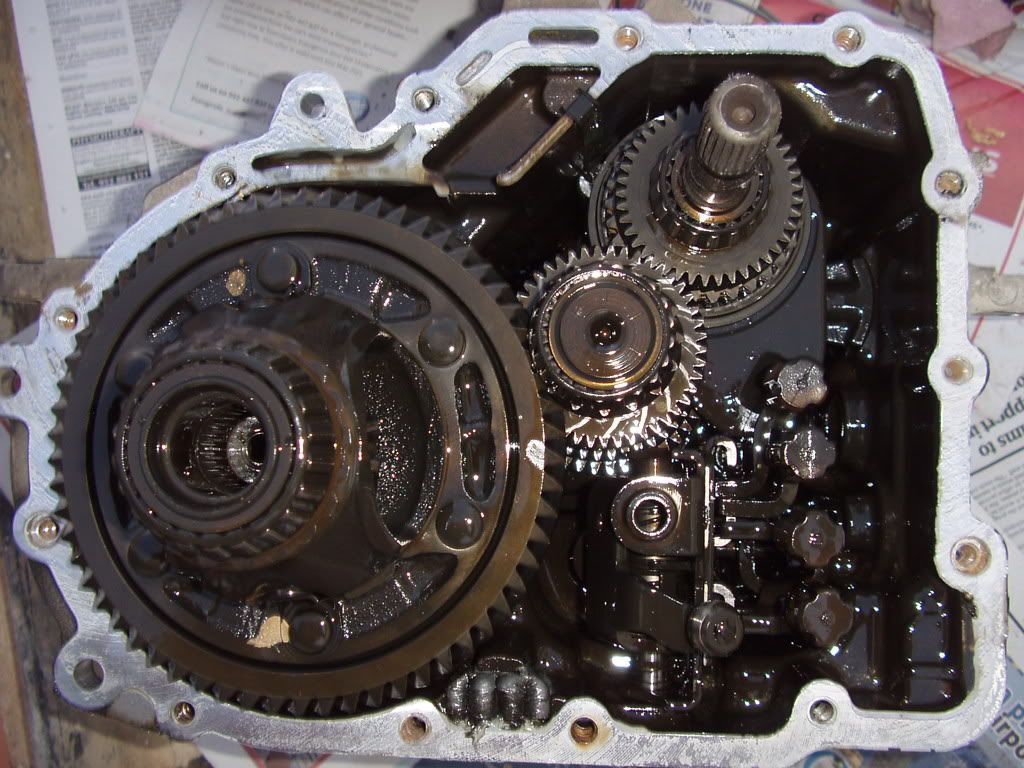
The differential will lift off at this time, note the magnet at the bottom of picture.
Worn Bearing
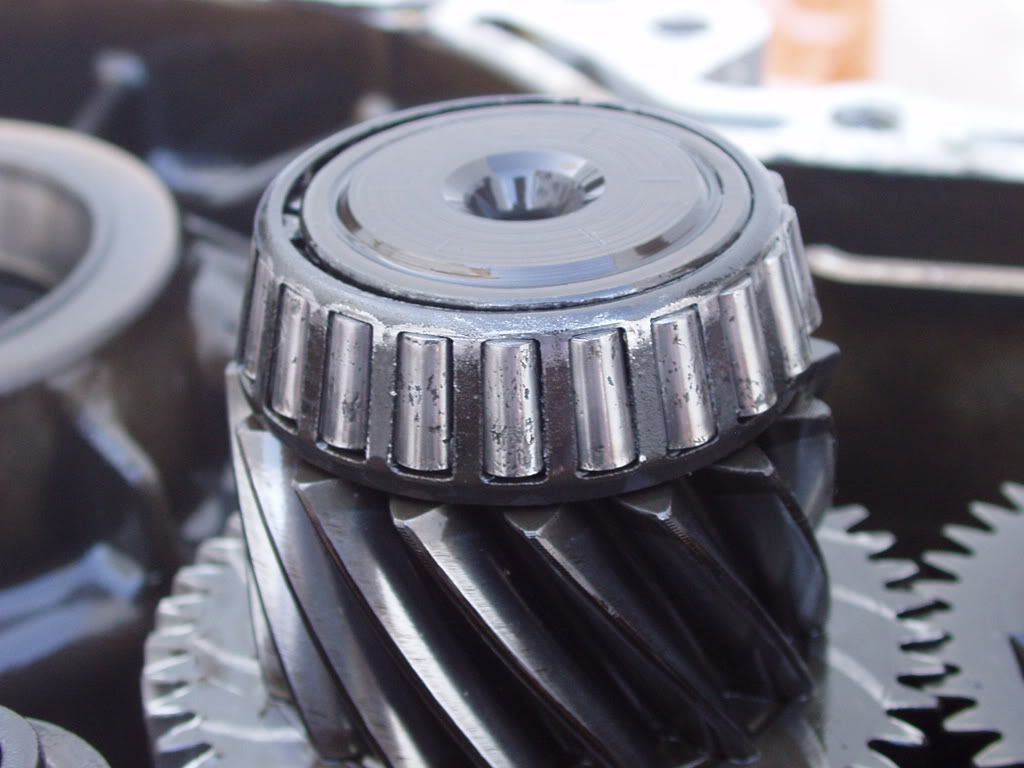
The race was very worn and the rollers quite pitted.
NOTE At this point I would advise putting tape around the rollers, as when the splitter was being drawn in one of the rollers popped out and dropped inside the gears. Took a bit of messing to extract it, tape would have saved all that. Benefit of hindsight!
Magnet
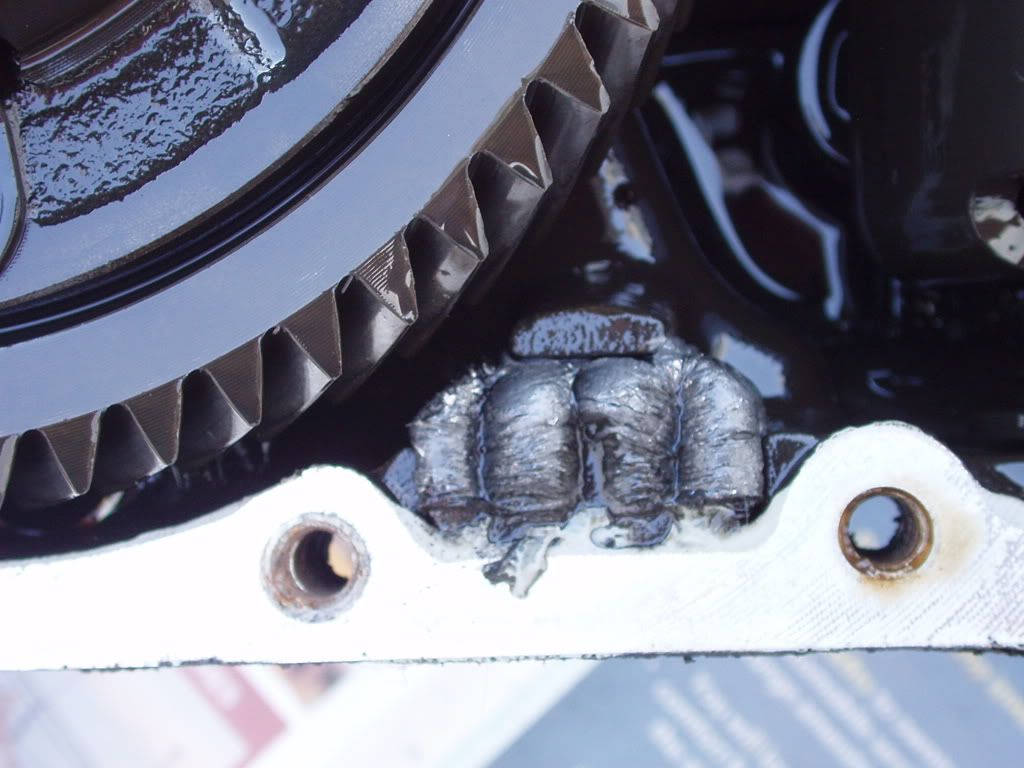
Magnet has done its' job stopping all this from circulating. Clean all this off before reassembly.
Puller in action
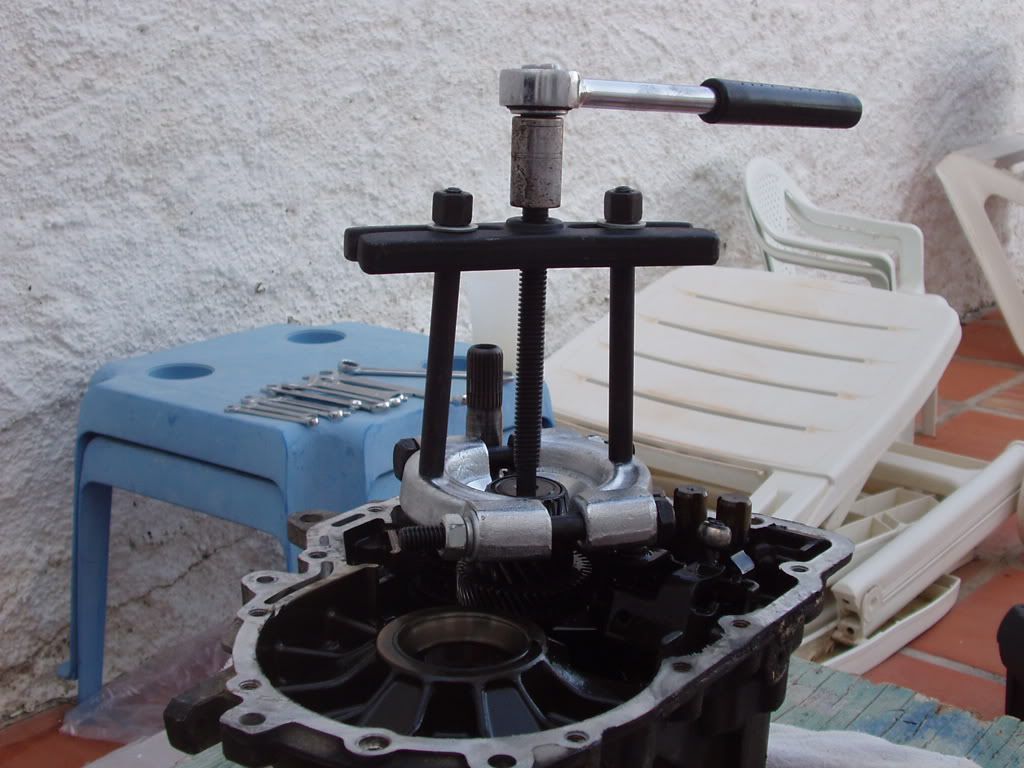
There is just room to fit the puller on the bearing, tighten up the two halves of the splitter to get a grip on the bottom of the bearing and start it moving. Next fix the 2 legs and the drive screw and wind it off. To clear the last few mm I had to reposition the splitter jaws as the screw bottomed out, and it just popped off. As simple as that best £18 spent on ebay in a long time.
Now to get the worn race out of the blind hole. There are a few methods to do this.
1 use the correct tool a multi expanding fingered thing with attached slide hammer, cost £100+ even on Ebay. Not tried.
2. Heat up the Aluminium case with heat gun or blow-lamp/torch to expand it more than the steel race then turn over and tap on some wood to shake it out. Tried it, got it hot enough to vaporize spit, but race was still firm. NOTE if you try this remember there is another race near it and that has a rubber oil seal in it, remove the rubber first, or it won't just be oil smoke that come off.
3. With an electric "Stick" welder run a bead of weld around the inside of the race and when it cools it shrinks the race. Tried this covered all the bits up with a damp towel and welded, bit of a all or nothing, as race was now absolutely trashed. Heart in mouth heard it Tick as it cooled and on turning and tapping out it popped just held in by last 1mm. I will try that first if there is a next time.
4. Grinding. Never got that far glad to say.
Whilst all this was going on the new race was in the freezer cooling to -18 to shrink it enough to start in the hole.
Race out but still hot.
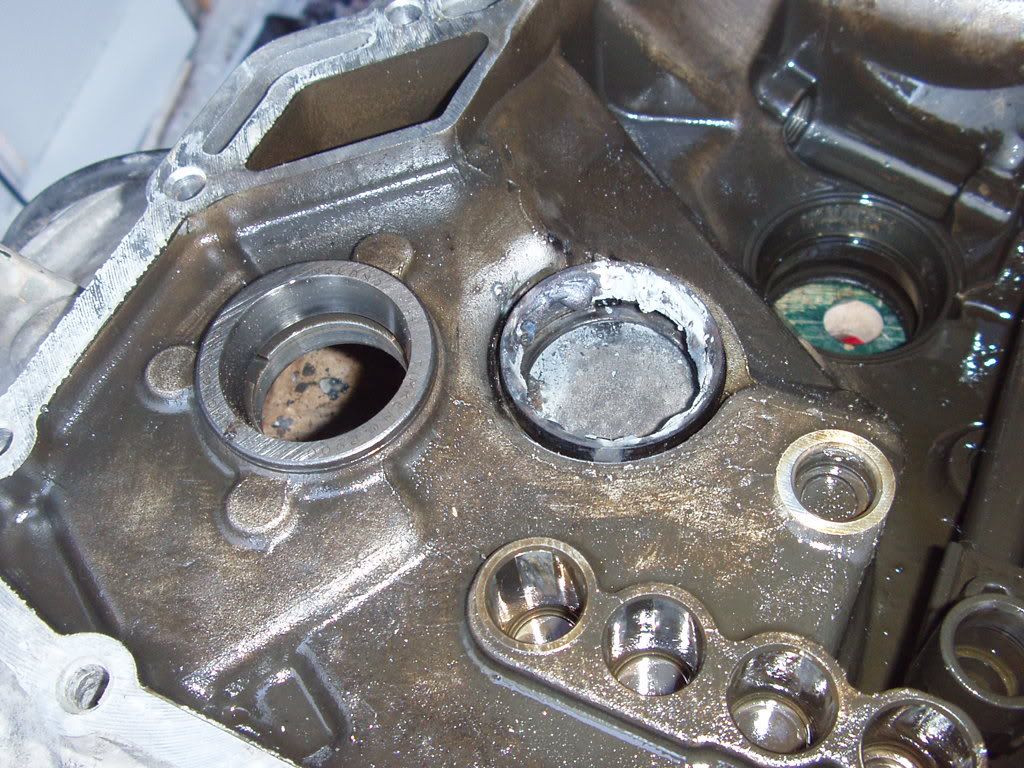
There is a shim under the race to set the preload as I could not remove the new race with out destroying it had to use the existing one and hope that the new bearing had similar spec to original. Fortunately it was a good match. Not a bad bet as I think the shims are more to accommodate variance in the casting and machining of the case.
Now to press the new bearing on. This proved to be a little tricky as the starting end is chamfered and it's sliding about whilst you try to set the puller to press it on.
The method was to put it in the oven at 150C and have a cuppa' and a biccie'.
After 15 min. or so I could hold it in an oven glove and GENTLY tap it enough to get a hold for the puller to do its work.
Pressing back on
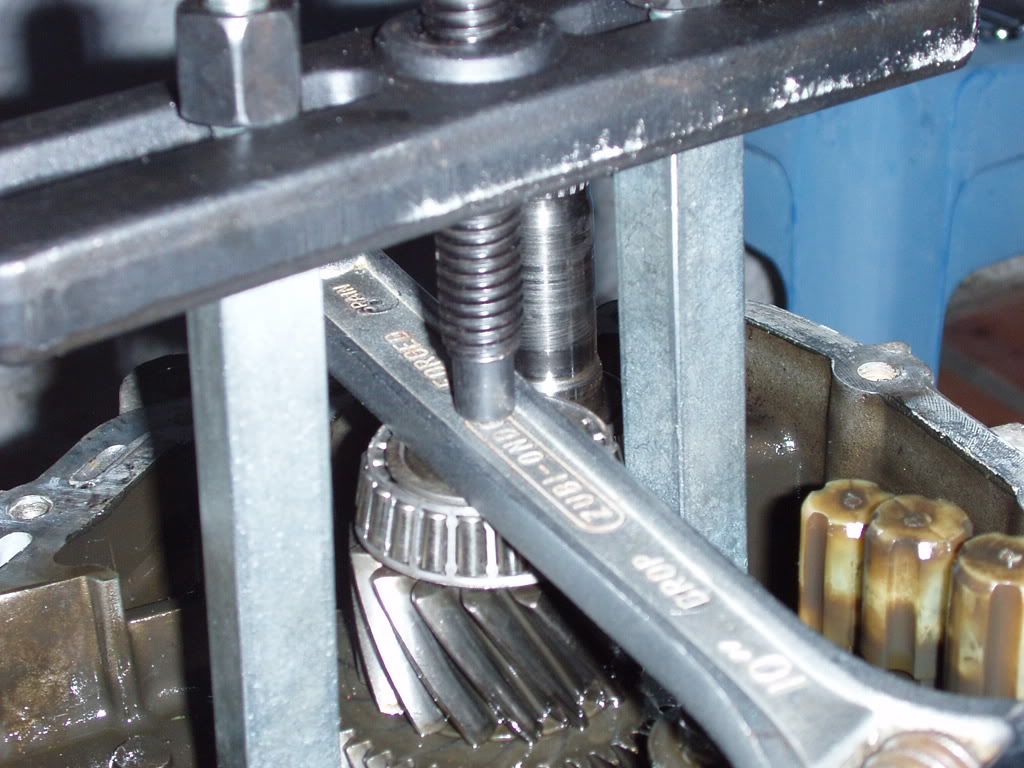
Needed the big spanner to spread the force evenly on the bearing. This stopped the bearing going fully home as spanner contacted end of shaft first.
After a bit a head scratching figured as old bearing has big chamfer at bottom it would be a good spacer to press new fully home.
Pressing New with Old
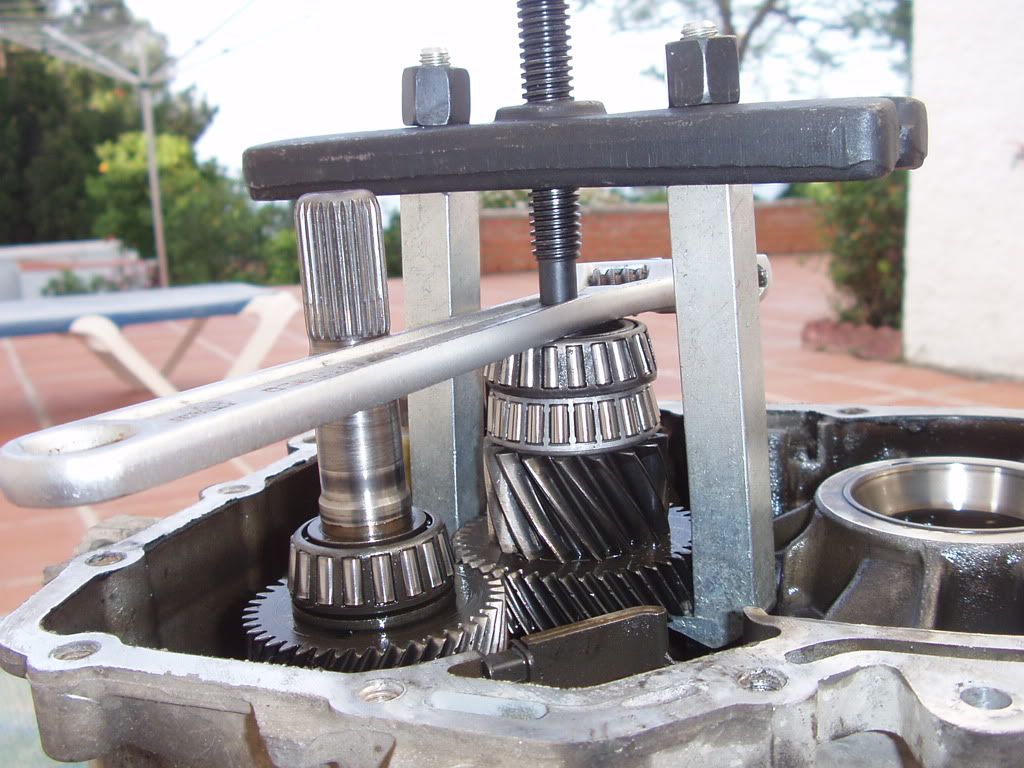
This picture also shows the new bearing is up-rated it has more rollers than the old one on top.
After this I now tapped in the new (-18c from freezer) race with a soft piece of brass so as not to damage it. Firmly supporting case on wood.
Bearing job done.
Other culprit the gear selector oil seal.
Pull out shaft, clean and protect with tape. Push back in all the way
Now remove the old seal. I punched a small hole in it and screwed in a small self tapping screw, then pulled and levered it out. Took about 3 attempts once it was moving came out ok.
Had to make a tool from a 18mm copper pipe fitting to tap the new seal in.
Prep all the inner lips of the new seals with Moly Grease so they wont not run dry till the oil reached them. The other seals on the box were changed, all straight forward.
Reassembly
Clean all mating surfaces
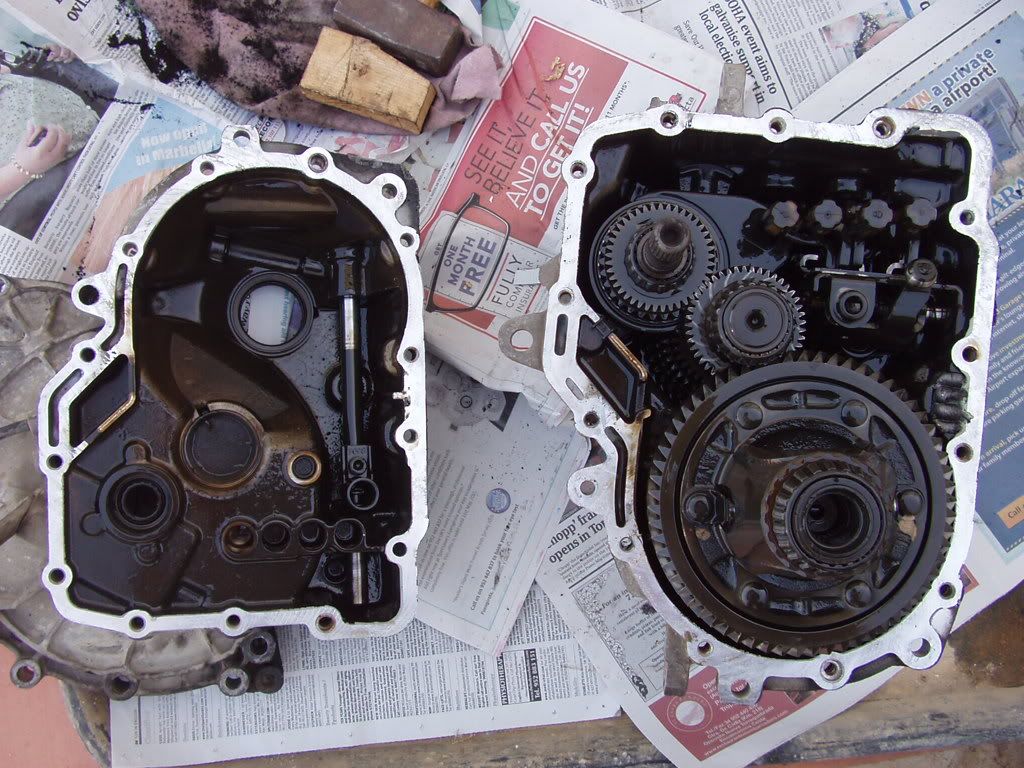
Replace diff, apply silicon gasket compound, align gear selectors in to other half of case, and gently bring together. Bolt up fingertight and check rotation in all gears. Leave in gear and check rotation as you torque up the bolts. You should feel slight resistance as the bolts get firm, this is the bearing preaload and as long as box rotates by hand ok in all gears now, thats it. Job done. - Well got to put it back in the car.
No its not a deliberate mistake I have not said replace the speedometer drive. The trick is to pour 3 liters of SEAT fully synthetic gear oil in there with the aid of a funnel. Then you replace drive. After a test run and the oil has circulated and settled take out the level plug to correct it, Catch this oil for top-ups about 200ml.
Apart from Spanners, Socket set and Spline bits. This is what was used:
Stick Welder,"Mallet" Silicon, copper pipe, Lev.Plug Key, Brass drift
AND
Bearing Splitter, Puller. £18 Ebay inc p&p
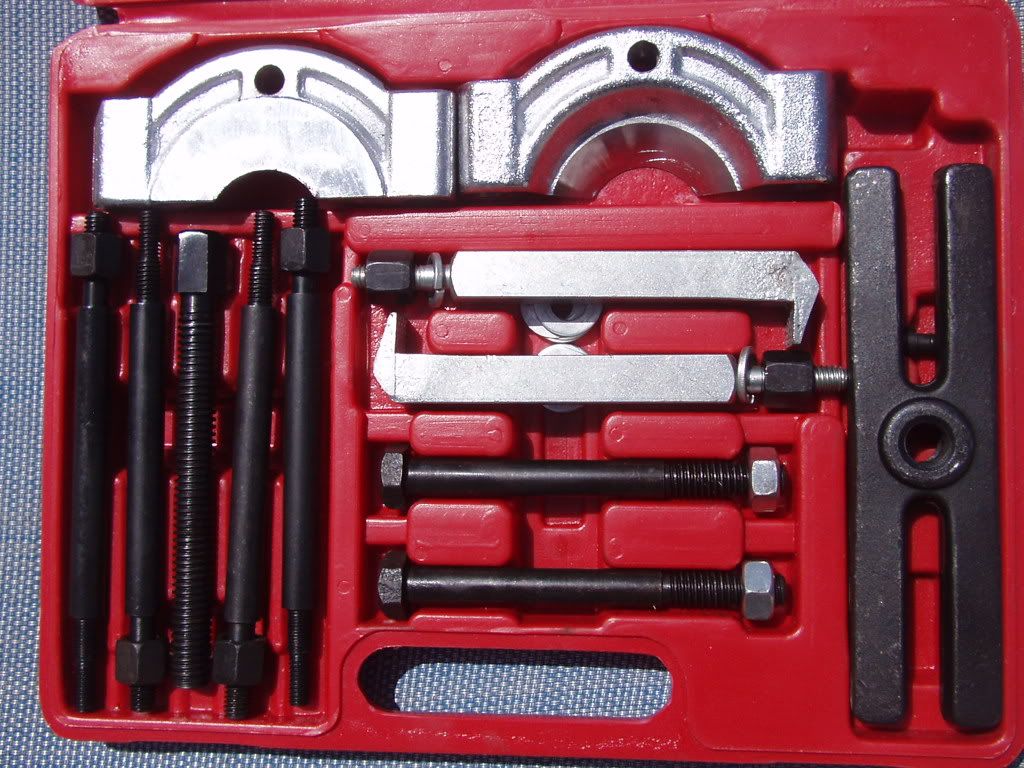
Not counting box out and back. All the bits described took about 4 hours.
I have done CV joints and wheel bearings before, but this is my 1st Gearbox.
The result is all quiet again and the changes are better especially the 5th gear, the play in the worn bearing was affecting that.
A lot cheaper then a rebuilt box or the scrapper.
Much more satisfying too!
Historical footnote: All the bearings that I saw in the box were made in England the new VAG bearing came in a box that said
"Made in China" but when opened it had marked on "made in Korea". The relentless march of the Asian Tiger!
The set of Multi-point Ribe bits, bought for the job, I had packed in my hand luggage coming back to England and were confiscated by Security. Ugg. No tools allowed, Sir! Ah well back to Fleabay.
With the high price, scrapper (200)or refurbished (600) gearboxes. I decided to have a go.
Initial purchase Bearing (w311 405 625 n) £24.60 and a set of oil seals £13.60
I also put a request in the forum for any tips, and received some good advice. See:
http://www.seatcupra.net/forums/showthread.php?t=315295
Gearbox as removed

See how the gear selector shaft seal is leaking.
With the box removed is was obvious there was another problem the clutch kit needed replacement along with the release bearing guide sleeve.
When I got the replacement part I was first offered one that was too big this was from a diesel with a bigger clutch, so check with the old one as a guide.
Now to take the box apart: You should have drained oil previously.
First remove speedometer drive complete. Them slacken and remove all 13 bolts holdin the 2 halves together. Then tap all the way around with a mallet to separate, I used a hammer and a block of wood. Once I got a bit of movement by tapping on the mounting flanges it split apart surprisingly easily. Be prepared for some oil spillage at this point.
Innards

The differential will lift off at this time, note the magnet at the bottom of picture.
Worn Bearing

The race was very worn and the rollers quite pitted.
NOTE At this point I would advise putting tape around the rollers, as when the splitter was being drawn in one of the rollers popped out and dropped inside the gears. Took a bit of messing to extract it, tape would have saved all that. Benefit of hindsight!
Magnet

Magnet has done its' job stopping all this from circulating. Clean all this off before reassembly.
Puller in action

There is just room to fit the puller on the bearing, tighten up the two halves of the splitter to get a grip on the bottom of the bearing and start it moving. Next fix the 2 legs and the drive screw and wind it off. To clear the last few mm I had to reposition the splitter jaws as the screw bottomed out, and it just popped off. As simple as that best £18 spent on ebay in a long time.
Now to get the worn race out of the blind hole. There are a few methods to do this.
1 use the correct tool a multi expanding fingered thing with attached slide hammer, cost £100+ even on Ebay. Not tried.
2. Heat up the Aluminium case with heat gun or blow-lamp/torch to expand it more than the steel race then turn over and tap on some wood to shake it out. Tried it, got it hot enough to vaporize spit, but race was still firm. NOTE if you try this remember there is another race near it and that has a rubber oil seal in it, remove the rubber first, or it won't just be oil smoke that come off.
3. With an electric "Stick" welder run a bead of weld around the inside of the race and when it cools it shrinks the race. Tried this covered all the bits up with a damp towel and welded, bit of a all or nothing, as race was now absolutely trashed. Heart in mouth heard it Tick as it cooled and on turning and tapping out it popped just held in by last 1mm. I will try that first if there is a next time.
4. Grinding. Never got that far glad to say.
Whilst all this was going on the new race was in the freezer cooling to -18 to shrink it enough to start in the hole.
Race out but still hot.

There is a shim under the race to set the preload as I could not remove the new race with out destroying it had to use the existing one and hope that the new bearing had similar spec to original. Fortunately it was a good match. Not a bad bet as I think the shims are more to accommodate variance in the casting and machining of the case.
Now to press the new bearing on. This proved to be a little tricky as the starting end is chamfered and it's sliding about whilst you try to set the puller to press it on.
The method was to put it in the oven at 150C and have a cuppa' and a biccie'.
After 15 min. or so I could hold it in an oven glove and GENTLY tap it enough to get a hold for the puller to do its work.
Pressing back on

Needed the big spanner to spread the force evenly on the bearing. This stopped the bearing going fully home as spanner contacted end of shaft first.
After a bit a head scratching figured as old bearing has big chamfer at bottom it would be a good spacer to press new fully home.
Pressing New with Old

This picture also shows the new bearing is up-rated it has more rollers than the old one on top.
After this I now tapped in the new (-18c from freezer) race with a soft piece of brass so as not to damage it. Firmly supporting case on wood.
Bearing job done.
Other culprit the gear selector oil seal.
Pull out shaft, clean and protect with tape. Push back in all the way
Now remove the old seal. I punched a small hole in it and screwed in a small self tapping screw, then pulled and levered it out. Took about 3 attempts once it was moving came out ok.
Had to make a tool from a 18mm copper pipe fitting to tap the new seal in.
Prep all the inner lips of the new seals with Moly Grease so they wont not run dry till the oil reached them. The other seals on the box were changed, all straight forward.
Reassembly
Clean all mating surfaces

Replace diff, apply silicon gasket compound, align gear selectors in to other half of case, and gently bring together. Bolt up fingertight and check rotation in all gears. Leave in gear and check rotation as you torque up the bolts. You should feel slight resistance as the bolts get firm, this is the bearing preaload and as long as box rotates by hand ok in all gears now, thats it. Job done. - Well got to put it back in the car.
No its not a deliberate mistake I have not said replace the speedometer drive. The trick is to pour 3 liters of SEAT fully synthetic gear oil in there with the aid of a funnel. Then you replace drive. After a test run and the oil has circulated and settled take out the level plug to correct it, Catch this oil for top-ups about 200ml.
Apart from Spanners, Socket set and Spline bits. This is what was used:
Stick Welder,"Mallet" Silicon, copper pipe, Lev.Plug Key, Brass drift
AND
Bearing Splitter, Puller. £18 Ebay inc p&p

Not counting box out and back. All the bits described took about 4 hours.
I have done CV joints and wheel bearings before, but this is my 1st Gearbox.
The result is all quiet again and the changes are better especially the 5th gear, the play in the worn bearing was affecting that.
A lot cheaper then a rebuilt box or the scrapper.
Much more satisfying too!
Historical footnote: All the bearings that I saw in the box were made in England the new VAG bearing came in a box that said
"Made in China" but when opened it had marked on "made in Korea". The relentless march of the Asian Tiger!
The set of Multi-point Ribe bits, bought for the job, I had packed in my hand luggage coming back to England and were confiscated by Security. Ugg. No tools allowed, Sir! Ah well back to Fleabay.
Last edited:


