Thanks for the quick reply. Especially interested as the wife complains that the rear indicators are not bright enough when the brake lights are on. I assured her that the car would not pass type approval without bright enough bulbs. But , in all fairness, I see (or not!) what she means
-
Hey Guest one of our sponsors Progressive Parts is running Black Friday and Cyber Monday offers - more details here
LED rear indicators
- Thread starter terryt
- Start date
You are using an out of date browser. It may not display this or other websites correctly.
You should upgrade or use an alternative browser.
You should upgrade or use an alternative browser.
To refit you just push the nobbles back in and push it back round in an arc then put the nut in.
Hi Dean, just posted about my troubles in dephead's tutorial, I have to be missing something!
I cannot for the life of me get the cluster back in correctly, it sits in and lines up with the screw and bolts in (thank god).
However if I start with the nobbles and try to circle it back in 1) the weather rubber AND hard plastic to which is attached get stuck between the cars body 2) the rounded tip of the lights is still protruding.
If I start by putting the bulk of the unit into the space for the cluster it goes in, but still protrudes.
I've tired on two occasions now (after cooling down from the first attempt
 ) and no matter what I do it makes no difference.
It's winding me up something rotten, I've also started damaging the paintwork (only internal corner that can't be seen with boot shut) on the second session of attempts.
How can something so simple be so sodding complicated. I'm actually contemplating taking it to a dealer, how embarrassing!
Here's a pic...

Hi rcopus,
Back on the grid now.
Here's some tips:
Dean C is correct: locate the lugs first but don't press all the way in and swing the cluster round in an arc. The hard and soft plastic will go under the rear wing extension
You may like to lubricate the lugs first with spit or detergent. This will help them glide into the grommets.
If the cluster ends up like yours, you have not quite edged the lugs in far enough to start with. Try again
If you have just a little protruding at the front end the you can gently ease the front of the cluster in by pressing. This is where the lubricant will help.
Note however that you should not push at right angles to the car but more so that the push is at 45 degrees . This is because the lugs are not set at 90 degrees.
Be gentle and it will work.
You may also want to put some masking tape around the paintwork to prevent scratching
Last edited:
Thanks so much!
All I needed was fairy liquid - don't I feel stupid!
There was actually no hassle at all when the fairy was on, probably because I'd spent so much time phaffing earlier. Second light took 45 seconds start to finish!
Actually came to a carpark as couldn't face spending anymore time in-front the neighbours.
Can't you just tell I work in IT
Thanks again for the tutorial and recommendation on bulbs, they look great.
Now let's see how I can f**k up fitting fan washers and the rest of my LED interior bulbs
PS - SEAT didn't use ANY washer on the screws in my car, must be because I didn't order an extended warranty!
All I needed was fairy liquid - don't I feel stupid!
There was actually no hassle at all when the fairy was on, probably because I'd spent so much time phaffing earlier. Second light took 45 seconds start to finish!
Actually came to a carpark as couldn't face spending anymore time in-front the neighbours.
Can't you just tell I work in IT
Thanks again for the tutorial and recommendation on bulbs, they look great.
Now let's see how I can f**k up fitting fan washers and the rest of my LED interior bulbs

PS - SEAT didn't use ANY washer on the screws in my car, must be because I didn't order an extended warranty!
Did you retrofit the washers?
Good luck on the other projects.
Have you seen my latest trailed here ?
http://www.seatcupra.net/forums/showthread.php?t=394959&page=2
Good luck on the other projects.
Have you seen my latest trailed here ?
http://www.seatcupra.net/forums/showthread.php?t=394959&page=2
Did you retrofit the washers?
Good luck on the other projects.
Have you seen my latest trailed here ?
http://www.seatcupra.net/forums/showthread.php?t=394959&page=2
I didn't have any rubber washers to put on the screws (I have plenty of computer junk and components but I don't do DIY!). Nice to see that SEAT don't bother to have any standards though, at least SEAT fitted two rubber washers on one of your screws rather than 0 on all the screws like mine eh!
I have all my LED bulbs waiting, already fitted the two map reading and rear seat lights, I need to add a resistor to get rid of the residual current as they are intermittently faintly illuminated.
The windscreen washer fan jets I already have and are waiting to be installed (got the info and part numbers from your thread on that).
On the plus side, I changed the key cap to a metal one without breaking it
Looks like a nice mod to do as leds do offer faster on/off time 
leds look brighter and it's hard to tell in the video, but does the arrow shape lens get lost in the brightness or is that the light just dazzling the camera? lol
I had to replace one of my rear lights last month as I was getting condensation in it and noticed a tiny tiny internal crack where it's bonded together.
I can't believe the way the rear lights are mounted and not obvious if you have never had to remove them before. I am refering to the two side lugs in the gromits of course, and easy when you know how
I did a little guide over on ****** with some pictures to help out anyone else that may have trouble.
Anyway, here it is...
hi guys,
Got my replacement light yesterday and fitted between the showers and all seems good now
Cost me £61 as I don't think they added the vat on
Not sure if all Seat, VW, Skoda, Audi are the same fitment wise, but I assume so, so will add a little how to to save some of you breaking you're outer rear lights
Should be simple really and is when you know how but if you can't see how the light mounts, it's very easy to break bits
There is a diagram in the manual and even I thought I understood it but obviously not.
Anyway, first open boot, Locate the little cover which is parallel to the light and remove to reveal the light mounting bolt.
Remove the mounting bolt with a flat head screwdriver by turning anti clockwise.
Once you have removed the bolt from the boot, you need to the top right edge of the light on the rear wing.
There are two bolts which are a push fit into rubber mounts in the rear quarter panel, these are the bolts...
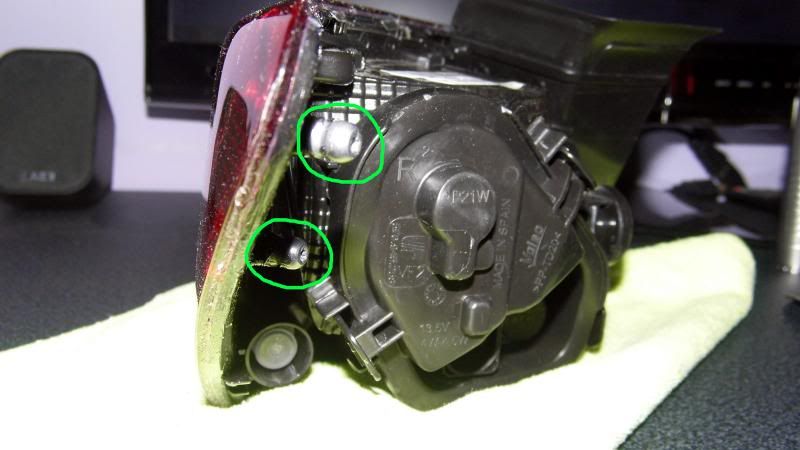
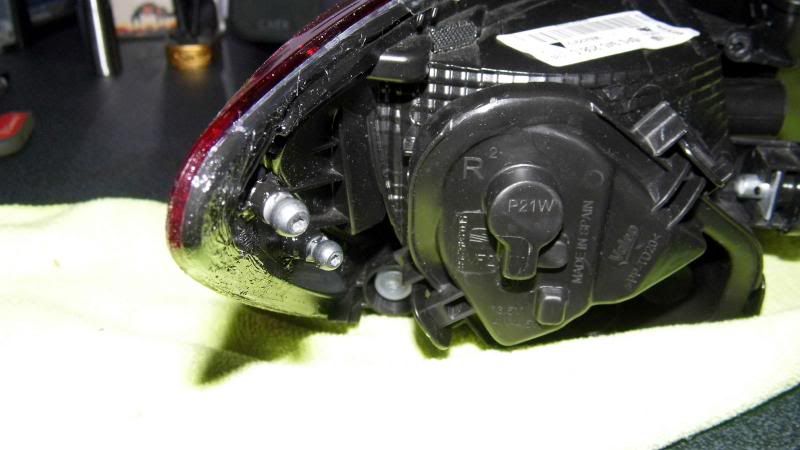
The bolts are here when light is fitted to vehicle...
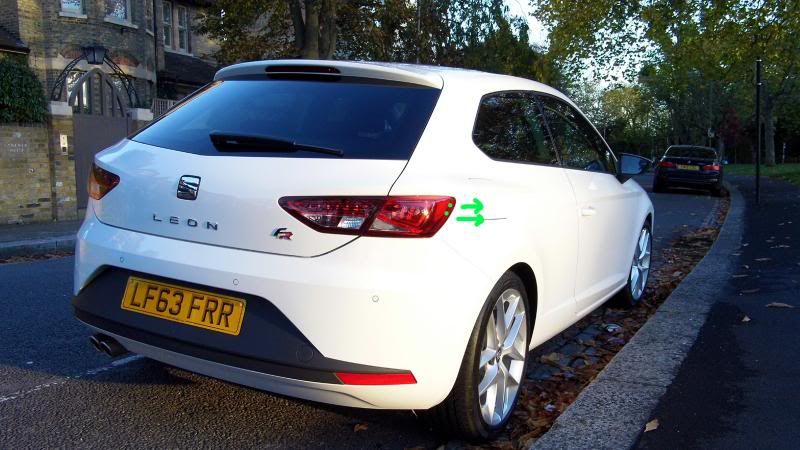
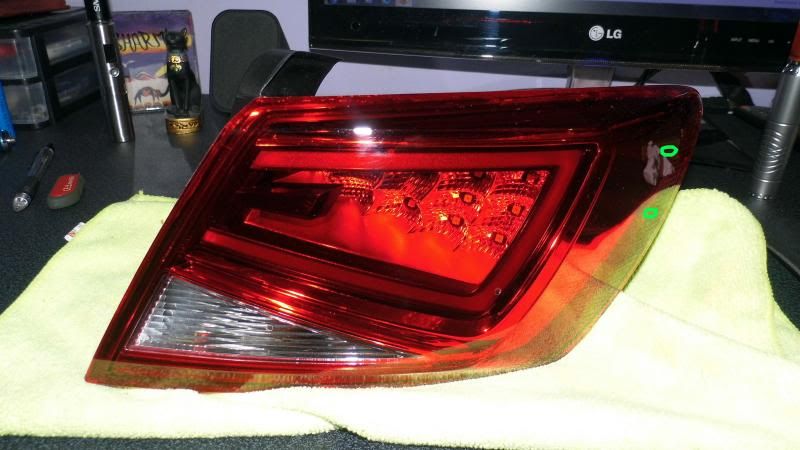
Standing at the side of the car with the rear wheel facing, you will need to grab the outer edge of the light and pull it towards you to release the bolts.
Remember they are push fit so there is nothing to undo.
Once the two bolts are clear, the light will slide out to the rear of the car
Replacement is reverse of removal.
I was careful but tried wiggling the light a bit before I knew how it was attached and both the push fit bolts had snapped off on the old light
It is pretty easy to remove now that I know how lol
Pictures are of the original light which had the crack in the glass, I have managed to dry it all out, glue bolts back on and silicone sealed the light all the way round so is all good for a spare now if I ever need it
The only time you will really need to remove the outer lights is if you need to replace the part, or replace a bulb.
If you have rear led lights, the only bulb that I can see that is replaceable are the indicator bulbs.
I am in no way responsible if you follow this guide blah blah blah lol
And if you do muck it up, maybe this will help lol
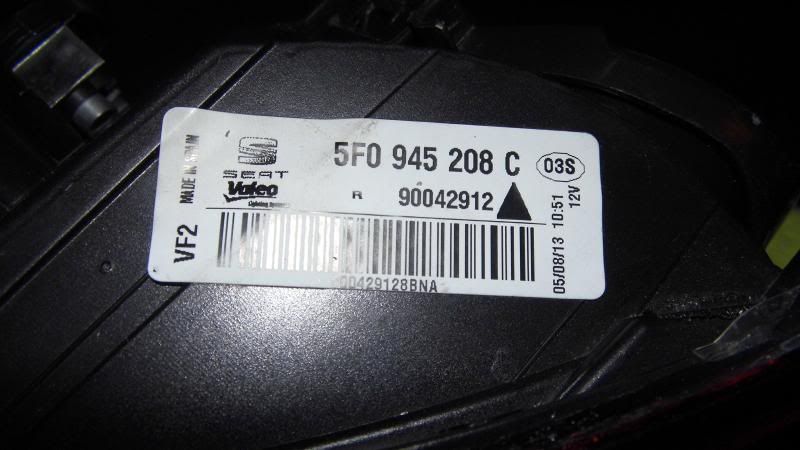
Hope this helps someone in future
leds look brighter and it's hard to tell in the video, but does the arrow shape lens get lost in the brightness or is that the light just dazzling the camera? lol
I had to replace one of my rear lights last month as I was getting condensation in it and noticed a tiny tiny internal crack where it's bonded together.
I can't believe the way the rear lights are mounted and not obvious if you have never had to remove them before. I am refering to the two side lugs in the gromits of course, and easy when you know how
I did a little guide over on ****** with some pictures to help out anyone else that may have trouble.
Anyway, here it is...
hi guys,
Got my replacement light yesterday and fitted between the showers and all seems good now
Cost me £61 as I don't think they added the vat on
Not sure if all Seat, VW, Skoda, Audi are the same fitment wise, but I assume so, so will add a little how to to save some of you breaking you're outer rear lights
Should be simple really and is when you know how but if you can't see how the light mounts, it's very easy to break bits
There is a diagram in the manual and even I thought I understood it but obviously not.
Anyway, first open boot, Locate the little cover which is parallel to the light and remove to reveal the light mounting bolt.
Remove the mounting bolt with a flat head screwdriver by turning anti clockwise.
Once you have removed the bolt from the boot, you need to the top right edge of the light on the rear wing.
There are two bolts which are a push fit into rubber mounts in the rear quarter panel, these are the bolts...


The bolts are here when light is fitted to vehicle...


Standing at the side of the car with the rear wheel facing, you will need to grab the outer edge of the light and pull it towards you to release the bolts.
Remember they are push fit so there is nothing to undo.
Once the two bolts are clear, the light will slide out to the rear of the car
Replacement is reverse of removal.
I was careful but tried wiggling the light a bit before I knew how it was attached and both the push fit bolts had snapped off on the old light
It is pretty easy to remove now that I know how lol
Pictures are of the original light which had the crack in the glass, I have managed to dry it all out, glue bolts back on and silicone sealed the light all the way round so is all good for a spare now if I ever need it
The only time you will really need to remove the outer lights is if you need to replace the part, or replace a bulb.
If you have rear led lights, the only bulb that I can see that is replaceable are the indicator bulbs.
I am in no way responsible if you follow this guide blah blah blah lol
And if you do muck it up, maybe this will help lol

Hope this helps someone in future
Last edited:
This is a really useful add on to the teradown found here.
http://www.seatcupra.net/forums/showthread.php?t=394840
Could you cut and paste it in sixysix?
Surprised that the whole unit was only £61. Was it the LED version. Looks like it from the pic. If so it's a steal. Have often found that parts you thought would break the bank don't and a small piece of plastic requires a new mortgage.
There is a diagram in the manual and even I thought I understood it but obviously not.

What is wrong with the handbook diagram sixysix? apart from asking you to pull in every direction
Thanks for the 'how to's' dephead2004 & sixysix, I've read both and tbh I was still unsure how to initially start pulling the lens off but wasn't too fussed having spent years on the tools in my early years. Since then I've read about rcopus nearly heading to the dealers to get it back on
 (you gave me a good laugh that day mate, I could feel your embarrassment levels rising), then sixysix cracking his lens and having to buy a replacement, now I'm not so sure
Last edited:
You'll be fine Andy. For me you're talking about someone who only uses tools on electrical devices like iPhones, I was bound to fail! 
Regarding what's wrong with the manual, for starters it's a classic SEAT manual. It tells you to unscrew anti clockwise in direction of arrows, yet the arrow in the diagram is going clockwise and use a screw driver when it's a 17mm internal hex or allen key!
If you were also to follow the removal instructions in reverse, putting the two bolts in would be the last thing you'd do, when it should be the first.
If you're not a complete novice like me and have common sense you'll be fine. If you rely on the instructions as gospel then you'll be screwed

Lol I never even noticed that, it was more the 2nd picture, the critical pull direction I was nosing at. I hope the same attention to detail doesn't carry over onto the production line 
Spent 6 years or so working on Citroen rcopus, ended it working in the Midlands. So we're mechanically minded but the fear of shelling out an unnecessary £61 prays heavy on a Scotsmans mind
Give it 6 months rcopus and you'll be checking fluid levels on your own
Edit.
Just noticed your in the Midlands rcopus, the garage was in Birmingham, place called Weolley Castle (spelling?) and the garage was called 'California Auto Centre', long long time ago, whether its still there is another story.
Spent 6 years or so working on Citroen rcopus, ended it working in the Midlands. So we're mechanically minded but the fear of shelling out an unnecessary £61 prays heavy on a Scotsmans mind
Give it 6 months rcopus and you'll be checking fluid levels on your own

Edit.
Just noticed your in the Midlands rcopus, the garage was in Birmingham, place called Weolley Castle (spelling?) and the garage was called 'California Auto Centre', long long time ago, whether its still there is another story.
Last edited:
Hi matey, yes no problem will paste it in later on for you 
The lens was already cracked before I got my hands on it lol that's why I was replacing it and only noticed the condensation and small crack a few weeks after getting the car
The instructions look pretty clear in the manual and that's what I followed and thought, but the two arrows to the lugs at the side did confuse me a bit to be honest as it just say pull up and away.
It all became obvious when I got the replacement light and could see how it mounted
As for the light, it is actually £146 inc vat for the unit.
I had a word with my dealer about getting it replaced under warranty but I could not prove it was already there when I got the car and they could not prove it was not but said it had been hit at some point.
Anyway, we agree'd to share the cost of the light and so £61 which did not include the vat I assume
I am not a complete novice either, replaced complete suspension on my peugeot, Heater matrix which was a dash out job, all servicing myself and no problems. then a SEAT rear light gets me wondering lol
And yes, not quite the reverse order as the two lugs go back in first, good point
Have added my little contribution to your FAQ now dephead 
Made a few little changes to try and make it easier to understand as well.
I agree about the SEAT manual, lots of little mistakes in there and aimed more towards the European left hand version instead of us right handers.
One obvious one I found was the fuse box. Book says and a diagram of the fuse-box behind the compartment next to the steering wheel.
The picture is of a LHD but you would assume, yep, it's in the same place but on the right hand side but Noooooooo!!
They left the fuse box in the same place so we have to guess, then take all our rubbish out of the glove box, then push in the outer tabs to release the upper pins to flap the glove box forward to get to the fuse box!
It's not hard to do, but why have these things in the manual if they are not even correct!
I am just off to double check that the engine is actually in the engine bay!
Made a few little changes to try and make it easier to understand as well.
I agree about the SEAT manual, lots of little mistakes in there and aimed more towards the European left hand version instead of us right handers.
One obvious one I found was the fuse box. Book says and a diagram of the fuse-box behind the compartment next to the steering wheel.
The picture is of a LHD but you would assume, yep, it's in the same place but on the right hand side
They left the fuse box in the same place so we have to guess, then take all our rubbish out of the glove box, then push in the outer tabs to release the upper pins to flap the glove box forward to get to the fuse box!
It's not hard to do, but why have these things in the manual if they are not even correct!
I am just off to double check that the engine is actually in the engine bay!

So I've noticed a new feature after I've installed the LED indicator bulbs.
Intermittently I completely lose DAB radio signal when the indicators are in use, it takes a few seconds to come back after the indicators are inactive.
Couldn't say for certain as hadn't used DAB radio much before installing the bulbs, but I doubt it did this before.
Intermittently I completely lose DAB radio signal when the indicators are in use, it takes a few seconds to come back after the indicators are inactive.
Couldn't say for certain as hadn't used DAB radio much before installing the bulbs, but I doubt it did this before.
Hi Rcopus, not found this myself. Use DAB all the time and indicators when I remember (!) and not noticed any fade outs. What were your LEDs same as mine?
Hey dephead, yep exactly the same as yours.
On the motorway last week I was able to repeat it almost every time when using the indicators. Not sure if the signal loss only occurs when there's a low signal already and the indicators tip it over the edge.
Have only done motorway driving since discovering this and she's been parked up at the airport since before my initial post, so haven't seen if it's something that happens during low-speed driving around town.
I'm sure you're spot on Dean, just suprised so much interference to knock out the radio completely.
I guess the fact it happens on the motorway is that there was probably low signal anyway during most of that journey when I was indicating. Annoying though because with my style of motorway driving I'm always using the indicators. Guess I should just drive in the middle lane like everyone else, or buy a different brand car and stick in the right hand lane.
Doesn't help that the aerial and amps are in the rear lid either.
Similar threads
- Replies
- 4
- Views
- 995
- Replies
- 15
- Views
- 1K

