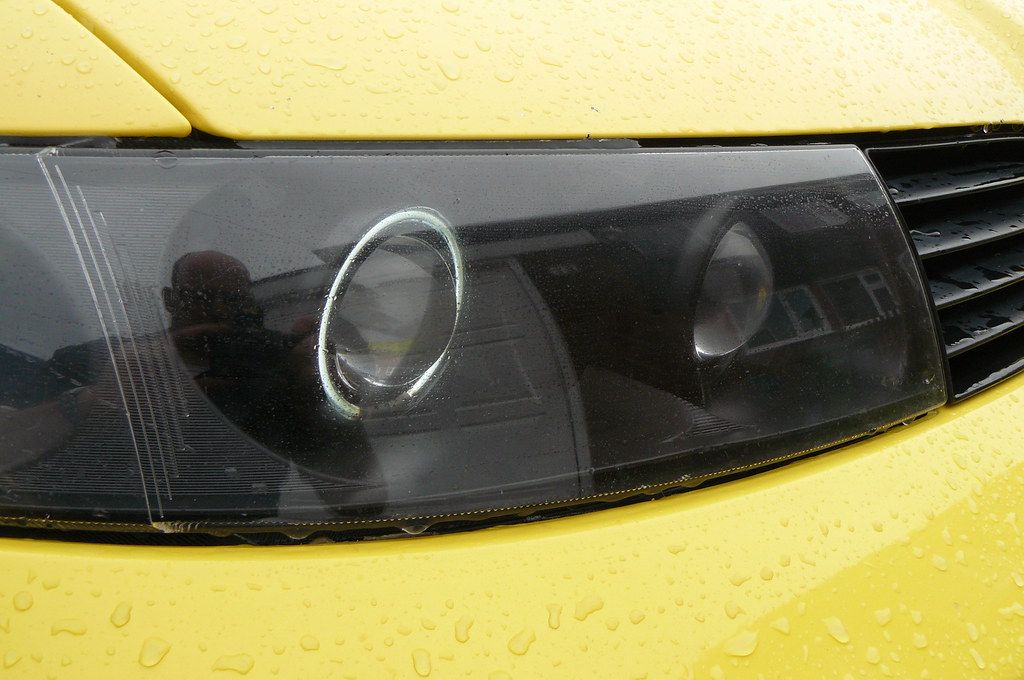
leon projector headlight pics anyone ??
- Thread starter kassim
- Start date
You are using an out of date browser. It may not display this or other websites correctly.
You should upgrade or use an alternative browser.
You should upgrade or use an alternative browser.
You could also make your own lights, these kits are realy good.


wow, i like them, is that some one you have made or what ar you saing?
give me more info please. if you wan to, you can give me a PM
Rauer
Guest
Rauer
Guest
Ok then, these are the KITS you will find several different ones some with ballasts and some with out you can get them separate though as seen HERE The shape of my projectors are as in the Ebay item shown although there are different ones the ones without ballasts tend to be cheaper . all together it should cost about £160-£180 to do the lights.
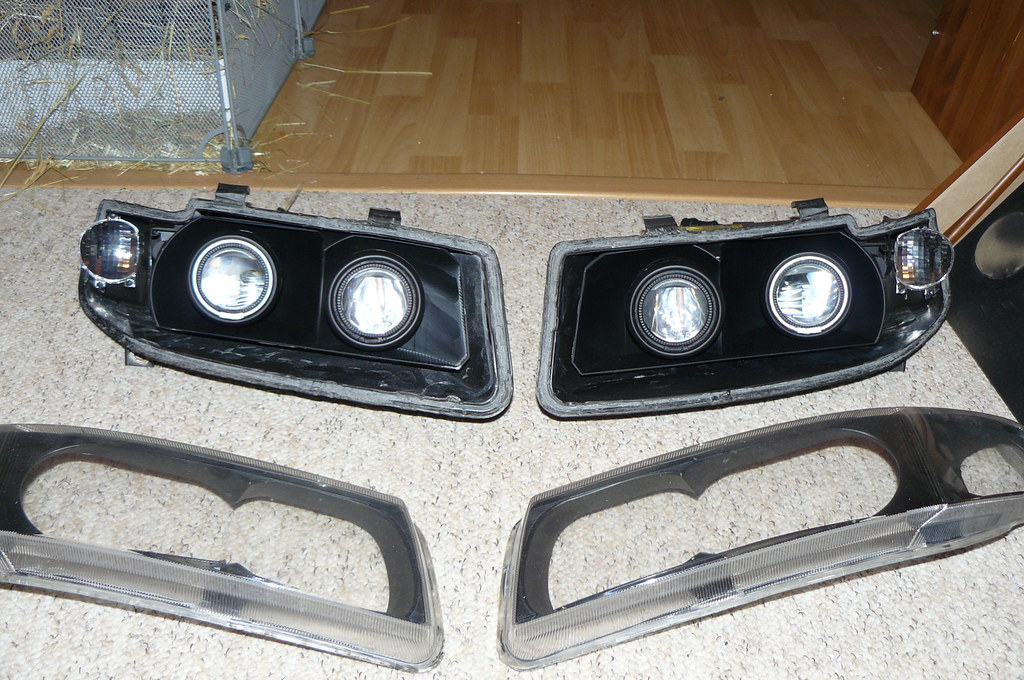
The first thing you need to do is split the OE lights, this is a huge PITA, i used a heat gun and a screw driver, its takes time an patience to split them, when you eventually get the lenses off, remove all the separate parts, all you need to do is unwind the adjusters and the reflector will come out. You can remove all the wiring from the drivers side light but you will need to make sure you keep the indicator wires in the passenger side one as the wires go internally to the indicator bulb holder. you will need to remove all the old bulb fittings , this is easy as they are only held in with small allen key screws. When you have fully stripped the light you will need to clean as much of the old adhesive off, when you have done that they should look abit like this.

There is a little switch in these lights which lifts a little flap to give more light on main beam, i left this in place on the dipped lights but removed it all on the main beam, so when the lights are on main beam you geat a bit more light from the dipped. (Not that you need it LOL)


I have fitted the light kit here. The kit is all chrome if thats what you want then just fit them as theya are, if you want them black, you will need to strip the lights down(small Allan key bolts) lightly sand the chrome to give a rough finish, this give the paint something to stick to, i used acid etch primer although normal primer will do, i decided not to have the angel eyes on both lights so i removed the one on the main beam, so masked the remaining one so i didn't paint it, then painted the rest mat black,, i used black light tint on the angel eye just to tone it down a bit, i also did the same to the indicator reflector. The dipped projector fits straight in (they fit in to the bulb hole and a nut is screwed on to hold it in place) the main one needs a bit of work with a dremel , but is not a problem, so when this is done you can fit in the other light, then clean all the internals , the last thing you want is a big finger print on the inside of the lense, the using the supplied silicon re fix the lense, i then strapped it up with gaffer tape until the silicon dried to make sure there is a good seal. Then you need to align the light i did this as best i could, but as it happened my MOT was the weekend after i fitted them so i had them done properly then.
The first thing you need to do is split the OE lights, this is a huge PITA, i used a heat gun and a screw driver, its takes time an patience to split them, when you eventually get the lenses off, remove all the separate parts, all you need to do is unwind the adjusters and the reflector will come out. You can remove all the wiring from the drivers side light but you will need to make sure you keep the indicator wires in the passenger side one as the wires go internally to the indicator bulb holder. you will need to remove all the old bulb fittings , this is easy as they are only held in with small allen key screws. When you have fully stripped the light you will need to clean as much of the old adhesive off, when you have done that they should look abit like this.

There is a little switch in these lights which lifts a little flap to give more light on main beam, i left this in place on the dipped lights but removed it all on the main beam, so when the lights are on main beam you geat a bit more light from the dipped. (Not that you need it LOL)


I have fitted the light kit here. The kit is all chrome if thats what you want then just fit them as theya are, if you want them black, you will need to strip the lights down(small Allan key bolts) lightly sand the chrome to give a rough finish, this give the paint something to stick to, i used acid etch primer although normal primer will do, i decided not to have the angel eyes on both lights so i removed the one on the main beam, so masked the remaining one so i didn't paint it, then painted the rest mat black,, i used black light tint on the angel eye just to tone it down a bit, i also did the same to the indicator reflector. The dipped projector fits straight in (they fit in to the bulb hole and a nut is screwed on to hold it in place) the main one needs a bit of work with a dremel , but is not a problem, so when this is done you can fit in the other light, then clean all the internals , the last thing you want is a big finger print on the inside of the lense, the using the supplied silicon re fix the lense, i then strapped it up with gaffer tape until the silicon dried to make sure there is a good seal. Then you need to align the light i did this as best i could, but as it happened my MOT was the weekend after i fitted them so i had them done properly then.
Last edited:
So these are the OEM lights fitted with the projectors can u still adjust the level with them from inside car ?
cracking write up by the way defo something to try might get a spare set of lights first just incase
cracking write up by the way defo something to try might get a spare set of lights first just incase
do you just use the ring for the parking light phill?
Side light - parking light, yeah
So these are the OEM lights fitted with the projectors can u still adjust the level with them from inside car ?
cracking write up by the way defo something to try might get a spare set of lights first just incase
Yes everything is as OE, which is one of the reasons i did it, the set i bought before didn't have the leval adjuster in them.
do you have a link where you get the kit from or do ya think trip to breakers find some projector lenses not bothered about the angel eye part
Rauer
Guest
Can you not just use the original side lights?
the projector would cover it unless you you relocated it maybe phillc did the projector cover the original hole for the side light ?
was thinking of doing something similar later in the year. hate not having the level adjuster. i will have to figure out some way of fitting a standard side/park light bulb. i dont like the rings at all.. wonder could a park bulb be somehow put into one of the projectors...
Both lights have there own ballast you wire one to the dipped circuit and the main onto the main circuit, i have cut of the old connector that went into the old lights and soldered the new lights wiring directly on to the cars wiring.
was thinking of doing something similar later in the year. hate not having the level adjuster. i will have to figure out some way of fitting a standard side/park light bulb. i dont like the rings at all.. wonder could a park bulb be somehow put into one of the projectors...
You could fit a bulb holder in the main body by the side or in between the projectors and fit a LED bulb in there that should work. I know what you mean about the rings that's the main reason i took the other one off, and now i quite like the one, its different as all the other kits you see have two.
Similar threads
- Replies
- 36
- Views
- 6K


