• Guest would you be interested in CUPRA or SEAT valve caps? let us know in the poll

  • Welcome to our new sponsor Lecatona, a brand dedicated to enhancing performance for VAG group sports cars, including SEAT, Audi, Volkswagen and Škoda. Specializing in High Pressure Fuel Pump (HPFP) upgrades.

Seat Leon 5F 1.4 TSI - Change Spark Plugs

Pentaw1nz

Active Member
Jun 21, 2021
18
3
Hi Guys,

My Leon is just over 60k KM (service interval) and I want to change my spark plugs. I know how to do it, but I ran into some information about indexing them so that the ground electrode is facing the cilider wall and the gap is facing towards the exaust valve.
Also explained in this video.

I was not familliar with this and also couldnt find any information about iindexing spark plugs on this forum.
Is this really something that I need to pay attention to? Or just buy the right spark plugs and torque them and that;s it?
 

adam davies

Active Member
Dec 30, 2019
347
145
Hi Guys,

My Leon is just over 60k KM (service interval) and I want to change my spark plugs. I know how to do it, but I ran into some information about indexing them so that the ground electrode is facing the cilider wall and the gap is facing towards the exaust valve.
Also explained in this video.

I was not familliar with this and also couldnt find any information about iindexing spark plugs on this forum.
Is this really something that I need to pay attention to? Or just buy the right spark plugs and torque them and that;s it?
Load of crap in my opinion. Its only a 1.4 low horsepower car dont worry about all that bs.
 
  • Like
Reactions: Woody_72 and Walone

Lozzy15

Mods mods mods
Staff member
Moderator
Mar 24, 2015
577
390
Ilkeston, Derbyshire
Can't say I've ever heard this over the years I've worked on cars and can't see it making an ounce of difference either. Especially as many spark plugs these days have multiple electrodes and gaps so you wouldn't even be able to do this anyway. The important thing to make sure is that you're fitting the correct plug for the engine and tightening it up right. I've have a spark plug crack and drop the ceramic insulation into a cylinder before and it's a nightmare!
 

SuperV8

Active Member
May 30, 2019
1,544
685
Your spark plugs are in the middle of your cylinder head!
Indexing is not required for modern pent roof 4 valve combustion chambers.

Indexing was done back in the day on 2 valve cylinder heads where the spark plug was to the side but even then the benefit was questionable.

"Indexing is done by placing (usually copper) washers of varying thickness on the spark plug shoulder, so that when the spark plug is tightened, the plug will rotate a certain amount, and gap will point in the desired direction. In most engines, performance will improve when the spark plug gap opens toward the intake valve(s). However, without testing different index positions in an engine on a dyno, it is nearly impossible to determine which index increases performance. Indexing spark plugs will typically make only a few more horsepower – usually less than 1% of total engine output. For a 500 hp engine, that’s only 5 hp. It is usually not worth the effort.

There are also drawbacks to indexing spark plugs. When washers are added, the spark plug may loosen if the washers don’t crush properly and hold the torque. Also, if too many washers are added, the firing end of the plug will not be as far into the combustion chamber and performance can decrease."
 

Pentaw1nz

Active Member
Jun 21, 2021
18
3
Thanks, wont do it then.
This guy is also talking about it, and actually working on a recent 1.4 tsi engine.


I want to order some Bosch or NGK spark plugs. Only need the torque tool. What's the most efficient for a 15 nm+ tool? 3/8 ?
 
  • Like
Reactions: Walone

Walone

Active Member
Feb 10, 2016
1,628
454
Near Heathrow
Thanks, wont do it then.
This guy is also talking about it, and actually working on a recent 1.4 tsi engine.


I want to order some Bosch or NGK spark plugs. Only need the torque tool. What's the most efficient for a 15 nm+ tool? 3/8 ?
Have you changed your plugs yet? Would like to know how you got on with removing the coils. :)
 

Pentaw1nz

Active Member
Jun 21, 2021
18
3
Not yet, waiting for the delivery. There are many videos in YouTube. If you are lucky you can pull them our straight or with a tie wrap underneath.

If you are unlucky, both parts separate and you end up with the rubber being stuck. I've seen a video where a guy puts his air compressor in the rubber and blows some air in, which pops the rubber out.

Other way is ordering the special coil removal tool which is about 50 EUR here, so I first give it a go with pulling it out and using my air compressor if needed.
 
  • Like
Reactions: Walone

SuperV8

Active Member
May 30, 2019
1,544
685
Thanks, wont do it then.
This guy is also talking about it, and actually working on a recent 1.4 tsi engine.


I want to order some Bosch or NGK spark plugs. Only need the torque tool. What's the most efficient for a 15 nm+ tool? 3/8 ?
This guy is basically quoting the marketing spiel from the Bosch plugs regarding the indexing, basically the threads are made to start at the same point on each plug so when torqued the plug ground electrode is always pointing in a certain direction.
Don't worry about it - just fit and torque your plugs.

I would double check the correct torque as the 15nm you quote is different to what he says from the Bosch plug. The plug packaging usually says the correct torque or angle.
 
  • Like
Reactions: Pentaw1nz

Crossthreaded

Active Member
Apr 16, 2019
546
150
I would agree with the above comments. Just buy the recommended plugs made by a "big name" manufacturer - eg. NGK, Bosch, etc - and buy from a trusted source like a motor trade supplier (Factor) or main dealer because there is a rampant trade in counterfeit motor spares, spark plugs in particular.

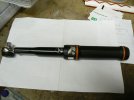
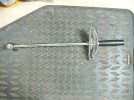
Choice of torque wrench? I really can speak with experience here having used torque wrenches for most of my working life. Don't buy a cheap "bargain". A torque wrench should be a precision instrument. I've used a lot of torque wrenches during my life and by using one you are often trying to set a fixing very precisely and close to it's point of failure. "Cheap" products, I can tell you, are unlikely to achieve this. The first one I bought was whilst I was still learning my trade back in the '60's and had to do the head gasket in my 850 Mini. There was a large trade parts supplier near me and he sold me a simple "beam type" wrench which did the job. As I got to know more about tools I quickly came to doubt this tool's accuracy and bought a Britool to replace it. The old beam wrench had a scale running from 0 to 150 ft lbs but, as with most torque wrenches, is probably only really accurate around it's mid range, which is actually why it probably got the Mini's nuts done up to around the correct tightness. I wouldn't particularly advise you buy this type as you have to watch the scale whilst you are using it and this can be difficult in some applications.

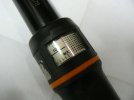
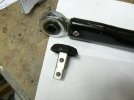
All my other wrenches are of the preset click type - except one, which I'll talk about later - I have 2 Britools with half inch drives one 25 to 135 nm range, the other 70 to 330 nm (for doing hub nuts, crank pulleys etc) I also bought a Norbar 30 to 150 nm as a back up to the smaller Britool. These tools have done me for many years but then, especially when metric fittings made their appearance, things started being held together with smaller nuts and bolts - 6mm studs (10mm spanner needed) on inlet manifolds suddenly started appearing whereas the older British cars would have used considerably larger items (1/2" AF spanner) so I found the torque settings were right at the lower end of what my wrenches could accurately do. After a lot of research I bought a Halfords Professional 3/8" drive with 8 to 60 nm range. I believe this is a rebranded Norbar wrench? I'm delighted with it - Not cheap but if you can get your hands on a Halfords trade card you'll get a serious discount on it. Ok, I know you're not in Britain, but others may benefit from this info. Some of the most accurate wrenches these days are based around strain gauge technology and have digital read outs but for a good one of these you are talking lots of cash. Also make sure you're chosen purchase can apply torque both clockwise and anticlockwise. many have a reversible square drive like the Britools and Norbar - I'll try to post an illustration at the end of this. You won't often need to torque left hand threads but it can be handy - I was working on an old Alfa Romeo a wee while ago which had right hand threaded wheel nuts on one side and left handed on the other!

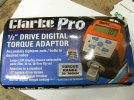
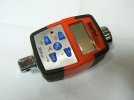
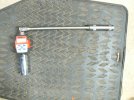
One "left field" consideration might be a "Digital Torque Adaptor". This is a strain gauge type adaptor which has a female 1/2" drive on it's input side, to take some thing like a "T" handle or power bar, and a male 1/2" drive on the output side to accept a socket etc. You can set it in two modes. either you set up a preset figure you want to achieve and it will "beep" when that tightness is achieved - so, in this mode it's just like using a "click type" wrench except it "beeps" instead of "clicking". - Or you can set it up so it displays the tightness figure you are applying on it's wee display - so now it's like a beam type to use. I find it works very well indeed but it's bulky once you've got your drive bar on the one side and socket on the other, so pretty useless for doing cam belts etc, or anywhere that access is restricted. However it has one really great use for me, I use it to check calibration on my other mechanical type wrenches. This is because torque wrenches should be checked periodically for accuracy and recalibrated if necessary. This is not a cheap procedure but I find I can use the torque adaptor to check the other wrenches by setting the torque adaptor to record "live" figures as applied and presetting a click value on the wrench under test. Then I put my Lambda sensor socket in my vice and plug the adaptor into it with the torque wrench on top. Pull on the torque wrench whilst watching the adaptor figures as I go and see what I get when the wrench clicks. I do this for settings at about 1/4, 1/2 and 3/4 full scale on the wrench under test and repeat each 3 times to get an accurate figure. This allows me to quickly identify if one of my wrenches is going noticeably out of calibration. I've been in touch with the Clarke people about accuracy of the adaptor over time (ie does it, in itself, need to be periodically calibrated like a mechanical wrench) their reply was that possibly when it gets really old this might be advisable but as long as you use it sensibly and don't use it out of range, use good batteries and do the battery recalibration periodically (There is a function which needs to be done each time you use it which matches actual battery state to the adaptor - very simple to do - and there's a low battery warning too) They were very interested to hear I was using it in this way and could think of no reason why it would not give a valid outcome. So now I do this instead of spending a fair amount of money on regular, and often needless, recalibration charges.

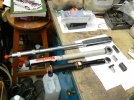
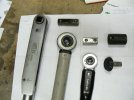
I'll now attempt to post some images for you to illustrate the above. The black wrench is the 3/8 drive one and the silver one is my old beam deflection type.

Sorry, I did "go on" a bit there didn't I. But I hope it's all stuff which might help you and anyone else thinking of buying one of these very useful and essential tools

Oh, and a wee PS here. VERY IMPORTANT - never leave a "click type" torque wrench with the spring wound up when you have finished using it. By which I mean you must wind it back down to the zero reading otherwise the spring will change it's characteristics (you might say it'll weaken) and from then on the calibrated scale becomes meaningless! Also keep it clean and store it somewhere reasonably dust free. Dirt, even dust, in the working mechanism will alter it's accuracy.
 

Attachments

  • P1090839.JPG
    P1090839.JPG
    395.1 KB · Views: 167
  • P1090838.JPG
    P1090838.JPG
    334.5 KB · Views: 138
  • P1090837.JPG
    P1090837.JPG
    386.3 KB · Views: 115
  • P1090840.JPG
    P1090840.JPG
    499 KB · Views: 134
  • P1090843.JPG
    P1090843.JPG
    531.8 KB · Views: 135
  • P1090841.JPG
    P1090841.JPG
    363 KB · Views: 128
  • P1090842.JPG
    P1090842.JPG
    510.9 KB · Views: 157
Last edited:

Mr Pig

Active Member
Jun 17, 2015
2,705
953
I changed my plugs ( 1.4 TSi ACT) a few months ago and what I would say is just try it first. I was worried by the horror stories about the boots sticking but in the event they came out no problem.

It doesn't matter if the coil comes off the boot, it just pops back on again. The trick to getting them out is to not yank hard on them. Firm pull and hold it to give the boot time to free off. All four came out no problem.
 

RUM4MO

Active Member
Jun 4, 2008
7,966
1,059
South Scotland
My first DIYer torque wrench was one of these bending ones, obviously that choice was based purely on price. An uncle needed a torque wrench to work on his HB Viva, and so my father suggested that he and I swopped torque wrenches and so I ended up with a Britool one - obviously that uncle was left to use that cheap bending beam one, so that was the end of it.
Norbar I also like, I bought one for jobs like spark plugs, later bought a much higher capacity Halfords Prof series one for wheel hubs - and as said the QA cal certificate mentions Norbar. Because the first Norbar I bought had quite a limited range, I needed to but another Halfords Prof series one when it came to changing the front belts on my Audi S4 as the correct torque was a bit above the range of the first Norbar - and as Crossthreaded said using these sorts of tools near either end of their quoted range is just kidding yourself.

The safest way to remove the coils on these engines is to buy a coil remover tool that has an expanding split system that grabs the lined hole the securing bolt passes down through. I think as said already, if you remove these coils at the recommended service period, you should be able to get them off without any issues - leave them undisturbed for many many years and you might have a problem. VW group suggest that you make sure that the open end of the coil assembly is coated with a suitable paste/grease prior to refitting.

Edit:- I even bought one of these square drives that had a "cap" on the end (from Murrays Tools), because my first Norbar had an annoying habit of releasing that square drive every time I removed a socket - swopping for that other square drive stopped that nonsense!
 
Last edited:

Crossthreaded

Active Member
Apr 16, 2019
546
150
'Mornin' RUM, hope you didn't get caught in all that rain yesterday, I'm not sure how far out of the city you are, as you probably know I'm in the north, near Leith, and we were treated to a pretty spectacular thunderstorm - lots of lightening - and an absolute deluge of rain which flooded the garden. I see the new St James shopping centre seems to have leaked from the news reports today?

Anyway, back to the torque wrenches - I'll post a couple of illustrations to help people understand what I'm talking about - I think these cheap "bendy bar" type which you can buy for around £12 to £20 are best avoided but there are wrenches which use this principle, often in conjunction with a circular dial gauge to give the reading, which are very accurate - and very expensive, My daughter's neighbour over in Southern Maryland showed me his which was a Snap On and definitely the "real deal". Still had the problem that you had to watch the dial whilst tightening though, I much prefer the "click" type.

The wee 3/8 drive Halfords wrench came with the sort of square drive you mention - with a "cap" to stop it pulling out with the socket when you remove it. Also acts as a "spinner" for running a nut/bolt down it's thread to the point of real tightening. My bigger Norbar does not have this and it's square drive quite often comes out with the socket, a little annoying but not the "end of the world and everything" (who said that?). I've never had this happen with the Britool which has a much more substantial drive piece with much more strongly spring loaded retaining balls and a deeper square drive "collar" all together. The Britool, to me, epitomizes the old "British" way of doing things. It's massively engineered, heavy to use and will probably last "for ever". It's one shortcoming is that it doesn't have a ratchet drive so you have to take it off and on the bolt you are tightening if you need to take more than about half a turn on it to tighten it so takes a little longer when tightening the likes of a series of head bolts.

A final word to those just starting out with their first torque wrench. Friction between the moving securing nut/bolt and the stationary thing you are tightening to - maybe a cylinder head or caliper carrier - is a big issue with torque tightening. (one of the main reasons why a lot of "stuff" is now angle tightened). The actual clamping force applied to the two, or maybe more, components you are trying to hold together will vary depending on this friction. So a clean and completely lubricant free bolt tightened to, let's just say 20 ft lbs, will clamp the parts together with a certain crushing force. Now lubricate the bolt and the clamping force will be significantly increased. This is because a torque wrench measures turning effort on the fixing not clamping force between the components. You need to know what the recommendation on lubrication is before you start, especially if the components are critical to safety. As a general rule of thumb, when you ask the manufacturers what their recommendation is most reply "lightly oiled" I've not really been able to ascertain a universal definition of "lightly oiled" but I myself take it to mean neither completely bone dry to the point of almost seeing rust on the surface, or swimming in oil as it would be if you took an oil can to it, so the equivalent to wiping an oily rag over it? Then, when actually tightening, you must tighten up to the "click" point in one smooth consistent sweep without pausing until you hear that click. If you stop just short of the "click" point the extra force needed to break the friction between the nut/bolt and the component when you start again will almost certainly make the wrench click too early and you won't get a correct tightening. Tightening by degree almost completely overcomes this problem because by turning the nut/bolt through a specified number of degrees you are advancing that fixing along it's thread by a certain amount which has no relationship to how much friction it is experiencing, which gives a much more reliable clamping outcome. I did say above that it "almost" overcomes all the friction problems but it depends on arriving at the correct starting point to work well and pretty much all manufacturers specify very lightly torquing the fixing before you start with the angle turning. There are two problems I see straight away with this. No1. If the fixing is not free spinning on it's tread then, just like with conventional torque tightening, your fixing will not "arrive" at the correct starting point - friction at very low torque figure is much less a factor so whether the threads are oiled or dry becomes less relevant. No2. When tightening something like a cylinder head where multiple fixings are acting on the same component and a crushable gasket is sometimes involved, it's not enough to simple initially tighten each fixing to it's "starting point" with the torque wrench just once. As you go round the many fixings there will be a settling effect so if you then go back to the first one you tightened you'll very likely find it is completely slack and can often even be moved with your fingers. Where multiple fixings are used on one component part you must continue to go round them several times until they all "click off" without the fixing moving, then you can start your angle tightening.

Hope you all enjoyed that and that I didn't bore you all to tears?
 

Attachments

  • P1090849.JPG
    P1090849.JPG
    545.7 KB · Views: 151
  • P1090850.JPG
    P1090850.JPG
    477.1 KB · Views: 201

Pentaw1nz

Active Member
Jun 21, 2021
18
3
This guy is basically quoting the marketing spiel from the Bosch plugs regarding the indexing, basically the threads are made to start at the same point on each plug so when torqued the plug ground electrode is always pointing in a certain direction.
Don't worry about it - just fit and torque your plugs.

I would double check the correct torque as the 15nm you quote is different to what he says from the Bosch plug. The plug packaging usually says the correct torque or angle.
What should be the correct torque for the plugs? The package indicates 1/16 and 1/12 with an arrow, but I'm not sure what that means.
WhatsApp Image 2021-07-05 at 15.37.12.jpeg


Just received the pollen filter, air filter, spark plugs and my torque wrench. Will try to change the plugs today or tomorrow.
 

Crossthreaded

Active Member
Apr 16, 2019
546
150
The guide on your spark plug package is a general guide for doing it without a torque wrench. The illustration on the left shows a plug without a crush washer and suggests it should be turned one sixteenth of a turn after it is in contact with the cylinder head - that's the relevance of the no1 picture. The one on the right is for a plug with a crush washer and is recommending one twelfth of a turn. If you try to do it this way and you've little previous experience of installing plugs then I wish you good luck! I doubt if I could judge it? Most vehicle manufacturers now a days have their recommended torque figure to achieve optimum installation which will be either in the owners manual - if you're lucky - or maybe a Haynes or on line manual or you could just ring up the main dealer.
PS I'm just dying to know, what wrench did you buy? Make and type please, not that I'm nosey, just?
 

Pentaw1nz

Active Member
Jun 21, 2021
18
3
The guide on your spark plug package is a general guide for doing it without a torque wrench. The illustration on the left shows a plug without a crush washer and suggests it should be turned one sixteenth of a turn after it is in contact with the cylinder head - that's the relevance of the no1 picture. The one on the right is for a plug with a crush washer and is recommending one twelfth of a turn. If you try to do it this way and you've little previous experience of installing plugs then I wish you good luck! I doubt if I could judge it? Most vehicle manufacturers now a days have their recommended torque figure to achieve optimum installation which will be either in the owners manual - if you're lucky - or maybe a Haynes or on line manual or you could just ring up the main dealer.
PS I'm just dying to know, what wrench did you buy? Make and type please, not that I'm nosey, just?
Someone replyd here and also YT video says 22nm for the spark plugs, 8nm for the ignition coil bolts. I'll go with that.

And yes, it is.my first time. I did some small work on my cars and motorcycles but first time for spark plugs.
 
Last edited:

Crossthreaded

Active Member
Apr 16, 2019
546
150
The safest way to remove the coils on these engines is to buy a coil remover tool that has an expanding split system that grabs the lined hole the securing bolt passes down through. I think as said already, if you remove these coils at the recommended service period, you should be able to get them off without any issues - leave them undisturbed for many many years and you might have a problem. VW group suggest that you make sure that the open end of the coil assembly is coated with a suitable paste/grease prior to refitting.
The Ibiza will be going in to AVW soon for it's cam belt to be renewed so it's time to make my mind up about a few things. Should I change the water pump as it's not part of the cam belt drive train. So far I haven't found one VAG source which recommends it as an automatic thing to do, so, as her mileage is pretty low 5.25 years old now with less than 25,000 miles under her wheels, I think I'm going to leave it alone. I think they have to take the pump belt guard off tho install the cam locking tools though so might get them to change the wee synchronous belt if it looks like it could do with it. Going to leave it to them. I also think I'm going to leave the coolant alone as the main dealer says it's good for much longer than the 5 years it's been in there and I don't think this car will be a long term prospect like my old Cordoba tdi was - just too much to potentially go wrong. I will be getting them to do the aircon though. It's working fine but has never had a fluid scrub/recharge since she was new so I'm sure will benefit from that. Lastly the plugs - which you mention here. I've been suffering a bit of a failure of confidence in myself due largely I think to my unfamiliarity with this vehicle. I'd decided to get Allen's lads to pull the plugs, which haven't been disturbed since new, more to just make sure they weren't corroded in place than anything else as they are nowhere near the sort of mileage they should be able to attain. I'd decided to get them to do this because I was "bricking" it over the thought of the coils self destructing on removal. However I've now seen a number of videos showing peoples different solutions to the possible problems and I've also found the "magic" tool which allows a vertical pull to be applied (which seems to be half the "trick" ie, don't pull them squint") https://www.ebay.co.uk/itm/17428993...a=1&pg=2334524&_trksid=p2334524.c100667.m2042 The tool looks affordable and my confidence is considerably boosted so I'm going to give this a try myself. I'll probably just coat them with silicon grease but I believe VAG recommend a specific product. Do you know what it is and what it costs - bet it's only available from the dealers and will cost a small fortune?
 

Crossthreaded

Active Member
Apr 16, 2019
546
150
Someone replyd here and also YT video says 22nm for the spark plugs, 8nm for the ignition coil bolts. I'll go with that.

And yes, it is.my first time. I did some small work on my cars and motorcycles but first time for spark plugs.
Just went and dug out my Haynes manual and it says:
1.0 litre CHYB engine 22 nm
1.0 litre CHZB (my engine) CHZC 25 nm
1.2 litre CBZB engine 25 nm
1.2 litre CJZD CJZC 22 nm
1.4 engines 30 nm

Later on however, in the ignition system section, it says 1.0 and 1.2 litre engines 22 nm and 1,4 litre 25 nm! So i guess you're not going to go far wrong with either 22 or 25 as the difference is almost inconsequential.
By the way it also states the sump plug at 30 nm which is what AVW told me and I've now done mine up to that twice and it's been absolutely fine.

Incidentally, was it you RUM that we discussed reusing sump plugs? My engine has the same sump plug as my son's old 1.9 TDI Fabia used to use and I just reused the one on that many times but it's recommended to replace the plug, with it's captive steel washer, at each oil change on the Ibiza. I really couldn't see the sense in this so a few weeks ago when I did her 5th service (2nd one done by me with first 3 being done my main agent to protect warranty rights) I carefully examined the plug which came out (new one fitted by me last year) and it looked absolutely as new. Of course being a steel washer this isn't a crush washer. Anyway I reused it, tightened it down to 30 nm and it's absolutely fine.

Hope that's helpful folks?
regards Jock
 
  • Like
Reactions: Pentaw1nz

Pentaw1nz

Active Member
Jun 21, 2021
18
3
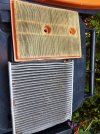
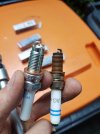
Just finished changing the bosch OEM plugs to NGK, which I torqued on 22nm. If anyone else has other insights, plz let me know. I'll add some pictures for a comparison.
Also changed the pollen filter and air filter.

Pics below are all after 64.000 km.

Thx for the tips and also about telling me that I should put the torque wrench back to 0 after using it !


By the way, the coil plugs came out very easy. I put a tie wrap underneath them to pull them out straight (like the guy in the video). A little warm (not hot) engine can also help withb pulling them out.
Before putting them back in I used a little bit of grease in the side of the coil rubber.
 

Attachments

  • 20210705_175732.jpg
    20210705_175732.jpg
    951.4 KB · Views: 192
  • 20210705_173943.jpg
    20210705_173943.jpg
    393.6 KB · Views: 255
Last edited:

RUM4MO

Active Member
Jun 4, 2008
7,966
1,059
South Scotland
@Crossthreaded , I am/was probably spoilt a bit torque wrenches wise, while the "120lbsft" version I originally swopped with my father did not have a ratchet, the ones we requested at work did, so when some "clever" person decided that they needed to reduce calibration costs, lots of "not frequently used" Britool torque wrenches were scrapped - only to reduce annual calibration cost - I saved a 1/2"sqr drv maybe "120lbsft" ratchet one, one I used every day, and a couple of lower ranges of Britool 3/8"sqr drv, a 1/4"sqr drv and a 1/4" again Britool torque screwdriver. I like the "big" Halfords Prof (Norbar) as its handle is longer so less straining at high torques - these 1/2" sqr drv Britool ones were quite a bit shorter - especially the earlier non ratcheting one.

I have a good mind to report you to the chief burgers of Embra for calling their lovely big new "shopping thing" the St James Centre, but I'll let you off this time!

We went visiting friends through in Kilmaurs yesterday, so a bit of heavy rain here and there on the motorways, and more on the way back. It was sort of sunny all day through West so we sat out in my mate's newly built garden room looking across to Arran - which was free from clouds, then a quick dive around the back roads in his old SAAB 96, it can still run at 60MPH easily, my eyes were nipping a bit by the time the pair of us returned to their house, maybe not surprising for an old car! Then the next classic SAAB 90/99/900 convertible he is sorting up had to get moved back into the garage as it looked like rain was nearby - it needs a lot of work, most of its electric, ie roof and front windows have been sorted, the rear side glasses can't be moved -yet, it needs a lot of welding before looking for an MOT.

Edinburgh daughter and her man have been away down South - Leeds, London, Canterbury, London, Carlisle and only back today so they missed all the nasty rain in Edinburgh. The BBC claimed the Bypass was flooded again this time, I got caught on that when it flooded for the first time, the police forced me to drive through a flood in my beloved 1991 VX Cav GSI 2000 16V 4X4 - then they accepted that that was a mistake and we all had to drive back through the flood, well some of us made it through and back! I think that we got home from South Gyle by 20:00 after leaving work at 16:30, probably so people took even longer, that was a mess, the flat/level section just at the top of the hill beyond Colinton was where the flooding was.
 
  • Like
Reactions: Crossthreaded

RUM4MO

Active Member
Jun 4, 2008
7,966
1,059
South Scotland
@Crossthreaded , sump plug on your engine, so VW Group have moved back to using a sump plug with a captive steel washer, my wife's 2015 1.2TSI Polo has a sump plug and a crushable washer, maybe I mentioned this before, doing it this makes for less waste as the workshop will claim to be replacing the sump plug every time - expect, the money side of things, the small insignificant crush washer cost more than the plug/washer combo!!

Stuff for applying to the lower face of the coil rubber extension, as some of that gets left on the old spark plug, I have noticed that it is yellowish in colour - I too would normally just use silicon grease, but for some reason I bought a tube of "specialist grease" for use where two different metals touch - and it is yellowish, I must look at it to see what else it is used for!
 
  • Like
Reactions: Crossthreaded
Progressive Parts, performance parts and tuning specialists