I followed this procedure (I didn't have the engine running)..
Unzip the file. The final structure should be as follows:
Folder: SEAT_NAV_SSB
Folder: SEAT_PLUS_SSB
File: metainfo2.txt
Copy the two folders and file on an SD card Class 10 8GB (If the slowest car been use, the update can be longer, with Class 10 takes about 40 minutes)
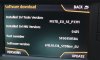
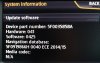
Update method MIB1 5.8 "
1) Use SD 8GB at least and to be Class 10 (much faster)
2) Format the SD card in FAT32
3) Copy the data on the SD card (All folders and TXT file should be at the root of the card)
4) Insert the SD card into the player SD1 glove.
5) Put the car ignition (not start the engine under any circumstances or turning off the Infotainment)
6) Press the Menu button on the Infotainment and hold until you exit the service menu.
7) Select SW Update and click on Update.
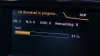
8) Wait for the system to give us a Update Update message and confirm.
9) We connect the diagnosis device (Vagcom,
OBDeleven, etc.) and perform a Scan..
10) Erase all faults.
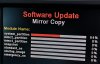
For Step 8 - it goes through several reboots and also gives you a count down of the number of processes it has left to undertake. Some of the reboots were quite slow.
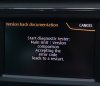
For step 9/10 - I used ODB11 and performed a scan - this highlighted a fault in the information control unit module for the Confirmation of installation change. I followed these steps to update it:
1. Select the information control unit module
2. Adaptations
3. Confirmation of installation change
4. Make a note of this value.
5. Use a hex XOR calculator like the one linked below
http://www.miniwebtool.com/bitwise-calculator/
6. Enter YOUR value for "confirmation of installation change" into input 1 and the value "C9D2" for input 2 and perform XOR function.
7. Go back to "confirmation of installation change" and input the new hexadecimal value you got from the calculator.
I then performed another scan to ensure it had cleared it.

 IMG_20191024_081914.jpg1,005.5 KB · Views: 537