Okay so I installed my EGR delete pipe. A few people asked how to fit it so I thought I'd take a few pics for those who asked and hopefully it might help them!
I've never written a guide or anything before so apologies if I don't explain myself properly. I've circled some photos in Paint to show where the key parts are what i'm talking about.
The guide is simply showing how to remove the EGR valve, whether you want to remove it to clean it or to fit a delete pipe. The kit i'm fitting may be different to darkside or allard delete kit so it may vary when it comes to the gaskets etc.
Remove the engine cover and you should get something like this (great start, if your engine isn't there i'm not really sure what to suggest haha)
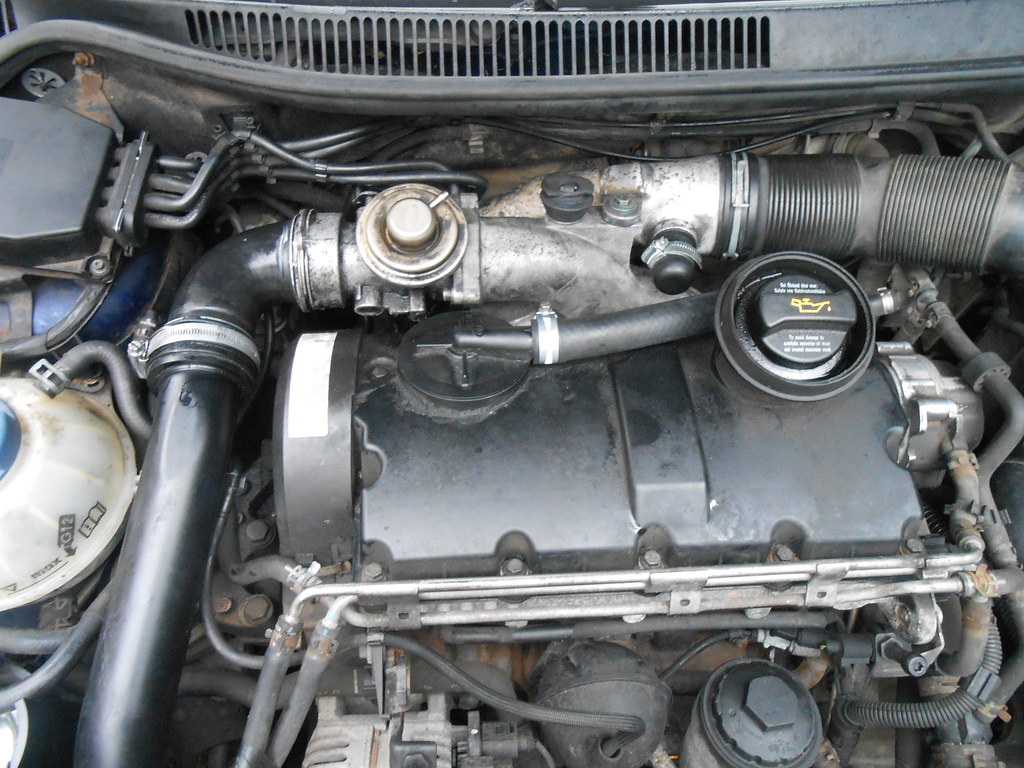
Now the bit we're focusing on is the thing in the top left of the image with the goldy spaceship looking thing on.
Put a screw driver like shown behind the bayonet clip and pull upwards towards the sky, it will open up and you should be able to slide the black 90 degree silcone pipe out of the metal EGR itself.
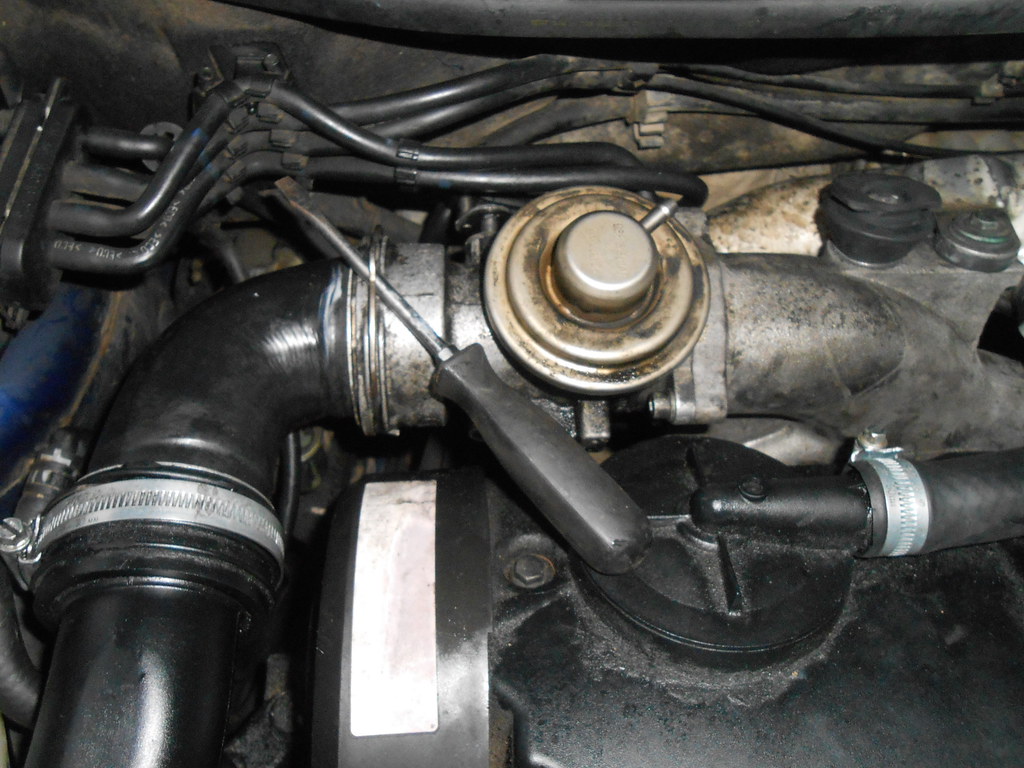
Do the same for the other pipe at the other end of this small 90 degree silicone pipe. On mine I have an extra jubilee clip securing my pipe on because I wanted to make sure mine wasn't leaking any boost at all.
Should now look like this!

Now directly underneath the space ship. An EGR pipe attaches to the EGR itself via two 6mm allen key bolts. You need to remove these as show in the following pics, its pretty tight for room but I found the best way is to get a small allen key and get a ring key spanner on it for leverage and undo.
Circled is the bolt, it is pointing towards the sky and at the very top of the image just out of focus is the space ship looking thing for reference.

The circles display where the bolts are, obviously on the circle at the top it is underneath the EGR. i just put a circle there to show you its rough whereabouts underneath the egr valve.

Okay so now you should have removed two bolts now for the EGR pipe.
The 3 bolts holding the EGR to the inlet manifold can now be removed.
These are in the following locations:


The 3rd bolt is underneath the valve and the circle shows its whereabouts roughly, its a bit fiddly again but you should find it easy enough with a long allen key this time. The bolt is horizontally facing like the other two bolts holding the egr to the inlet manifold. Arrow shows this

I used a ring key spanner on the allen key as shown to get some leverage to undo the bolts.
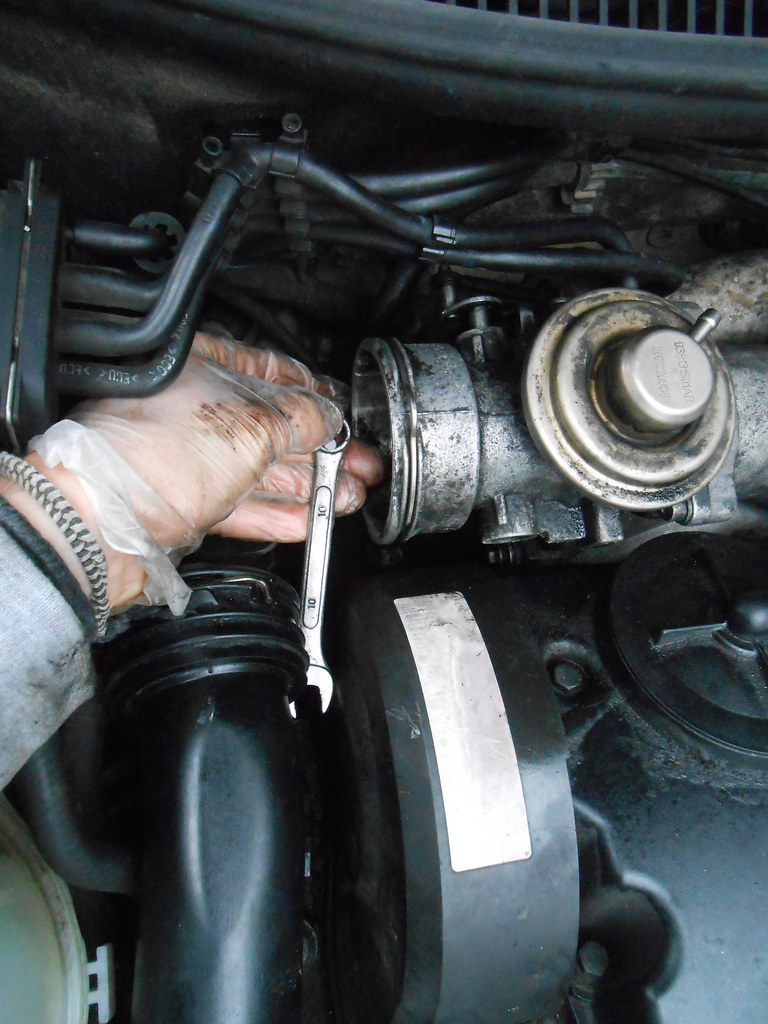
The egr is now loose and can be removed! It will be held on loosely by the vacuum pipes. One of mine is currently blocked up by a m6 bolt for the EGR as I can disable my EGR this way without an EML appearing. Yours should be attached to the nipple on the space ship.

I've highlighted these vac pipes with circles here. Simply pull them off the EGR valve.

Your EGR should look considerably worse than mine, i've recently cleaned mine out. If you're simply cleaning out your EGR valve you can just clean it out now and re isntall by doing the reverse of what i've done up to here but carry on reading if you're fitting the EGR delete pipe!
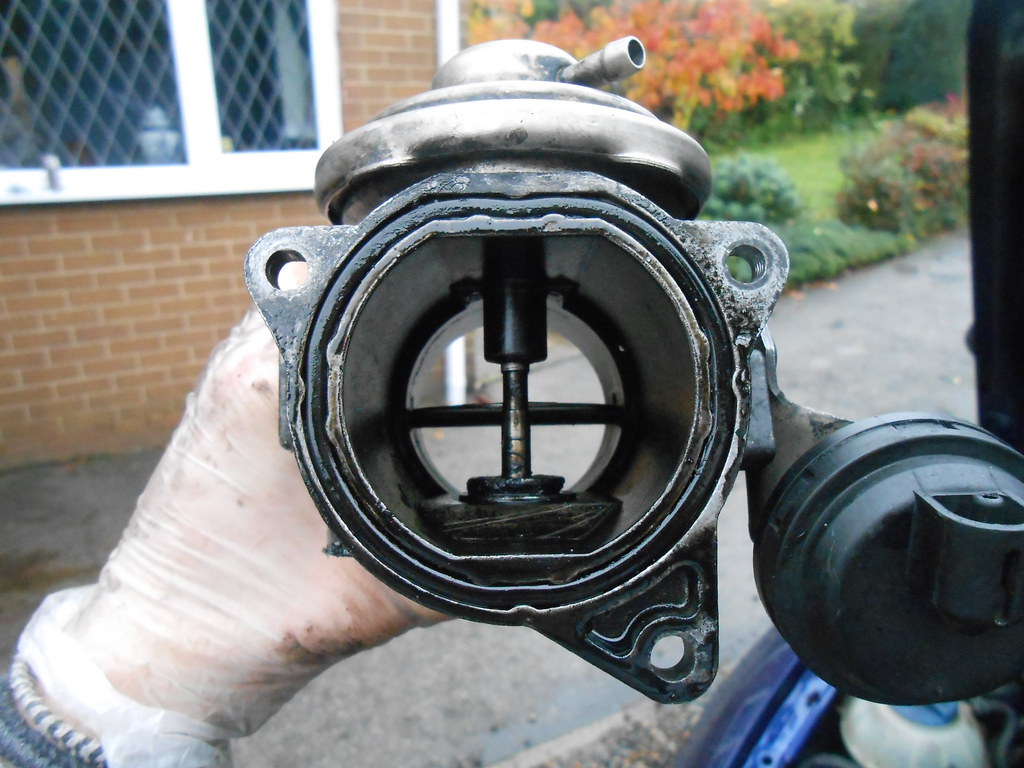
The EGR delete pipe. Mines got a boost nipple for a boost gauge
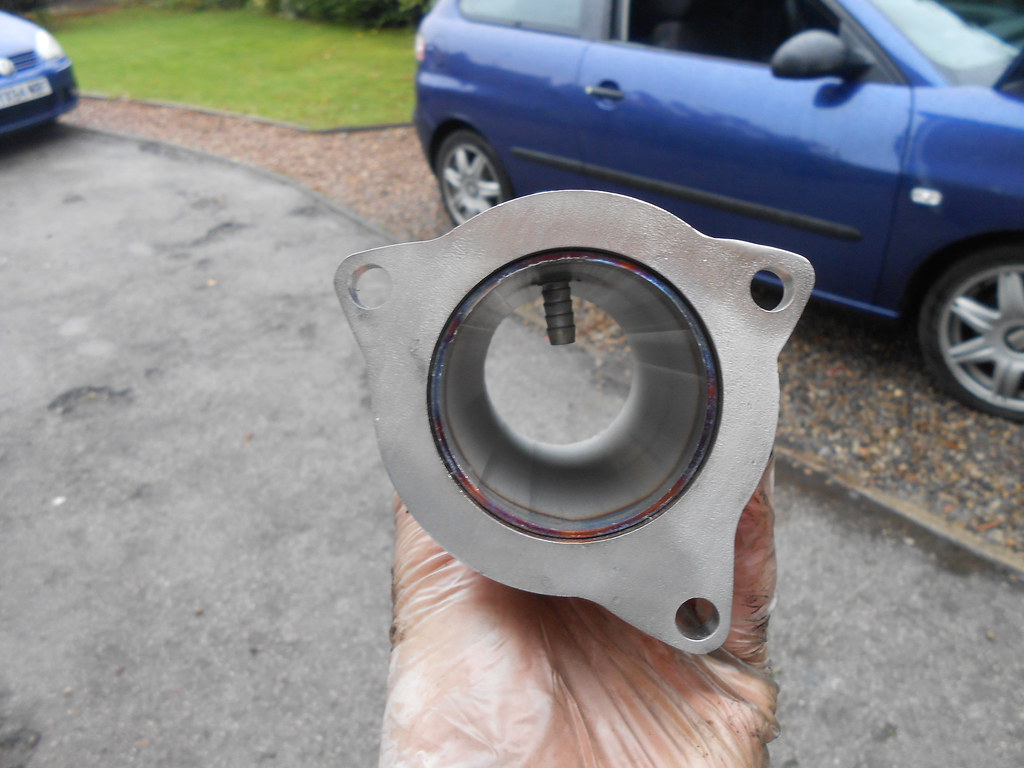
Now you have to remove this pipe that my fingers are on. This is the EGR pipe that transports exhaust gas to the egr valve. This is being removed and a blanking plate is going on the exhaust manifold instead.

Remove the two clips holding the air intake pipe on. Mole grips I find are great for this as it holds them in place whilst you slide them along the plastic pipe. Remove the pipe.

Okay so with this removed, have a look in the space you've just created and you should be able to see a goldy looking pipe connecting to the exhaust manifold. this is the egr pipe aforementioned that is going to be removed.
Circled are the two bolts that need to be removed.

They will be on TIGHT! Exhaust gas is hot and warps them slightly so be careful removing them. Lots of WD40 required.
Mine were 12mm but test yours before as some engines may differ.
This is a better pic showing the two botls to be removed

Remove them and give the pipe a wiggle and it will come out like this

Now to fit the blanking plate, put the gasket under the metal plate and fit where the pipe just went.

This picture shows the blanking plate being fitted to the exhaust manifold

Now put the rubber gasket on the EGR delete pipe as shown in this pic

Offer the pipe and gasket up to your inlet and stick the 3 bolts in. Do them all up finger tight, do not torque one up fully then the other then the other!

You now need to remove the original coupler from the pipework, as you have a new egr delete pipe that doesn't use the shoddy bayonet clips. I used an angle grinder and cut straight through it.
In hind sight I went too far and should have taken it steady as I cut straight through the rubber pipe which didn't give me much room to play with when fitting it back on the egr delete pipe


But it went on perfectly as shown.
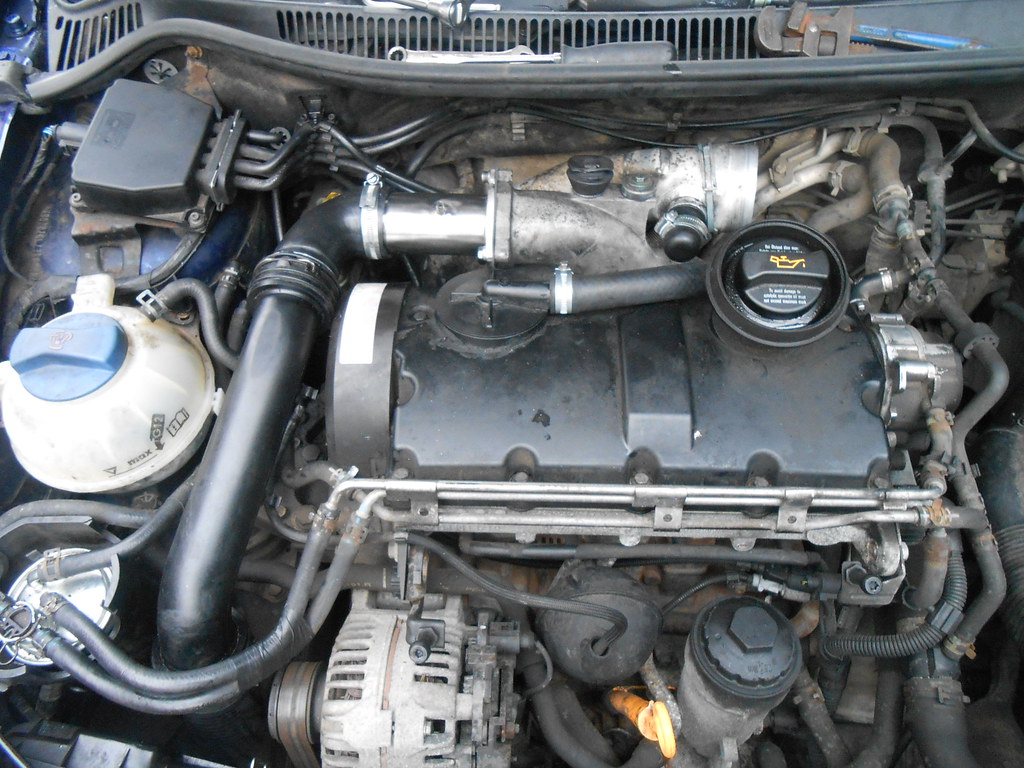
I then blocked up the vacuum pipes. One is larger than the other so I used an m6 and an m5 bolt. The smaller one for the anti shudder valve.

That's it really! Hope this helps anyone
I've never written a guide or anything before so apologies if I don't explain myself properly. I've circled some photos in Paint to show where the key parts are what i'm talking about.
The guide is simply showing how to remove the EGR valve, whether you want to remove it to clean it or to fit a delete pipe. The kit i'm fitting may be different to darkside or allard delete kit so it may vary when it comes to the gaskets etc.
Remove the engine cover and you should get something like this (great start, if your engine isn't there i'm not really sure what to suggest haha)

Now the bit we're focusing on is the thing in the top left of the image with the goldy spaceship looking thing on.
Put a screw driver like shown behind the bayonet clip and pull upwards towards the sky, it will open up and you should be able to slide the black 90 degree silcone pipe out of the metal EGR itself.

Do the same for the other pipe at the other end of this small 90 degree silicone pipe. On mine I have an extra jubilee clip securing my pipe on because I wanted to make sure mine wasn't leaking any boost at all.
Should now look like this!

Now directly underneath the space ship. An EGR pipe attaches to the EGR itself via two 6mm allen key bolts. You need to remove these as show in the following pics, its pretty tight for room but I found the best way is to get a small allen key and get a ring key spanner on it for leverage and undo.
Circled is the bolt, it is pointing towards the sky and at the very top of the image just out of focus is the space ship looking thing for reference.

The circles display where the bolts are, obviously on the circle at the top it is underneath the EGR. i just put a circle there to show you its rough whereabouts underneath the egr valve.

Okay so now you should have removed two bolts now for the EGR pipe.
The 3 bolts holding the EGR to the inlet manifold can now be removed.
These are in the following locations:


The 3rd bolt is underneath the valve and the circle shows its whereabouts roughly, its a bit fiddly again but you should find it easy enough with a long allen key this time. The bolt is horizontally facing like the other two bolts holding the egr to the inlet manifold. Arrow shows this

I used a ring key spanner on the allen key as shown to get some leverage to undo the bolts.

The egr is now loose and can be removed! It will be held on loosely by the vacuum pipes. One of mine is currently blocked up by a m6 bolt for the EGR as I can disable my EGR this way without an EML appearing. Yours should be attached to the nipple on the space ship.

I've highlighted these vac pipes with circles here. Simply pull them off the EGR valve.

Your EGR should look considerably worse than mine, i've recently cleaned mine out. If you're simply cleaning out your EGR valve you can just clean it out now and re isntall by doing the reverse of what i've done up to here but carry on reading if you're fitting the EGR delete pipe!

The EGR delete pipe. Mines got a boost nipple for a boost gauge

Now you have to remove this pipe that my fingers are on. This is the EGR pipe that transports exhaust gas to the egr valve. This is being removed and a blanking plate is going on the exhaust manifold instead.

Remove the two clips holding the air intake pipe on. Mole grips I find are great for this as it holds them in place whilst you slide them along the plastic pipe. Remove the pipe.

Okay so with this removed, have a look in the space you've just created and you should be able to see a goldy looking pipe connecting to the exhaust manifold. this is the egr pipe aforementioned that is going to be removed.
Circled are the two bolts that need to be removed.

They will be on TIGHT! Exhaust gas is hot and warps them slightly so be careful removing them. Lots of WD40 required.
Mine were 12mm but test yours before as some engines may differ.
This is a better pic showing the two botls to be removed

Remove them and give the pipe a wiggle and it will come out like this

Now to fit the blanking plate, put the gasket under the metal plate and fit where the pipe just went.

This picture shows the blanking plate being fitted to the exhaust manifold

Now put the rubber gasket on the EGR delete pipe as shown in this pic

Offer the pipe and gasket up to your inlet and stick the 3 bolts in. Do them all up finger tight, do not torque one up fully then the other then the other!

You now need to remove the original coupler from the pipework, as you have a new egr delete pipe that doesn't use the shoddy bayonet clips. I used an angle grinder and cut straight through it.
In hind sight I went too far and should have taken it steady as I cut straight through the rubber pipe which didn't give me much room to play with when fitting it back on the egr delete pipe


But it went on perfectly as shown.

I then blocked up the vacuum pipes. One is larger than the other so I used an m6 and an m5 bolt. The smaller one for the anti shudder valve.

That's it really! Hope this helps anyone


