Hello here the document for the solution of the problem P27F500. It is in russian but I have traslate it:
Gear Selector Repair OCTAVIA A8 / Event P27F500
This instruction applies when the following records are present in the transmission control unit (TCU) event recorder during the initial diagnosis:
Repair Instructions
Further Steps
Work Execution Times
Recommendations for the Use of Protective Grease for Contacts
Gear Selector Repair OCTAVIA A8 / Event P27F500
This instruction applies when the following records are present in the transmission control unit (TCU) event recorder during the initial diagnosis:
- P27F500: Selector block solenoid 1 is stuck in the open position
- P271100: Invalid gear shifting
- P07E400: Park position not engaging
- P07E600: Park position locking
- P288A00: Parking lock actuator - short to positive
- P288B00: Parking lock actuator - invalid signal
- P288900: Parking lock actuator - short to ground
Repair Instructions
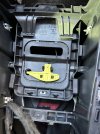
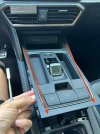
- Remove the selector cover with the selector lever -EX2- (Pos. 1 in the image) according to the ESLA Pro repair manual.
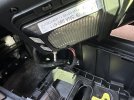
- Remove the solenoid from the selector cover. To do this, insert a hook -3438- under the solenoid's metal plate above the connector in the direction indicated by arrow -1- in the photo. Then, pull the hook up and, alternating the movement to the right and left, gradually pull the solenoid up (according to arrow -2-) from the selector cover.
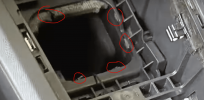
- Using a needle of the appropriate size, bend the contacts until full contact is achieved. Check that the contact tabs are not deformed.
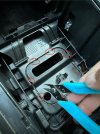
- Clean the solenoid contacts and the corresponding pins in the selector body with a contact cleaner.
- Apply protective grease to the solenoid connector contacts. See the recommendations for grease use at the end of the document.
Further Steps
- Create two loops about 70 mm on the side with two 2.5*200 mm plastic ties (see photo).
- Insert the tie loops under the side latches of the solenoid on the selector cover (see photo).
- Degrease the external side surfaces of the solenoid and the inner surface of its housing, as well as the outer sides of the solenoid latches in the cover.
- Apply two points of polyurethane adhesive for bonding glass or D_511500A2 adhesive in the lower corners of each side of the solenoid (4 points in total). Diameter of the points 4-5 mm, height 4-5 mm.
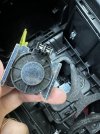
- Carefully install the solenoid into the selector cover. Make sure the latches on the body are secured.
- Pass a third tie through the loops of the two previously installed ties and close the lock (see photo). The lock of the central tie should face the direction of the vehicle's movement.
- Gradually tighten the side ties and adjust the position of all three ties to achieve the following result:
- The central tie must wrap both solenoid latches.
- The side ties prevent the central one from slipping off the latches. The locks of the side ties should be just below the upper edge of the latch.
- Carefully tighten the central tie to further tighten the solenoid latches. Do this gradually, in several steps, checking the correct position of the tie on the latches. If necessary, adjust (position and tension) the two side ties and the central one. Do not apply excessive force during tightening to avoid breaking the tie or causing it to slip off the latches.
- Cut off the excess tie, leaving 3-5 mm after the lock.
- Recommendation: To practice tie installation, it is recommended to perform steps 6-13 without applying adhesive (step 9) on the solenoid. Once practiced, repeat steps 6-13 with adhesive application.
- Reassemble in reverse order.
- Wait at least 2 hours for the adhesive to cure.
- Clear the recorded events from all control units. Perform a test drive in all modes. Stop at least 10 times and engage the park position.
Work Execution Times
- 15000000: Guided fault finding ZE according to protocol
- 37121900: Dismantling and reassembling the selector lever cover - 20 ZE
- 37031999: Electrical system repair - 50 ZE
Recommendations for the Use of Protective Grease for Contacts
- It is recommended to use Molykote HSC Plus paste.
- Available in various sizes (100 g, 20 ml, 10 ml)
- Molykote HSC Plus is also available under the trade name ELP Imaging Premium (packaged in 10 ml syringes).
- If purchasing grease in tubes (100 g) or jars (20 ml), it is recommended to transfer it to a 10 ml syringe for ease of use.
- Apply the grease directly to the contacts in the solenoid connector. Avoid applying excessive amounts of grease.
- The grease consumption is about 0.1 - 0.2 ml per car.