
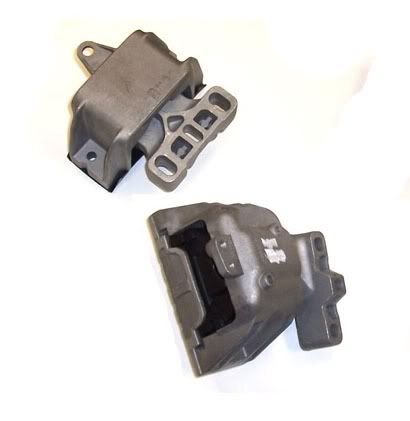
Well guys got uprated engine mounts from Issam (INA Engineering, has his own section now in the sponsors bit) through a GB that I arranged and with the help of dsrr and Issam things went well and all seem happy.
Anyway.....
I have never fitted engine mounts before so armed with a knowledgeable mate and a copy of elsawin and a boot full of tools we cracked on.
We had a pile of jobs to do, so didn't get pictures. (these will be uploaded as I can find them or if someone can donate them to the cause)
So due to the list of jobs needing doing we decided that if we got the transmission side done we'd be happy. This seemed to be the easier job to do so would hopefully give us some confidence for the engine side.

I have a BMC CDA and a strutt brace fitted so this guide will be different for people without these mods etc. If you don't have a strutt brace its a bit easier")
So first job was to get to the mount, this involved removing my induction kit (as mentioned above). This is only secured with one bolt to the passengers side turret, this was taken off and bolt and nut made back up to mounting brace so as not to lose it
Next the induction kit is made up to the MAF with two self tapping screws. As I was cleaning and re-oiling this, this connection was broken, if you not re-oiling/cleaning yours ommit this step.
Next the TIP jubilee clip was slackened to allow the connection between this and the MAF to be broken. NOTE the MAF is a sensitive piece of electronics (that cost about £100, this should be treated very carefully and kept as clean as possible. Also you really don't want anything going down the TIP and that would get you into a whole world of ****. I used freezer bags with sellotape to cover the MAF ends and TIP end, each to their own on this.
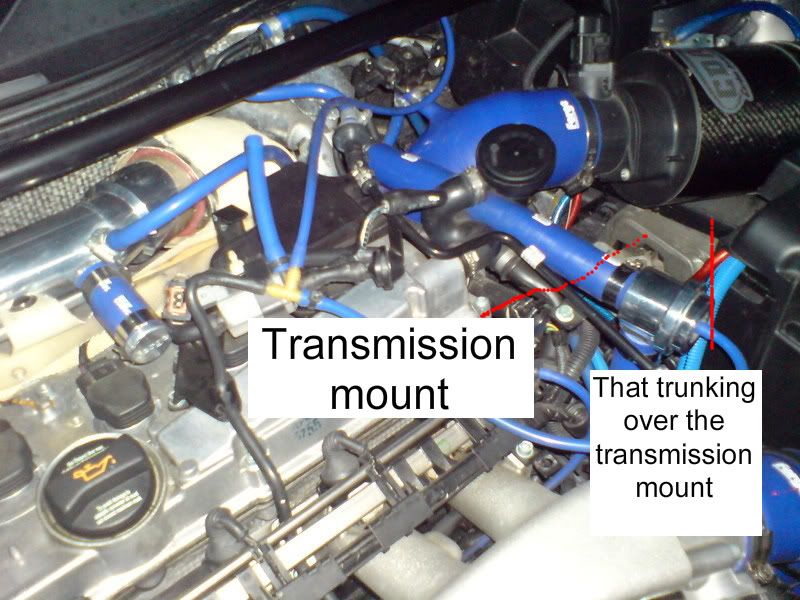
When this is removed you'll see an 'S' shaped piece of trunking carrying electric wires from below the battery to above the scuttle panel. #This is where you'll be glad you don't have a strutt brace#. The strutt brace fits very tightly over the top of this trucking and makes the lid of the trunking impossible to remove.
Anyway as I have the strutt brace the best I could manage was to manouver the lid of the trunking into the positions I needed it in. If you don't have the strutt brace the trunking lid will come off totally and make life a little easier.
The reason for needing this trunking out of the way is that it sits ontop of the transmission mount bolts. BUT clever little Juan had thought of this little problem and put holes in the bottom of the trunking to allow you to get a socket through to slacken/tighten these bolts, clever little Spaniard
So with access to these bolts next you need to support the engine, ideally you'll have an engine hoist, we had a trolley jack and a piece of wood which worked perfectly. The piece of wood was placed ontop of the trolley jacking arm and jacked up under the gearbox, there is an obvious place for this. This was jacked up to just support the weight of the gearbox and engine (you'll notice a slight rise in the engine when jacking, this is when to stop). This takes the tension off of the bolts in the mounts and allows this to come out very easily. This is THEE key step to a successful job, too much tension either way and you risk stripping the threads. This should be obvious as either the gear box will start dropping as you back off the bolts or the mount will rise as your backing off the bolts.
Anyway we had it just right, so this allowed us to back off the car chassis side three bolts, can't remember the sizes but all metric, think 8mm and 6mm. When these were backed out and the gear box side was backed off the mount was free (ish).
Yup that feckin trunking again!!
The trunking is quite tighly fitted over the top of the mount so not allowing much movement and due to the gearbox sitting higher than the chassis it cannot just slide out. This is where using a jack under the gearbox came in handy, what we did was to lower the gearbox enough to allow the old mount to slip out and the new one to slip in.
With the gearbox still lowered the mount was fitted to the chassis side and torqued (NOTE for the guys who were part of the GB, we didn't get washers with the bolts and the bolts that come off are ones with a built in washer on the head. For the two bolts that hold the mount to the gear box washers will be needed to fit this adequetly). Next the gearbox was raised to the mount, the bolts tightened, then the gearbox raised up hard against the mount. The mount has to sit flush/paralell against the gearbox mounting point, this is very important.
Once all the bolts are torqued thats this one done, see easy
All you need to do next is to put all the bits back on that you took off to get into the mount.
I hate to have to type this but it seems that Britian is changing to be a little America, so if you damage you car in anyway whilst following this guide or carrying out this job I take no responcibility, none!!
I'll get some picture for this guide as Dave will complain if I don't, lol
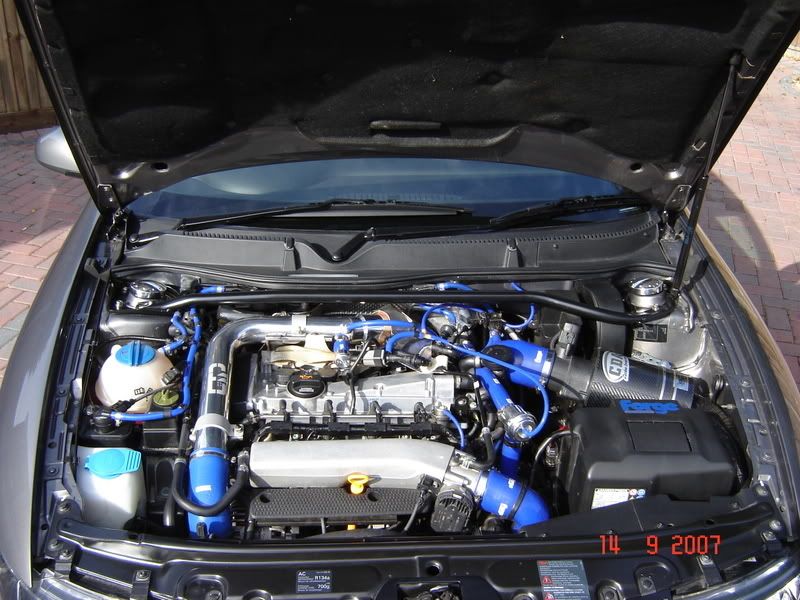
Massive thanks to Richybigman for allowing me to use his engine bay pictures, his engine by is very like mine only a bit cleaner
Anyway.....
I have never fitted engine mounts before so armed with a knowledgeable mate and a copy of elsawin and a boot full of tools we cracked on.
We had a pile of jobs to do, so didn't get pictures. (these will be uploaded as I can find them or if someone can donate them to the cause)
So due to the list of jobs needing doing we decided that if we got the transmission side done we'd be happy. This seemed to be the easier job to do so would hopefully give us some confidence for the engine side.
I have a BMC CDA and a strutt brace fitted so this guide will be different for people without these mods etc. If you don't have a strutt brace its a bit easier
So first job was to get to the mount, this involved removing my induction kit (as mentioned above). This is only secured with one bolt to the passengers side turret, this was taken off and bolt and nut made back up to mounting brace so as not to lose it
Next the induction kit is made up to the MAF with two self tapping screws. As I was cleaning and re-oiling this, this connection was broken, if you not re-oiling/cleaning yours ommit this step.
Next the TIP jubilee clip was slackened to allow the connection between this and the MAF to be broken. NOTE the MAF is a sensitive piece of electronics (that cost about £100, this should be treated very carefully and kept as clean as possible. Also you really don't want anything going down the TIP and that would get you into a whole world of ****. I used freezer bags with sellotape to cover the MAF ends and TIP end, each to their own on this.
When this is removed you'll see an 'S' shaped piece of trunking carrying electric wires from below the battery to above the scuttle panel. #This is where you'll be glad you don't have a strutt brace#. The strutt brace fits very tightly over the top of this trucking and makes the lid of the trunking impossible to remove.
Anyway as I have the strutt brace the best I could manage was to manouver the lid of the trunking into the positions I needed it in. If you don't have the strutt brace the trunking lid will come off totally and make life a little easier.
The reason for needing this trunking out of the way is that it sits ontop of the transmission mount bolts. BUT clever little Juan had thought of this little problem and put holes in the bottom of the trunking to allow you to get a socket through to slacken/tighten these bolts, clever little Spaniard
So with access to these bolts next you need to support the engine, ideally you'll have an engine hoist, we had a trolley jack and a piece of wood which worked perfectly. The piece of wood was placed ontop of the trolley jacking arm and jacked up under the gearbox, there is an obvious place for this. This was jacked up to just support the weight of the gearbox and engine (you'll notice a slight rise in the engine when jacking, this is when to stop). This takes the tension off of the bolts in the mounts and allows this to come out very easily. This is THEE key step to a successful job, too much tension either way and you risk stripping the threads. This should be obvious as either the gear box will start dropping as you back off the bolts or the mount will rise as your backing off the bolts.
Anyway we had it just right, so this allowed us to back off the car chassis side three bolts, can't remember the sizes but all metric, think 8mm and 6mm. When these were backed out and the gear box side was backed off the mount was free (ish).
Yup that feckin trunking again!!
The trunking is quite tighly fitted over the top of the mount so not allowing much movement and due to the gearbox sitting higher than the chassis it cannot just slide out. This is where using a jack under the gearbox came in handy, what we did was to lower the gearbox enough to allow the old mount to slip out and the new one to slip in.
With the gearbox still lowered the mount was fitted to the chassis side and torqued (NOTE for the guys who were part of the GB, we didn't get washers with the bolts and the bolts that come off are ones with a built in washer on the head. For the two bolts that hold the mount to the gear box washers will be needed to fit this adequetly). Next the gearbox was raised to the mount, the bolts tightened, then the gearbox raised up hard against the mount. The mount has to sit flush/paralell against the gearbox mounting point, this is very important.
Once all the bolts are torqued thats this one done, see easy
All you need to do next is to put all the bits back on that you took off to get into the mount.
I hate to have to type this but it seems that Britian is changing to be a little America, so if you damage you car in anyway whilst following this guide or carrying out this job I take no responcibility, none!!
I'll get some picture for this guide as Dave will complain if I don't, lol
Massive thanks to Richybigman for allowing me to use his engine bay pictures, his engine by is very like mine only a bit cleaner
Last edited:
