Right guys and mechanically minded girls, I've been having a bit of a problem with my coil packs on my 1.4 02 ibiza. Two in a week to be precise. ![Furious [:@] [:@]](/forums/styles/seatcupra/oldforumsmileys/furious.gif)
First time happened coming down the motorway and had no choice but to go straight to Morrisons Stirling and get it fixed.
All in all cost me about £130 (including hooking it up to the computer etc).
Second one went and i thought, "Hey, cant be that hard can it?"....
** As usual, I, nor the site are responsible if you damage your car or
bodily self due to the information included here!**
Anyway if your car starts to run on three or four cylinders suddenly and the ECU light comes on (flashing, looks like a deformed tap)
chances are its a coil pack away.
But fear not! Heres how to save the money and do it yourself!
Step 1
Get into a SEAT dealership and buy the coil pack. Should be around £30ish for one.
Find a nice quiet spot to work on your wounded beast, and
preferably out the rain and wind etc.
You will need:- A Torx Set (fiver from Halfrauds)
Big Screwdriver
Flat bladed implement (kitchen knife or shim plate)
8mm spanner
Rubber or rawhide mallet
Step 2
If you have just been driving it, go for a cup of tea and let it cool off for a bit in case you burn yourself
on the manifold cover. Also, make sure the ignition is off as these things (coil pack) generate high voltage and could be
a bit painful if touched when energised.
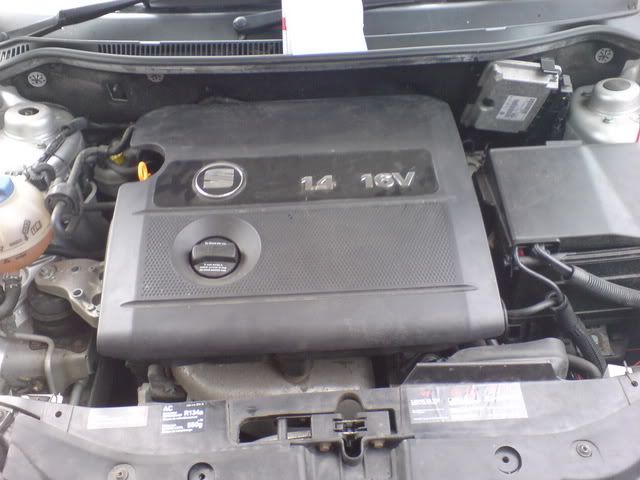
Pop the bonnet and take the engine cover off.
(just yank it upwards quite hard at each corner)
Remover breather hose on right hand side and put cover somewhere safe.
You can see the plug like things used to pop the engine cover on with.
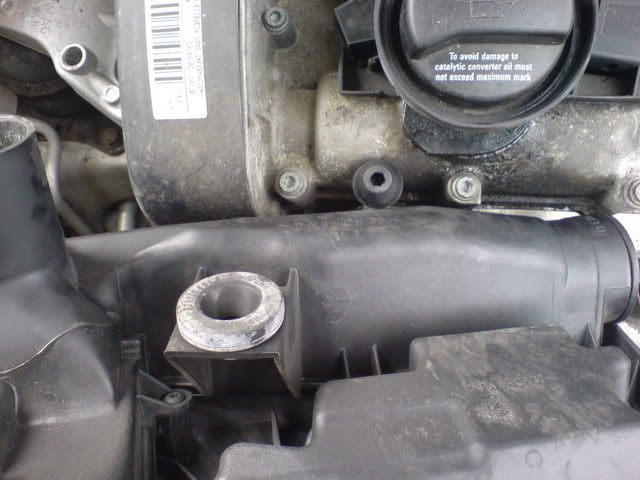
On top of the cylinder there are four strange shaped things sitting at funny angles.
These are the blighters to remove. If you are replacing all of them, undo the two Torx screws with your driver and gently pry the whole assembley upwards.
The top section should lift the probe section out of the holes with a pop. You can also twist off the oil filler cap assembly to get a bit more room.
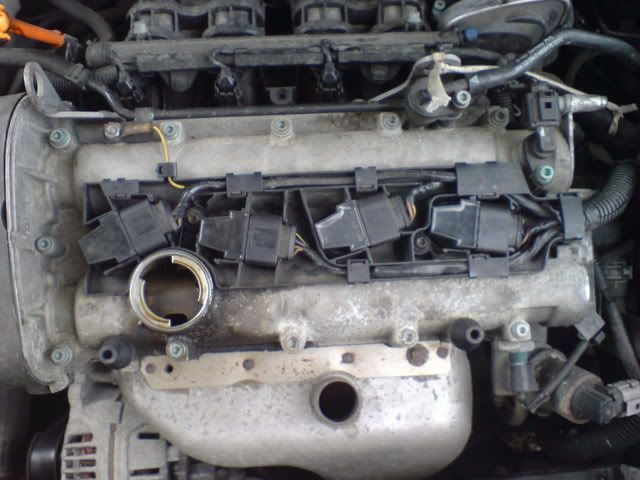
If like me you only need to replace one, then take them out one at a time and run the engine to find out which one is faulty.
(Ie; if you take out No1 cylinder and it runs worse than before its that one thats away.)
Make sure to remove all body parts from the engine bay when starting to prevent any accidents.
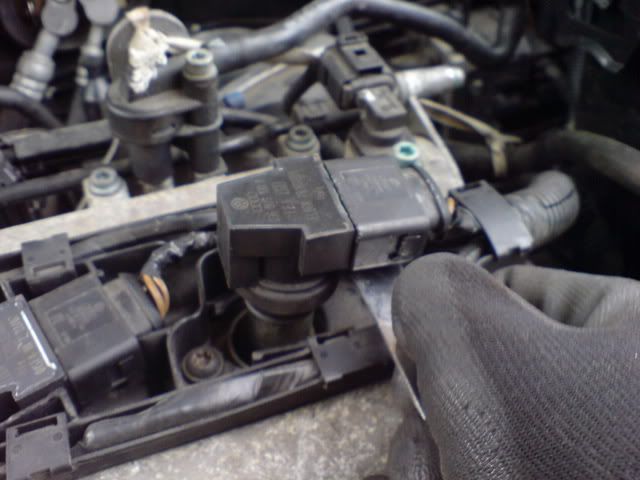
To remove one just put your high precision flat bladed instrument (knife)
under the box at an angle and carefully pry it up.
It should come out with a pop. Then disconnect the plug going to it with your knife.
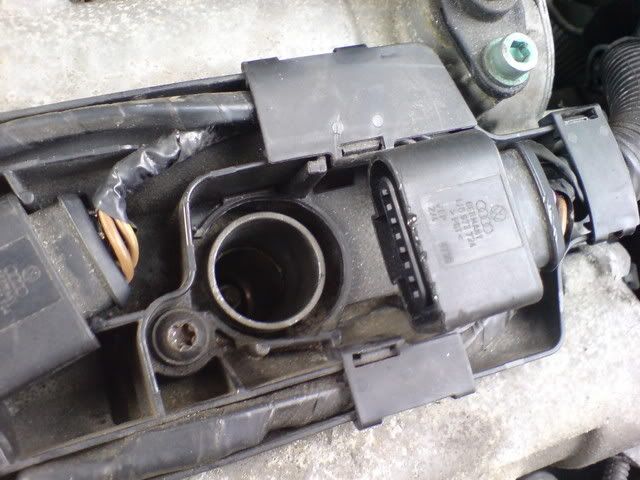
Do the same with all of them one at a time to figure out which one is borked as above. Then replace with the shiny new one you got from the nice people at SEAT.
Put the pack in about halfway into the hole, then plug the connector back in. Align the box with the plastic holder tray and push down slowy but firmly.
It should drop into place rather nicely and get firm at the very end.
Get your rubber mallet and give it a VERY gentle tap if you cannot get it to go in properly.
Remember to retighten the Torx screws if you removed them.
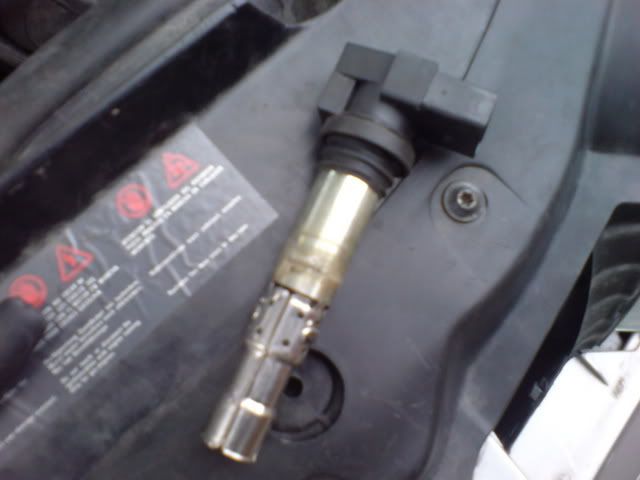
Bin the offending item.
Step 3
Now your vehicle should be running slightly better than before, if a bit lumpy at idle. Dont worry as we shall sort this later.
Put the engine cover back on and remember to reconnect the breather hose.
Now, disconnect the battery using the 8mm spanner and go and watch a film or something for half an hour. The lack of electrickery will reset the ECU and make it run sweet as a nut when you go to restart it.
After waiting about an hour, go and reconnect the battery and start the car back up, and let it idle for about ten minutes till it sorts itself out. After then the ECU light on the dash will have went off and the car will be back to its former glory.
Job Done!
Marvel at your engineering skills!
Hope this helps someone!
Gav![Cool [B)] [B)]](/forums/styles/seatcupra/oldforumsmileys/shades.gif)
![Furious [:@] [:@]](/forums/styles/seatcupra/oldforumsmileys/furious.gif)
First time happened coming down the motorway and had no choice but to go straight to Morrisons Stirling and get it fixed.
All in all cost me about £130 (including hooking it up to the computer etc).
Second one went and i thought, "Hey, cant be that hard can it?"....
** As usual, I, nor the site are responsible if you damage your car or
bodily self due to the information included here!**
Anyway if your car starts to run on three or four cylinders suddenly and the ECU light comes on (flashing, looks like a deformed tap)
chances are its a coil pack away.
But fear not! Heres how to save the money and do it yourself!
Step 1
Get into a SEAT dealership and buy the coil pack. Should be around £30ish for one.
Find a nice quiet spot to work on your wounded beast, and
preferably out the rain and wind etc.
You will need:- A Torx Set (fiver from Halfrauds)
Big Screwdriver
Flat bladed implement (kitchen knife or shim plate)
8mm spanner
Rubber or rawhide mallet
Step 2
If you have just been driving it, go for a cup of tea and let it cool off for a bit in case you burn yourself
on the manifold cover. Also, make sure the ignition is off as these things (coil pack) generate high voltage and could be
a bit painful if touched when energised.

Pop the bonnet and take the engine cover off.
(just yank it upwards quite hard at each corner)
Remover breather hose on right hand side and put cover somewhere safe.
You can see the plug like things used to pop the engine cover on with.

On top of the cylinder there are four strange shaped things sitting at funny angles.
These are the blighters to remove. If you are replacing all of them, undo the two Torx screws with your driver and gently pry the whole assembley upwards.
The top section should lift the probe section out of the holes with a pop. You can also twist off the oil filler cap assembly to get a bit more room.

If like me you only need to replace one, then take them out one at a time and run the engine to find out which one is faulty.
(Ie; if you take out No1 cylinder and it runs worse than before its that one thats away.)
Make sure to remove all body parts from the engine bay when starting to prevent any accidents.

To remove one just put your high precision flat bladed instrument (knife)
under the box at an angle and carefully pry it up.
It should come out with a pop. Then disconnect the plug going to it with your knife.

Do the same with all of them one at a time to figure out which one is borked as above. Then replace with the shiny new one you got from the nice people at SEAT.
Put the pack in about halfway into the hole, then plug the connector back in. Align the box with the plastic holder tray and push down slowy but firmly.
It should drop into place rather nicely and get firm at the very end.
Get your rubber mallet and give it a VERY gentle tap if you cannot get it to go in properly.
Remember to retighten the Torx screws if you removed them.

Bin the offending item.
Step 3
Now your vehicle should be running slightly better than before, if a bit lumpy at idle. Dont worry as we shall sort this later.
Put the engine cover back on and remember to reconnect the breather hose.
Now, disconnect the battery using the 8mm spanner and go and watch a film or something for half an hour. The lack of electrickery will reset the ECU and make it run sweet as a nut when you go to restart it.
After waiting about an hour, go and reconnect the battery and start the car back up, and let it idle for about ten minutes till it sorts itself out. After then the ECU light on the dash will have went off and the car will be back to its former glory.
Job Done!
Marvel at your engineering skills!

Hope this helps someone!
Gav
![Cool [B)] [B)]](/forums/styles/seatcupra/oldforumsmileys/shades.gif)
Last edited:


