-
Hey Guest one of our sponsors Progressive Parts is running Black Friday and Cyber Monday offers - more details here
My LCR Since '05 with Static+ Front Air Lift - Project Gone to a New Home.
- Thread starter James23Parkin
- Start date
You are using an out of date browser. It may not display this or other websites correctly.
You should upgrade or use an alternative browser.
You should upgrade or use an alternative browser.
looks like its meant to be like that!!!
great job
Very nice mate![Cool [B)] [B)]](/forums/styles/seatcupra/oldforumsmileys/shades.gif)
That looks awesome!
Nice one.
cracking job again!
Thanks very much for the comments guys.
I today set about fitting my coilovers and repainting the hubs and brake callipers. Those who have read my thread previously will know that I’ve had my coilovers for a couple of years now but had never got round to fitting them; mainly because I live in the sticks and the roads are really bumpy.
As this is something that I want to have ago at myself, I’ve collected all the parts needed to refurbish the wishbones etc. (Superpro Polybushes as pictured in a previous post). I haven’t managed to get a strut spreader yet so I’ve completed the rear, with the hope that I can complete the front in the next couple of weeks, time permitting.
I started out by sitting the rear of the car on axle stands and removing the wheels. I washed the wheel wells with hot soapy water (fairy liquid) to remove all the dirt. Once dry, I sprayed the brake with brake cleaner, and left them to soak. Next came the grubby work, in removing the old shocks and springs. With both wheels up in the air, the springs were easy to remove although I did have to use a spring compressor to jiggle them out. Using a 16mm spanner and some penetrating fluid I removed the nut and bolt holding the bottom of the shock to the beam; there’s two 16mm nuts holding the top of the shock to the body.
Frustratingly, the KW Competition rear shocks that I have didn’t marry to the top bush, so I’ll have to buy some that fit, so for the time being, I fitted Pi shocks that I had in the shed. The springs sat fine and I adjusted the height going by thread count (4th from bottom as a starting point).
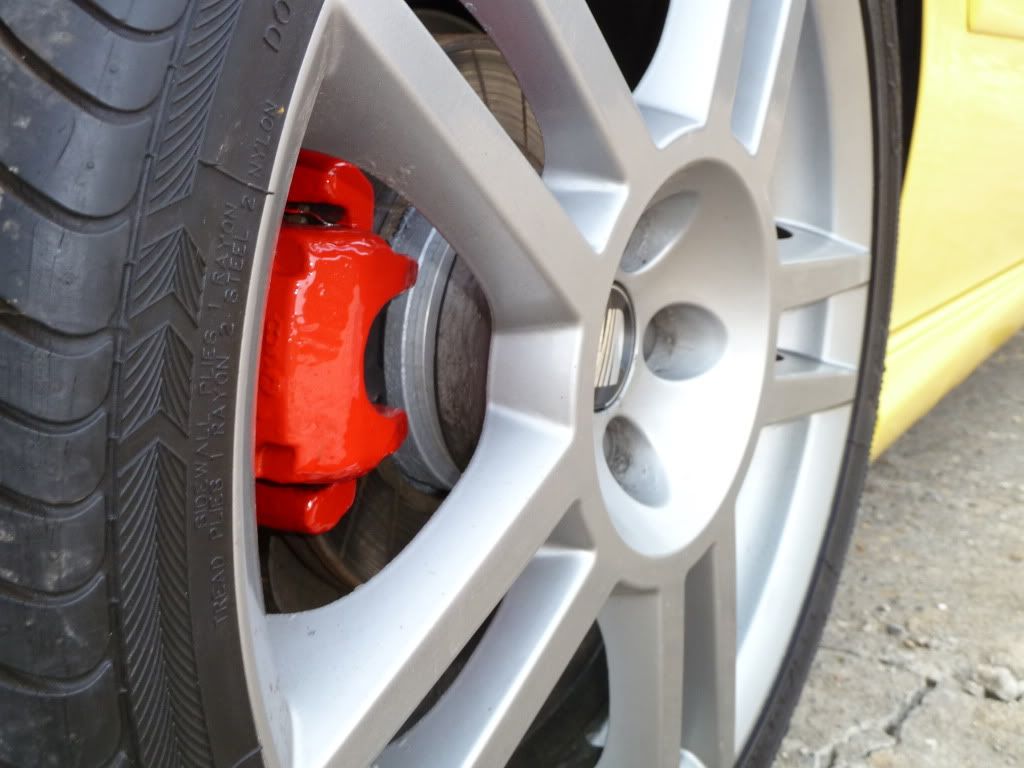
With the suspension all on, I wire brushed the brakes and hubs. For the hubs, I used a spray tin of Hammerite Smooth silver. I was a little unsure of the colour choice at first (thought about using black) but the colour is just right against the spacers. I sanded the brake surrounds and painted them black, with a lacquer finish. The callipers were sanded down, masked up and I used Hammerite Smooth red (which I’ll be using for the front); two coats of lacquer were applied after a few hours.
Here are the pictures.
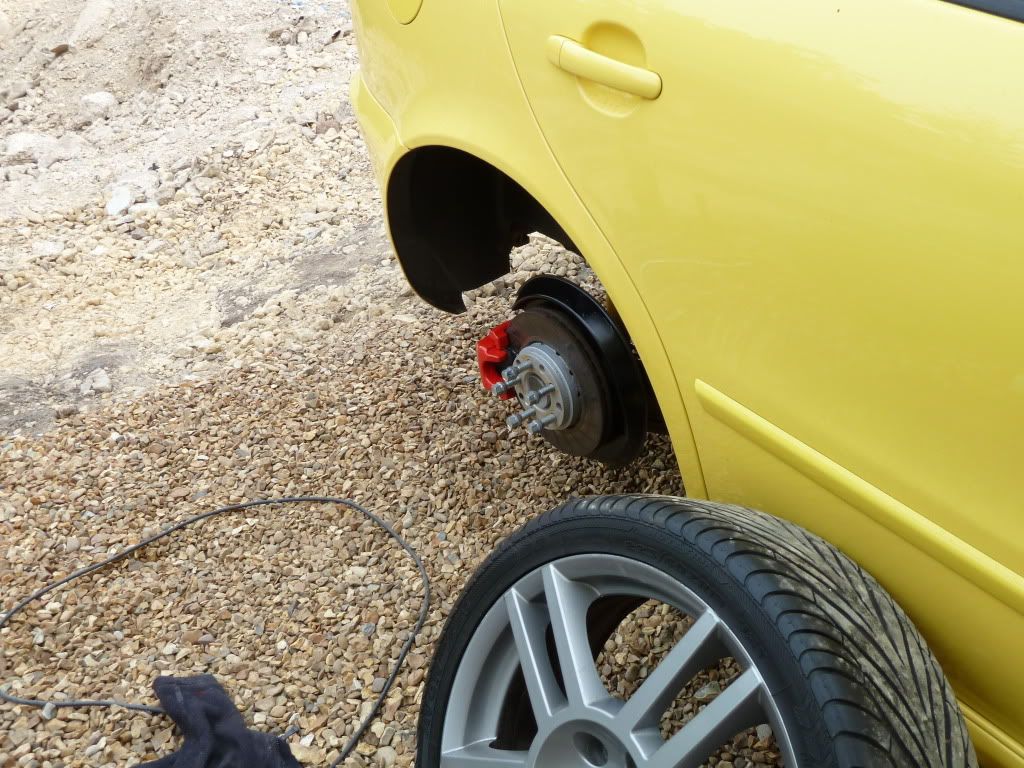
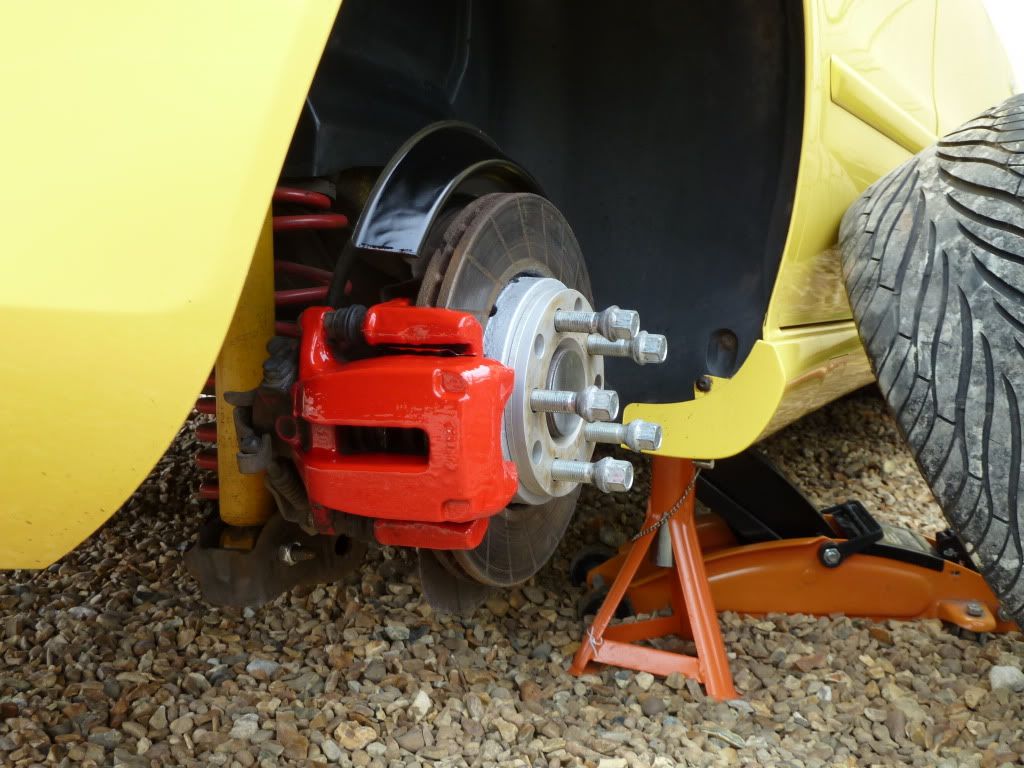
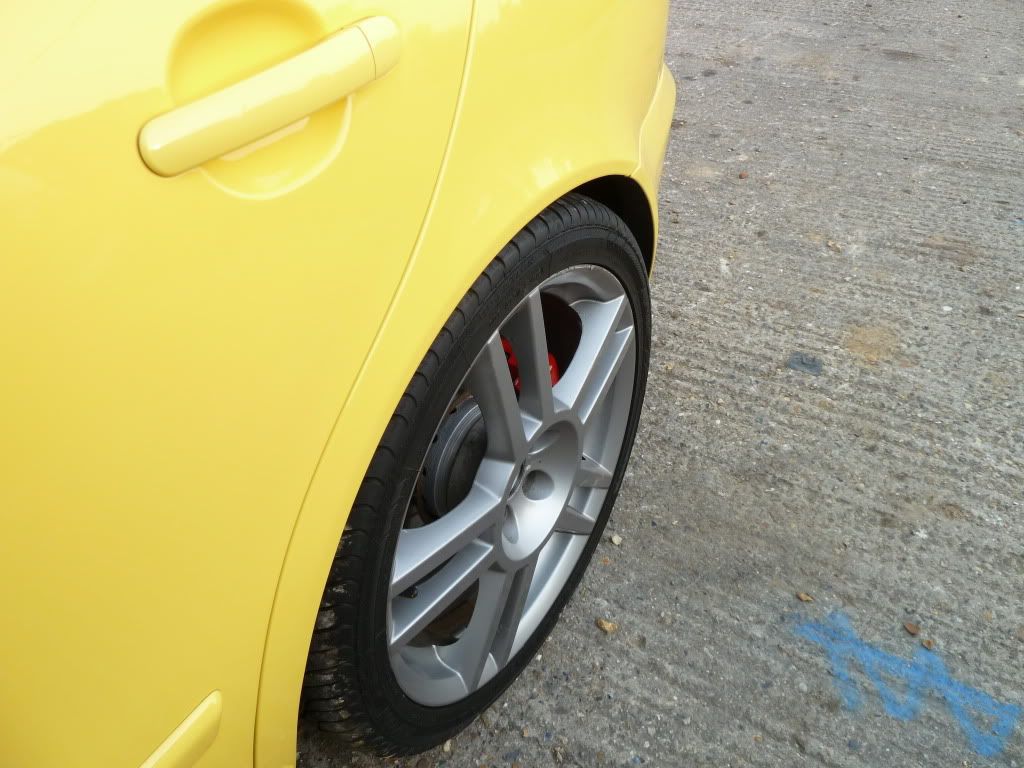
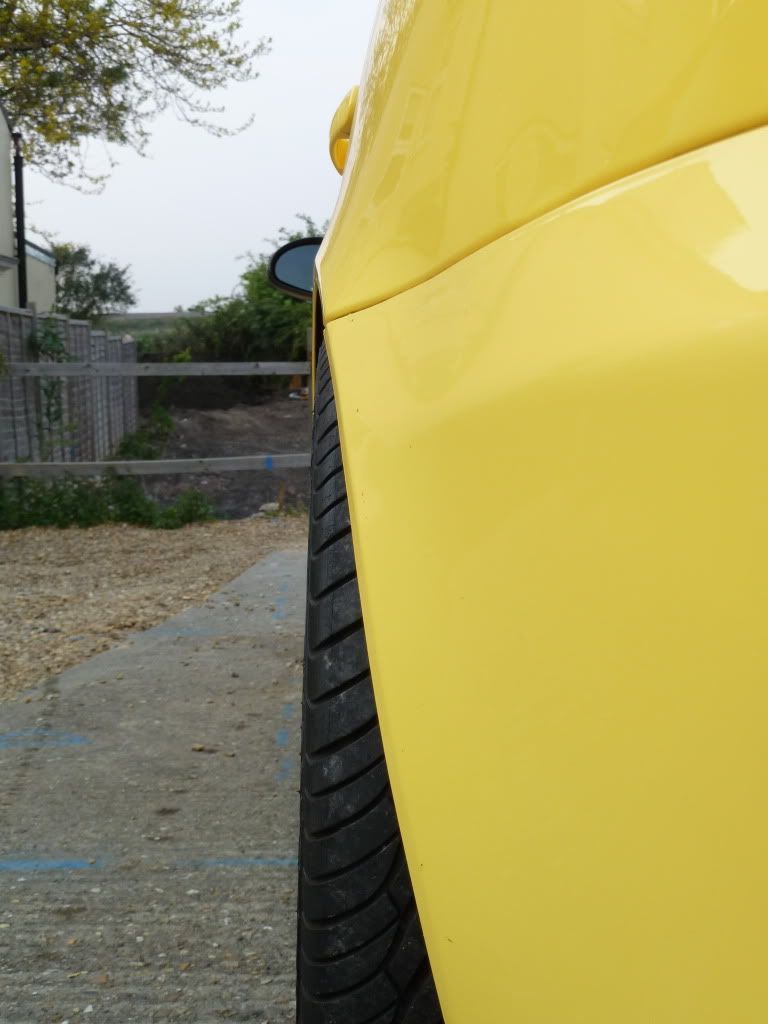
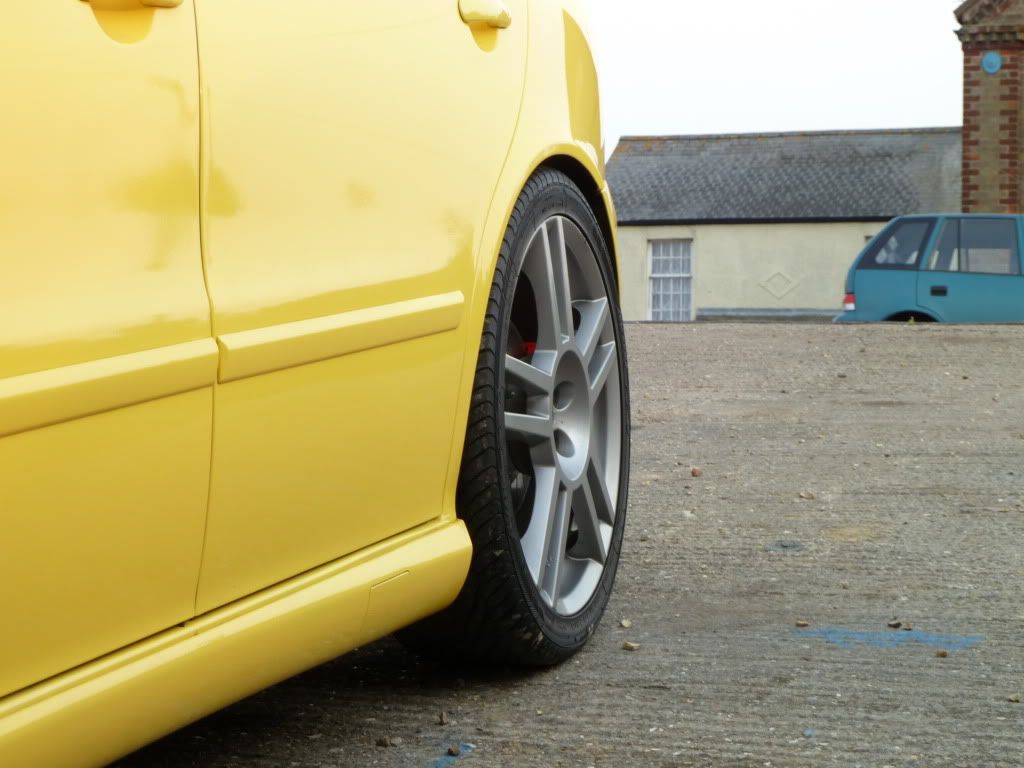
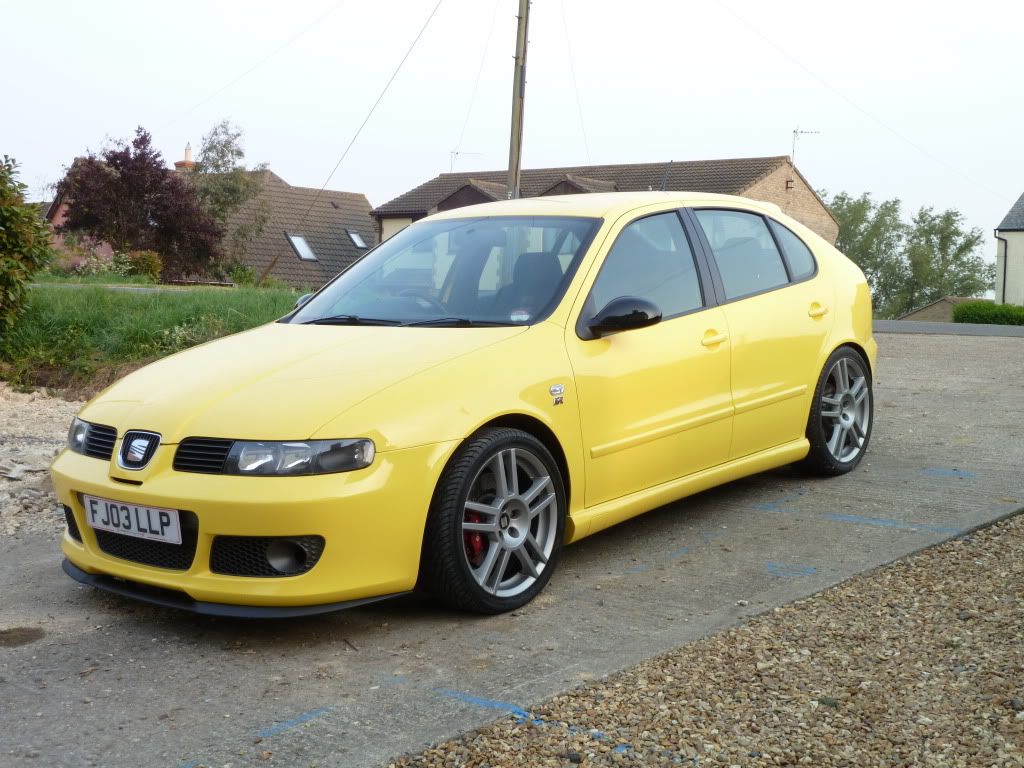
I’m very happy with how the rear of the car is now sitting, although it is perhaps a little low; I’ve not adjusted the ride height from the starting point (4th thread), but once it has settled and I’ve driven it, I’ll gauge just how much I need to raise it by. It is on its original 15mm spacers so I’ll also see if I need to reduce this too.
I received my Brembo stickers in the post yesterday, as used and recommended by JamJay, so if work commitments don’t get in the way over the weekend then I may refurb the front callipers, to keep things moving; I’m hoping to have my wheels done in the 4th week of May, at long last!
James.
As this is something that I want to have ago at myself, I’ve collected all the parts needed to refurbish the wishbones etc. (Superpro Polybushes as pictured in a previous post). I haven’t managed to get a strut spreader yet so I’ve completed the rear, with the hope that I can complete the front in the next couple of weeks, time permitting.
I started out by sitting the rear of the car on axle stands and removing the wheels. I washed the wheel wells with hot soapy water (fairy liquid) to remove all the dirt. Once dry, I sprayed the brake with brake cleaner, and left them to soak. Next came the grubby work, in removing the old shocks and springs. With both wheels up in the air, the springs were easy to remove although I did have to use a spring compressor to jiggle them out. Using a 16mm spanner and some penetrating fluid I removed the nut and bolt holding the bottom of the shock to the beam; there’s two 16mm nuts holding the top of the shock to the body.
Frustratingly, the KW Competition rear shocks that I have didn’t marry to the top bush, so I’ll have to buy some that fit, so for the time being, I fitted Pi shocks that I had in the shed. The springs sat fine and I adjusted the height going by thread count (4th from bottom as a starting point).
With the suspension all on, I wire brushed the brakes and hubs. For the hubs, I used a spray tin of Hammerite Smooth silver. I was a little unsure of the colour choice at first (thought about using black) but the colour is just right against the spacers. I sanded the brake surrounds and painted them black, with a lacquer finish. The callipers were sanded down, masked up and I used Hammerite Smooth red (which I’ll be using for the front); two coats of lacquer were applied after a few hours.
Here are the pictures.


I’m very happy with how the rear of the car is now sitting, although it is perhaps a little low; I’ve not adjusted the ride height from the starting point (4th thread), but once it has settled and I’ve driven it, I’ll gauge just how much I need to raise it by. It is on its original 15mm spacers so I’ll also see if I need to reduce this too.
I received my Brembo stickers in the post yesterday, as used and recommended by JamJay, so if work commitments don’t get in the way over the weekend then I may refurb the front callipers, to keep things moving; I’m hoping to have my wheels done in the 4th week of May, at long last!
James.
Last edited:
Hey Joe,
I used a more abrasive W&D paper- 120 grit, followed by 240 grit and then 800 grit. The reason I used a more abrasive paper was because I had some paint flake and wanted to get it as smooth as possible, so I pretty much went back to metal.If it hadn't of been Hammerite, I would of used some acid-etch primer before applying the red.
James.
Cheers James,
One of mine were terrible, literally all chalky like aluminium goes like and all the paint was bubbly as hell, I tried sanding down although not the best results (bit fiddly) but they came out OK in the end. Did you lacquer yours after?
Joe
One of mine were terrible, literally all chalky like aluminium goes like and all the paint was bubbly as hell, I tried sanding down although not the best results (bit fiddly) but they came out OK in the end. Did you lacquer yours after?
Joe
I know what you mean about the chalky-like finish; it took a few very light coats, which eventually gave it a solid and smooth finish. Yes, I used some U-Pol clear coat (3 coats) to hopefully give it a durable finish.
Thanks Phil. There's plenty of very good threads/ reviews and guides on SCN, so there's plenty to keep you moving. What car do you have? I'll keep an eye out for your thread, if you have/start one.
On a side note, I didn't get chance to do the front callipers today, but I did get chance to give it a quick wash and wax (using Poor Boys Bananarama). Also, whilst reading Mygel's thread about his spark plugs, I completely forgot about the Pulstar Pulse Plugs - BE1-I-Series Iridium that I bought last year (as John aka CupraMVR had been using, with good driveability results). So I fitted them. The Bosch Super Plus plugs that I fitted when I had new coilpacks looked absolutely tip-top so I may use them again if the Pulstars aren't suiting.
Drove the car for around 30 mins this evening; the rears feel firm but forgiving, without scrubbing arches over the bumps of the country roads around here . I'll give the new plugs a bit of time before I report; beyond the placebo, felt nice and smooth and pulls well.
James.
On a side note, I didn't get chance to do the front callipers today, but I did get chance to give it a quick wash and wax (using Poor Boys Bananarama). Also, whilst reading Mygel's thread about his spark plugs, I completely forgot about the Pulstar Pulse Plugs - BE1-I-Series Iridium that I bought last year (as John aka CupraMVR had been using, with good driveability results). So I fitted them. The Bosch Super Plus plugs that I fitted when I had new coilpacks looked absolutely tip-top so I may use them again if the Pulstars aren't suiting.
Drove the car for around 30 mins this evening; the rears feel firm but forgiving, without scrubbing arches over the bumps of the country roads around here
 . I'll give the new plugs a bit of time before I report; beyond the placebo, felt nice and smooth and pulls well.
James.
Debaffled Charge Pipe Guide - DIY
I was reading through TimJK’s thread yesterday and he explained that he debaffled his charge pipe, without replacing the baffled sleeve, like others have done. I searched SCN for such information and a guide, but there was little information on this. So, I thought I would give some guidance.
I removed my charge pipe this morning to see how I could go about removing the baffled sleeve.
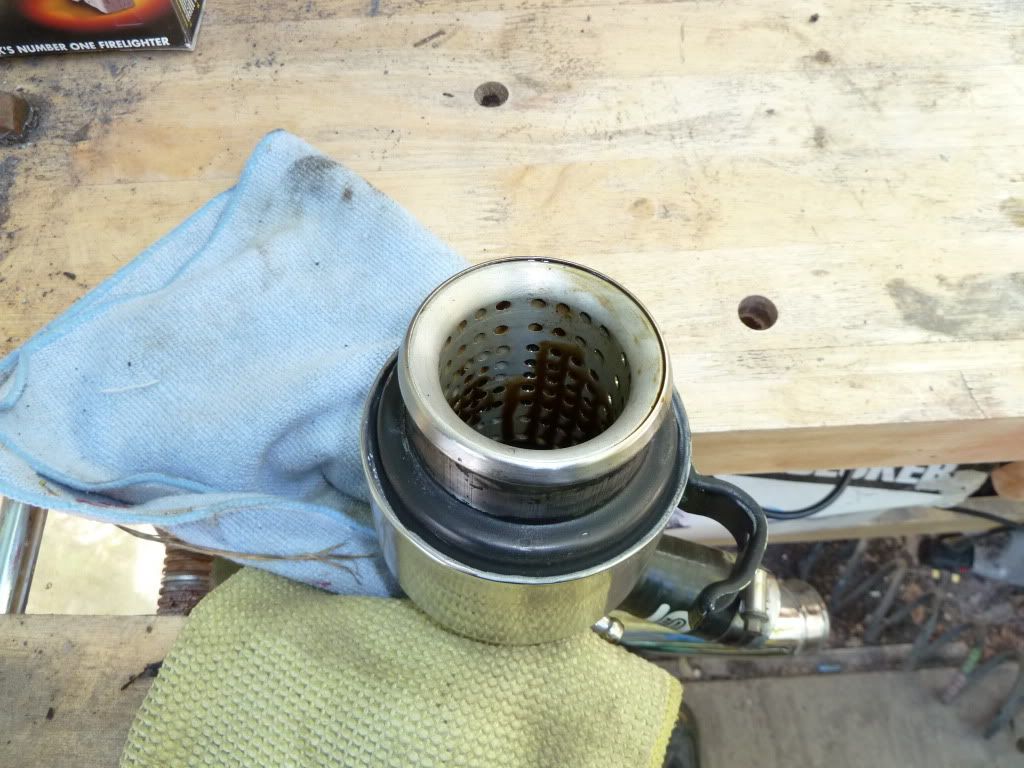
I was told that the metal was quite brittle and would respond well to a hammer and chisel. So that’s what I did. I positioned the chisel width wise as seen in the below picture.
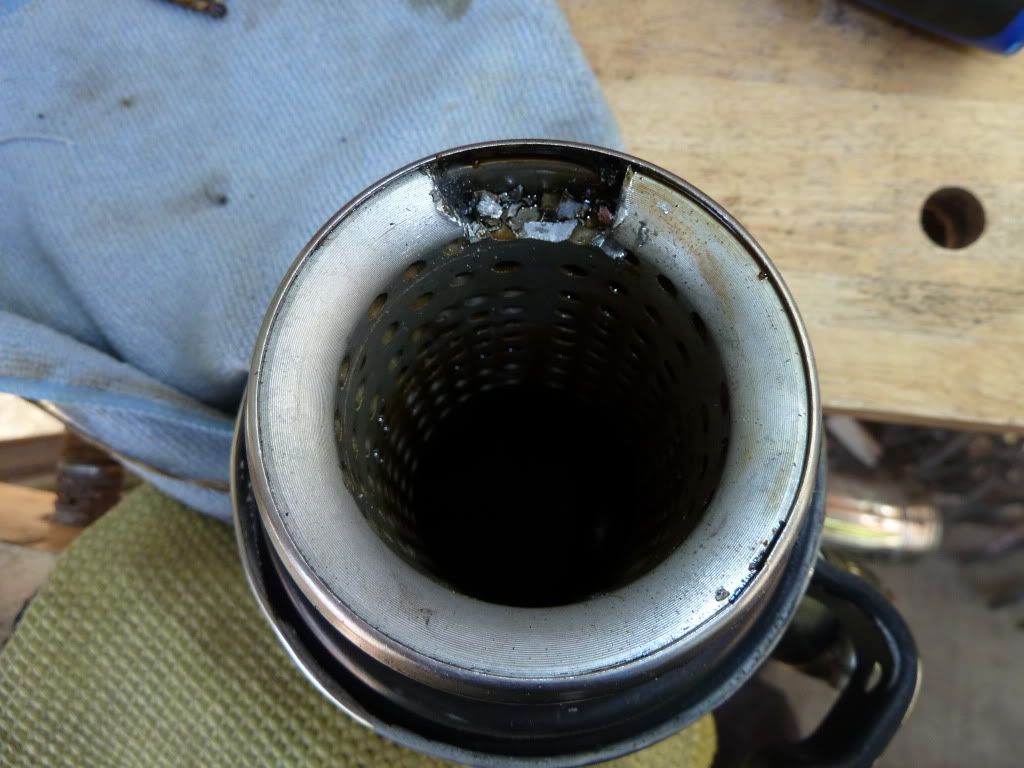
As you can see from the below pictures, the sleeve, which is perhaps 10 cm long, is secured by metal rings which attach it to the actual charge pipe. I chiselled clockwise, a ring at a time. There are five retaining rings in total, before you reach the bottom of the sleeve.
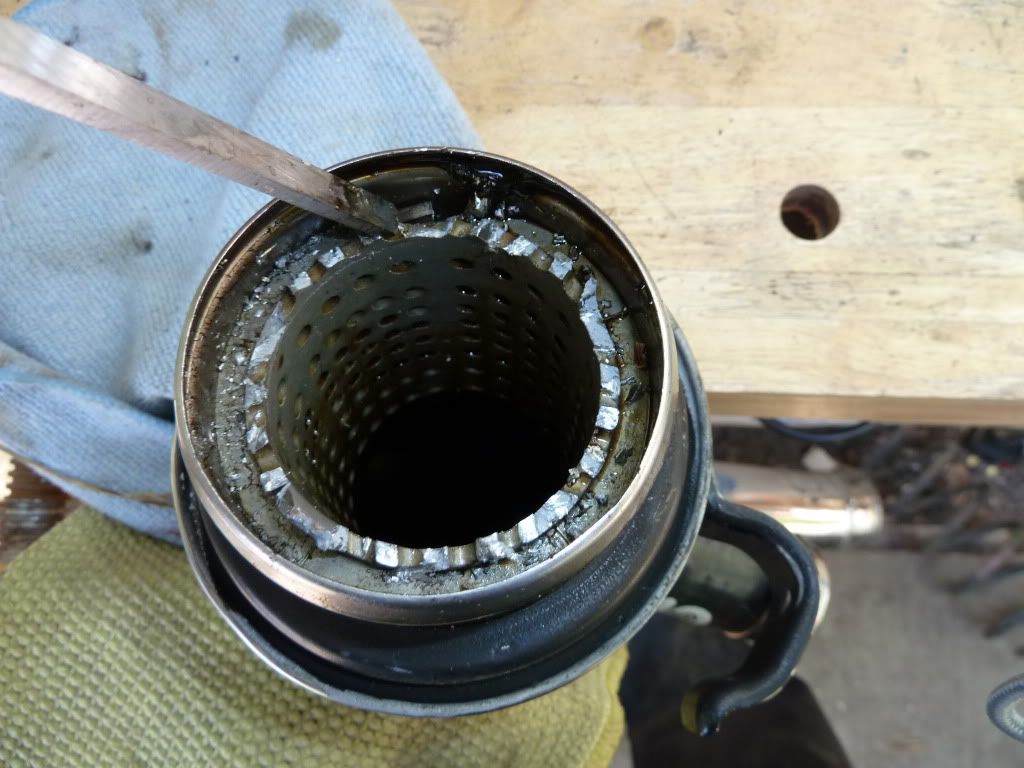
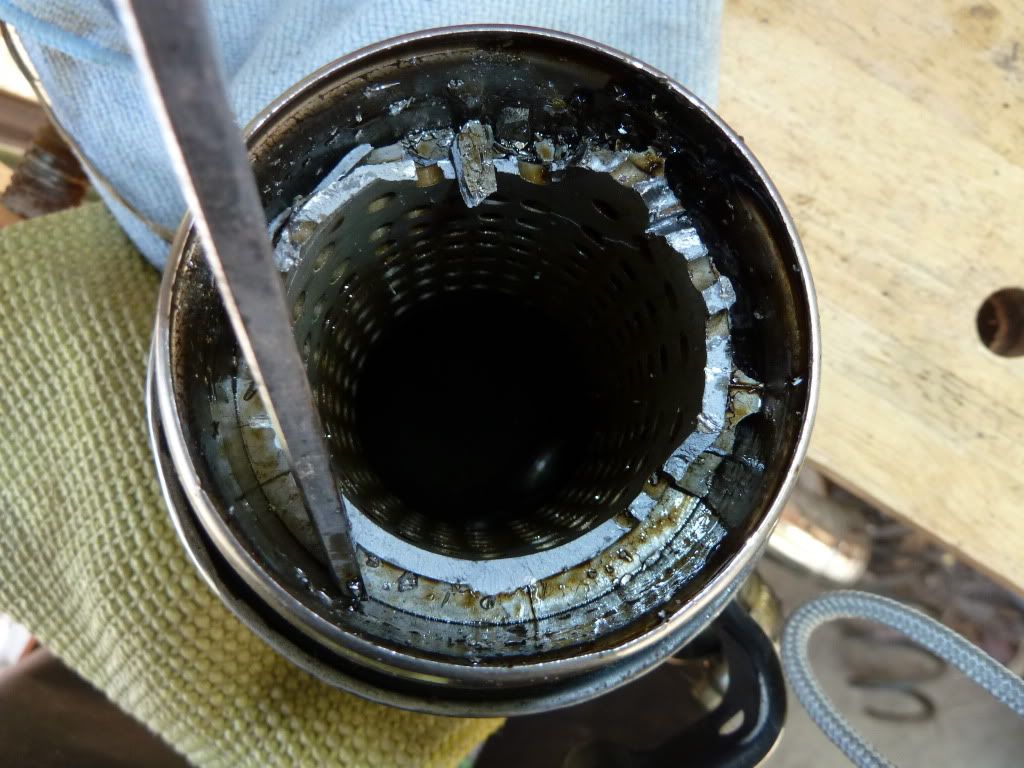
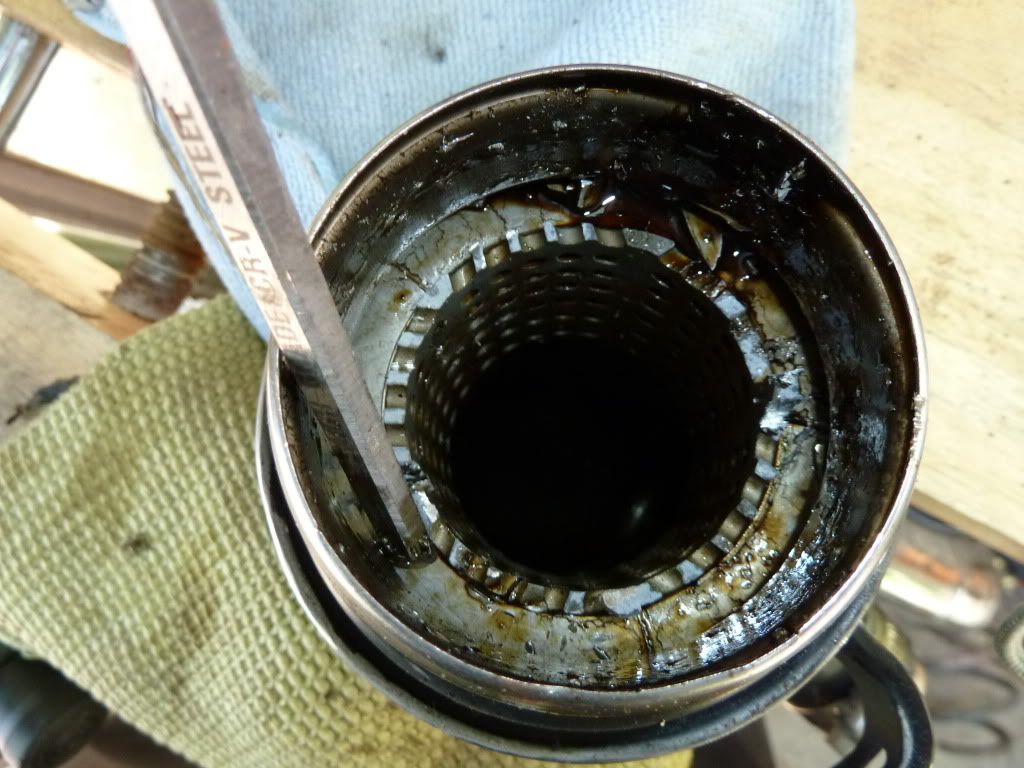
The pictures show ring by ring removal. I found it useful to chisel the ring, which simply broke into pieces, before removing the attached bit of sleeve. Eventually, you end up with this; a debaffled pipe.
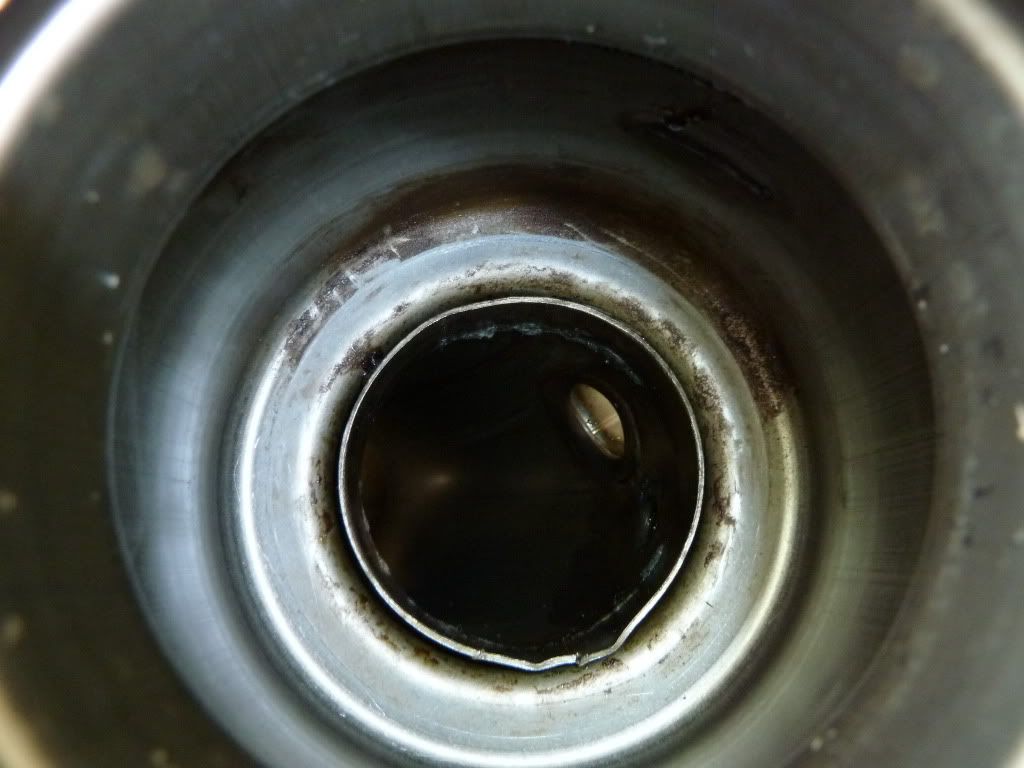
I was meticulous in cleaning the pipe afterwards, to ensure that all the tiny shards were removed, as I wouldn’t want anything to pass through the tubby.
Now, I’m not sure what this may achieve. It’s debaffled but as there is no replacement sleeve, who knows whether this will achieve anything? It’s meant to give slightly better throttle response and give a better flow to the turbo. Certaintly, on a mapped car this may have more of an impact, but we’ll see. It was a free mod and it will give me an indication as to whether a Forge debaffled charge pipe will be of any benefit.
I’m sure this may be a little contentious amongst those in the know, but as there was little in the way of a guide, hopefully members will find this of some use. I’ll be sure to give feedback once the car has been driven over a period of time.
James.
I was reading through TimJK’s thread yesterday and he explained that he debaffled his charge pipe, without replacing the baffled sleeve, like others have done. I searched SCN for such information and a guide, but there was little information on this. So, I thought I would give some guidance.
I removed my charge pipe this morning to see how I could go about removing the baffled sleeve.

I was told that the metal was quite brittle and would respond well to a hammer and chisel. So that’s what I did. I positioned the chisel width wise as seen in the below picture.

As you can see from the below pictures, the sleeve, which is perhaps 10 cm long, is secured by metal rings which attach it to the actual charge pipe. I chiselled clockwise, a ring at a time. There are five retaining rings in total, before you reach the bottom of the sleeve.


The pictures show ring by ring removal. I found it useful to chisel the ring, which simply broke into pieces, before removing the attached bit of sleeve. Eventually, you end up with this; a debaffled pipe.

I was meticulous in cleaning the pipe afterwards, to ensure that all the tiny shards were removed, as I wouldn’t want anything to pass through the tubby.
Now, I’m not sure what this may achieve. It’s debaffled but as there is no replacement sleeve, who knows whether this will achieve anything? It’s meant to give slightly better throttle response and give a better flow to the turbo. Certaintly, on a mapped car this may have more of an impact, but we’ll see. It was a free mod and it will give me an indication as to whether a Forge debaffled charge pipe will be of any benefit.
I’m sure this may be a little contentious amongst those in the know, but as there was little in the way of a guide, hopefully members will find this of some use. I’ll be sure to give feedback once the car has been driven over a period of time.
James.
SiLVeR
Guest
Thanks Phil. There's plenty of very good threads/ reviews and guides on SCN, so there's plenty to keep you moving. What car do you have? I'll keep an eye out for your thread, if you have/start one.
On a side note, I didn't get chance to do the front callipers today, but I did get chance to give it a quick wash and wax (using Poor Boys Bananarama). Also, whilst reading Mygel's thread about his spark plugs, I completely forgot about the Pulstar Pulse Plugs - BE1-I-Series Iridium that I bought last year (as John aka CupraMVR had been using, with good driveability results). So I fitted them. The Bosch Super Plus plugs that I fitted when I had new coilpacks looked absolutely tip-top so I may use them again if the Pulstars aren't suiting.
Drove the car for around 30 mins this evening; the rears feel firm but forgiving, without scrubbing arches over the bumps of the country roads around here. I'll give the new plugs a bit of time before I report; beyond the placebo, felt nice and smooth and pulls well.
James.
I don't have a LCR yet, I currently have a bmw e46 323ci but I am in the process of selling it and buying a lcr. I see your in ely im over in wisbech do you ever go to any of the cruises around here?
Phil
I don't have a LCR yet, I currently have a bmw e46 323ci but I am in the process of selling it and buying a lcr. I see your in ely im over in wisbech do you ever go to any of the cruises around here?
Phil
No mate, family life and work kinda gets in the way of that; nice to have it as a hobby that I can dip in and out of. Good luck with your search buddy.
James.
Just had a good look through your thread mate and it's a great read. I love the depth you put in your posts and the detail in which you explain everything.
Definitely considering nabbing a couple of your ideas! Definitely like how the spacers make the car sit aswell, was there any differences other than looks after fitting? How much did they cost for the front and rears?
Keep up the good work buddy, you have a fantastic car here that definitely looks the part!


