-
Hey Guest one of our sponsors Progressive Parts is running Black Friday and Cyber Monday offers - more details here
You are using an out of date browser. It may not display this or other websites correctly.
You should upgrade or use an alternative browser.
You should upgrade or use an alternative browser.
Basically the problem is this:
The cruise control thinks the rear brakes have been applied so it cuts the cruise control, this in turn causes the pre-heat light to flash because the brakes have not been applied, i.e. there is a problem with electronic fuel delivery. Note: the car will drive just fine, it's just the cruise control wont work and you have the most annoying yellow flashing light in your face (gets really annoying on a 300 mile run).
The switch is £6.75 + vat, stealer billed me £70+vat for labour (which I think is 1 hour, which is a friggin rip off, wont be going to the stealers anymore).
I asked a friend of mine who is a VAG specialist (yes I know should have taken it to him but I was working 300 miles away at the time), he would charge £50 inc. vat.
Hope that helps.
neiltdi
Guest
Thanks,
My Leon doesnt have cruise control, though I presume the same problem still applies.
Really annoying that all brake lights stop working. You'd have thought they'd run on seperate circuits for safe driving.
I have around 2 weeks of warranty left. This should be covered by them surely?
Thanks for the reply. I'll try and get it booked in ASAP.
Thanks,
My Leon doesnt have cruise control, though I presume the same problem still applies.
Really annoying that all brake lights stop working. You'd have thought they'd run on seperate circuits for safe driving.
I have around 2 weeks of warranty left. This should be covered by them surely?
Thanks for the reply. I'll try and get it booked in ASAP.
Your covered. Just get it booked in quick.
phaedrus
Guest
Just removed my own an hour ago. Will call the independent dealer I use for parts tomorrow for him to order it in for me.
You guys reckon the car can be driven with the switch removed till I get the new one fitted?
The old one wasn't working in the first place, so the brake lights weren't coming on anyway, but will the connector being disconnected cause any problems?
FWIW, ours is a 1998 1.9TD Alhambra, and in case it's of any use to anyone out there, here's my description of what I did. Not as detailed as OP's, but it may be of use to Alhambra owners as an augment to OP's great guide.
There are 4 philips screws to come out (red circles) after you pull the fuse cover flap out from its 2 pivot lugs (green circles in 1st pic, red circles in 2nd pic).
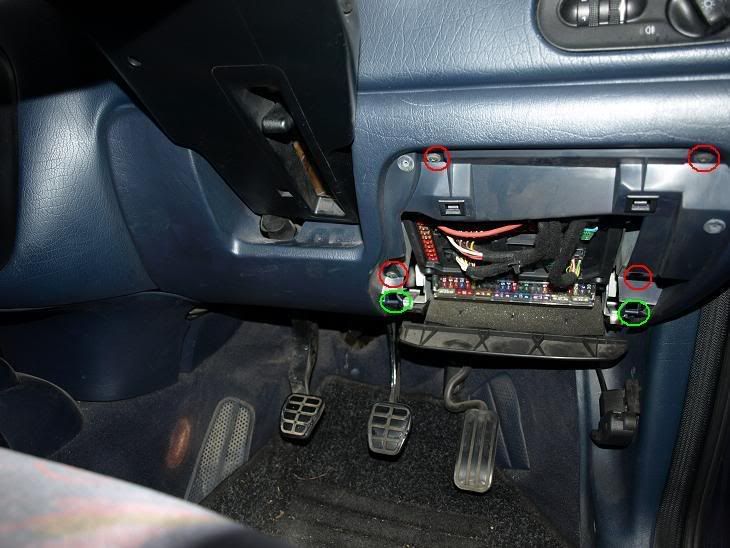
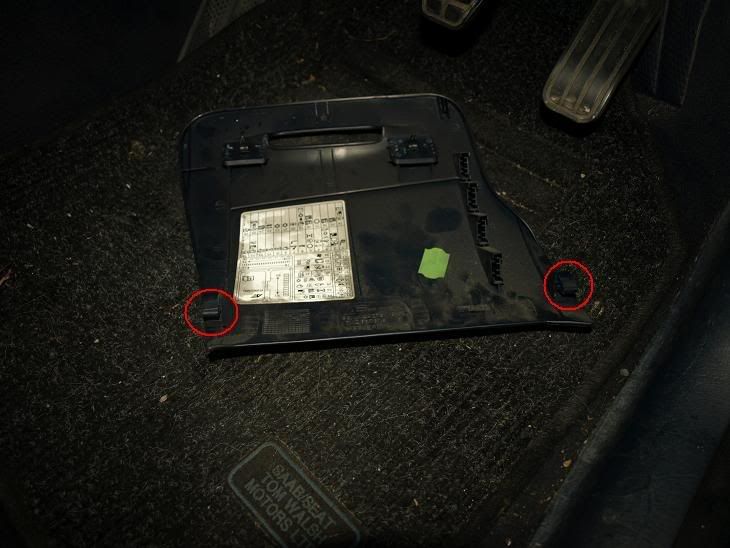
There's 1 expanding lug to come out on the side of the lower dash panel. Open the door fully to get at it. Pry it out with a flat-head screwdriver.
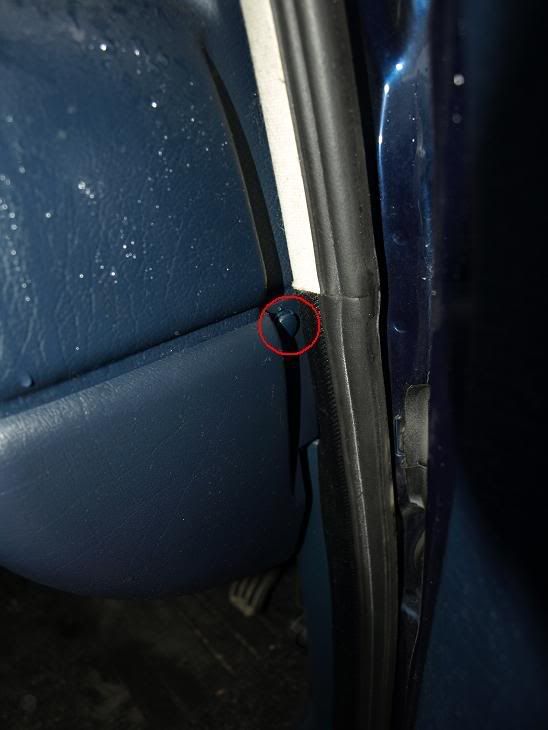
There are two lugs to come out at the top of the lower dash panel, to the right of the steering wheel. (There are two more to the left, so don't try to remove the panel completely just yet).
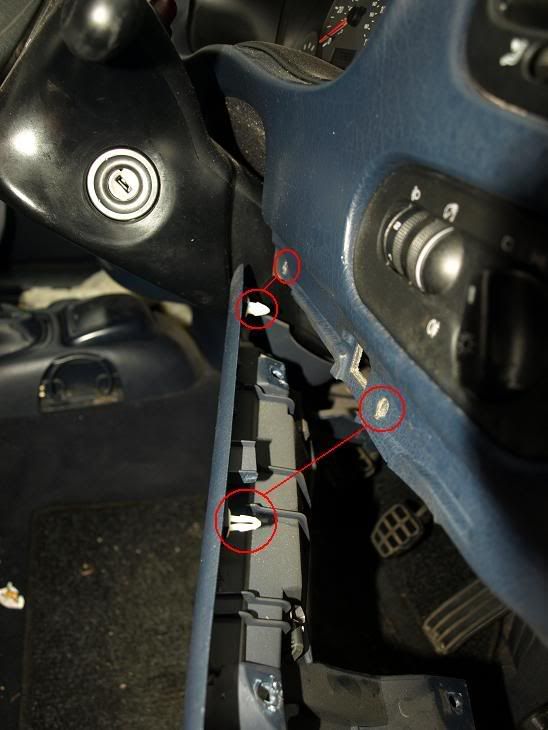
Remove one screw (red circle) from the lower centre dash piece in front of the ashtray, and pop out the locator lug (green circle).
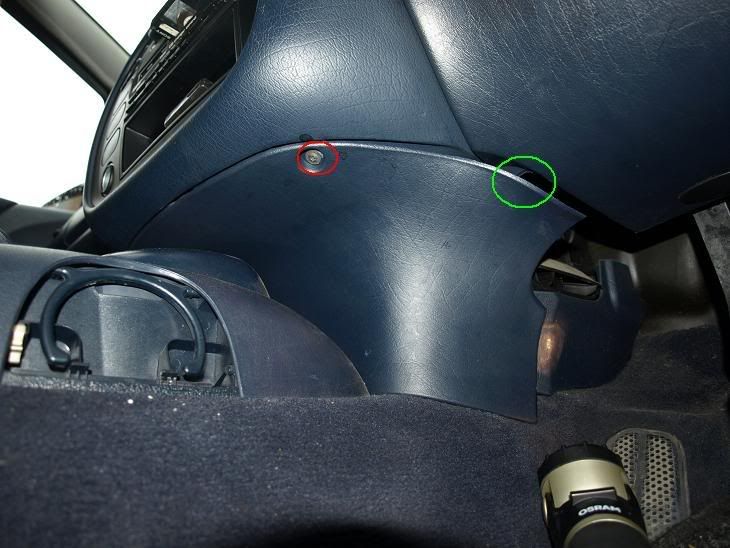
Remove the final philips screw holding the main lower dash panel (red circle).
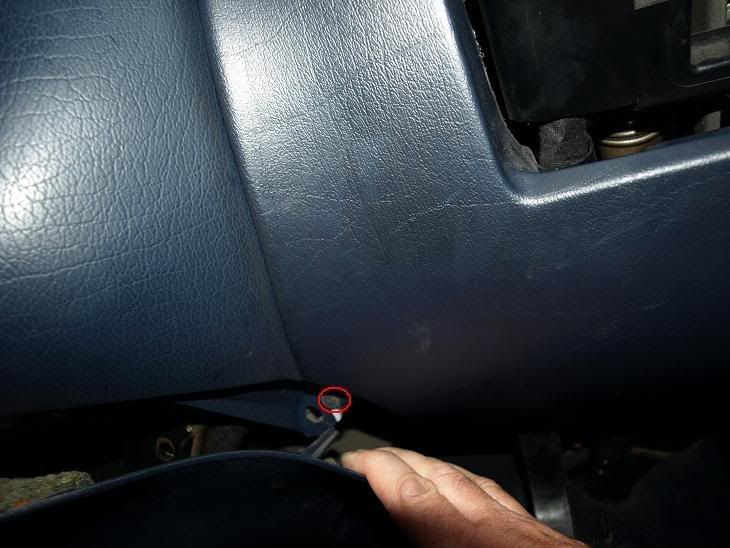
Pop out the two remaining locator lugs at the top of the panel, to the left of the steering wheel and pull the panel away completely.
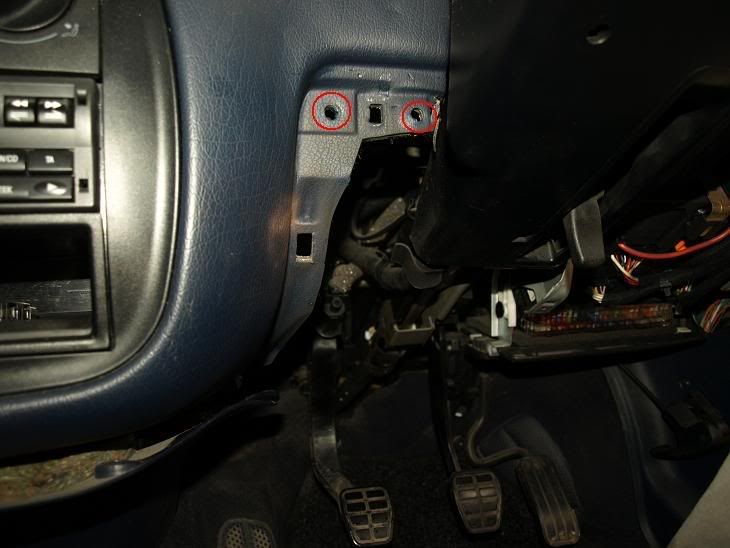
Curse at and spit on the offending piece of crap, before disconnecting the electrical connection.
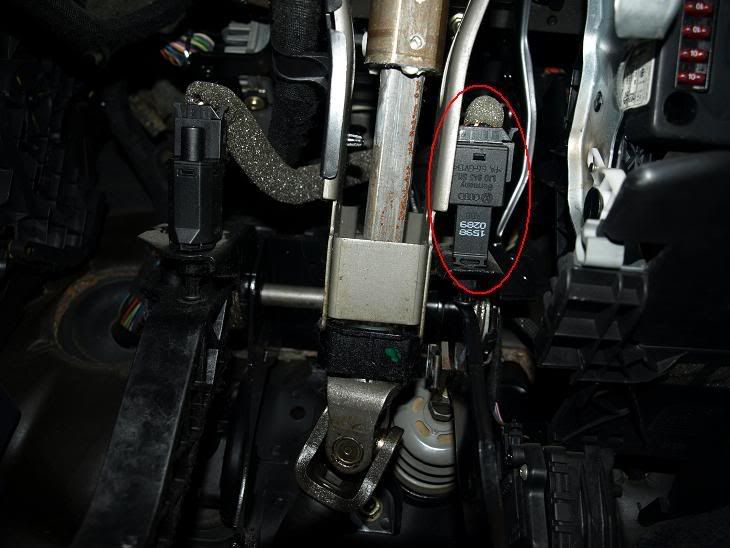
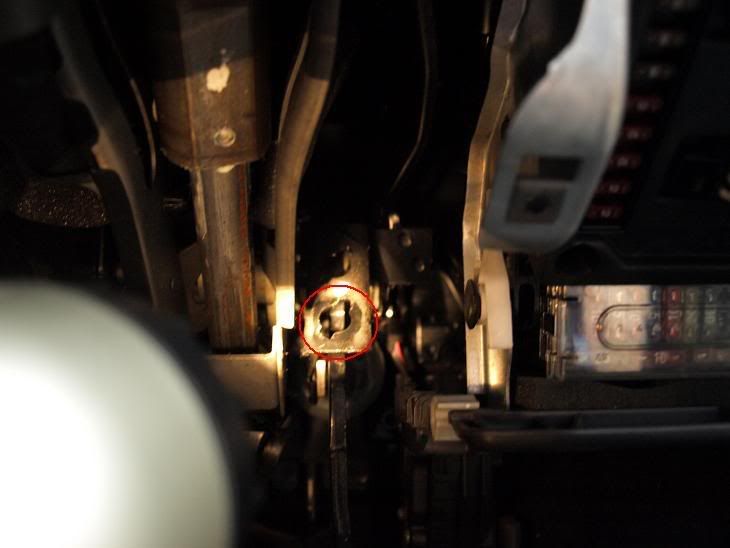
Turn the switch till you feel the two opposing lugs line up with the correct slots (cant remember whether I went clockwise or counter - sorry), then firmly pull it out. I needed to gently coax it with the flat-head screwdriver.
TBC...
You guys reckon the car can be driven with the switch removed till I get the new one fitted?
The old one wasn't working in the first place, so the brake lights weren't coming on anyway, but will the connector being disconnected cause any problems?
FWIW, ours is a 1998 1.9TD Alhambra, and in case it's of any use to anyone out there, here's my description of what I did. Not as detailed as OP's, but it may be of use to Alhambra owners as an augment to OP's great guide.
There are 4 philips screws to come out (red circles) after you pull the fuse cover flap out from its 2 pivot lugs (green circles in 1st pic, red circles in 2nd pic).


There's 1 expanding lug to come out on the side of the lower dash panel. Open the door fully to get at it. Pry it out with a flat-head screwdriver.

There are two lugs to come out at the top of the lower dash panel, to the right of the steering wheel. (There are two more to the left, so don't try to remove the panel completely just yet).

Remove one screw (red circle) from the lower centre dash piece in front of the ashtray, and pop out the locator lug (green circle).

Remove the final philips screw holding the main lower dash panel (red circle).

Pop out the two remaining locator lugs at the top of the panel, to the left of the steering wheel and pull the panel away completely.

Curse at and spit on the offending piece of crap, before disconnecting the electrical connection.

Turn the switch till you feel the two opposing lugs line up with the correct slots (cant remember whether I went clockwise or counter - sorry), then firmly pull it out. I needed to gently coax it with the flat-head screwdriver.

TBC...
phaedrus
Guest
... continued
I tried squirting it with WD40 and reconnecting the switch. It started working inconsistently, so I disconnected it again.
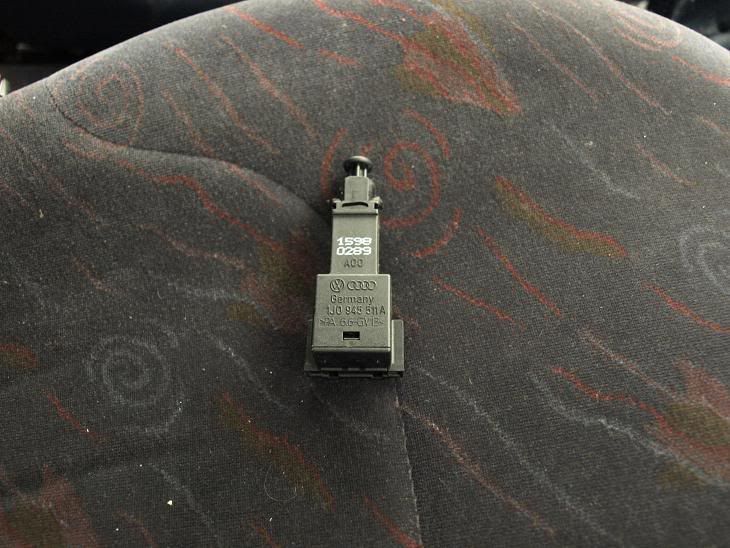
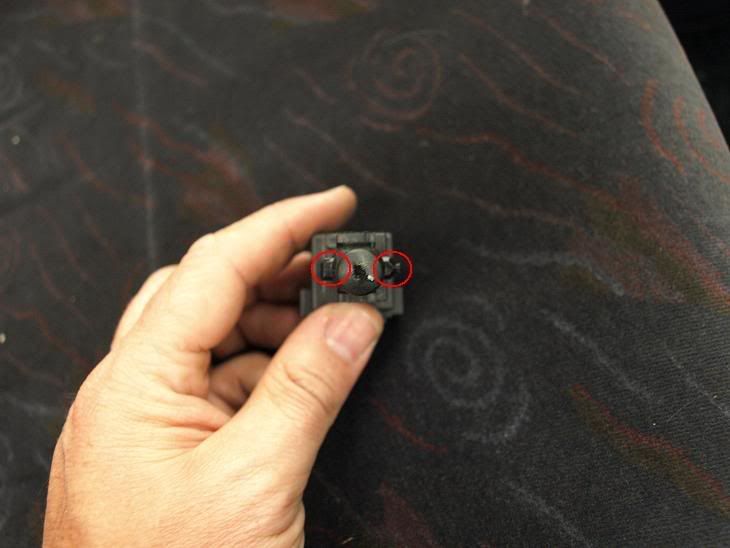
You can just make out the different shapes of the two lugs. The left one is square and the right is pointed.
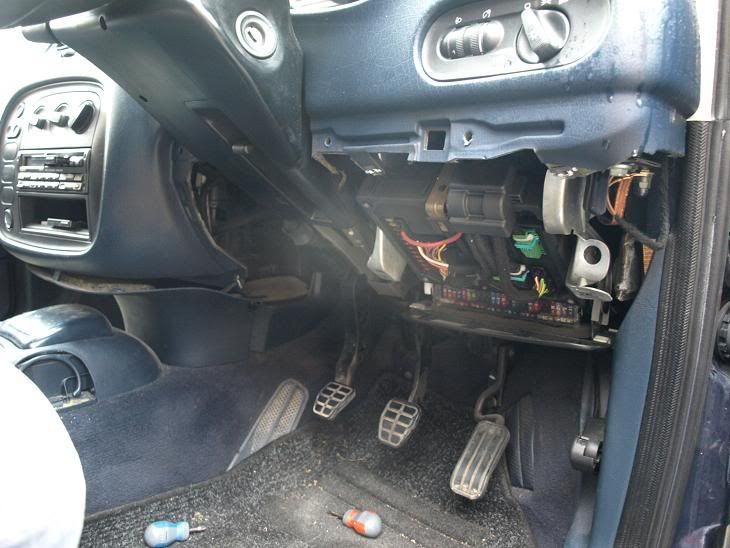
It's not pretty, but I'm leaving it all like this till I fit the new switch.
Many thanks to OP for posting his guide - it made it less daunting. This is not necessarily a dealer job, folks.
You CAN do it yourself.
Mark
I tried squirting it with WD40 and reconnecting the switch. It started working inconsistently, so I disconnected it again.

You can just make out the different shapes of the two lugs. The left one is square and the right is pointed.

It's not pretty, but I'm leaving it all like this till I fit the new switch.

Many thanks to OP for posting his guide - it made it less daunting. This is not necessarily a dealer job, folks.
You CAN do it yourself.
Mark
This is an excellent guide!!!
Read the part number out to the GSF part shop and the part was in stock. Although I used the new part code it still turned out to be the pink one, the guy at GSF said that OEM were orginally black and now green, if it was pink that it would of probably already been replaced at some point...
Followed the instructions and got it sorted in no time - my only advice to anyone else fitting a new switch would be...
After I fitted the switch it didn't work even though it was secure and had clicked twice (as per additional GSF printed help sheet they gave me over the counter). So I un-twisted and took out the brake sender and then simply put it back in twisted it back into place. started working a treat. Can only assume that it had not seated correctly against the pedal arm.
Thanks again mate.
Hi
Could this cause the following?
ABS and TSR lights?
Engine managment light?
Battery lights all on?
Could this cause the following?
ABS and TSR lights?
Engine managment light?
Battery lights all on?
trumpetman1
Guest
I had a mk4 Golf with this problem. First time they replaced it under warranty, second time they charged me as a part already replaced under warranty isn't covered a second time if it fails!! Seems like a get out clause so they don't have to keep paying out for parts that blatantly aren't good enough quality.
Glad to see its still helping
its still helping!!!!,
thanks for all your time and effort..
great post
InTheSeat
Guest
Awesome post. I had a problem with the brake lights not coming on till too late. I had to stand on the pedal for the lights to work. I got the panels off as described. I took the switch out, which happened to be what looks like the new one you lot talked about (well it was the green one anyway!) but everthing seemed ok. I took the switch apart, stretched the spring slightly to make the plunger a bit more resisting. All back together and works like a dream. Now I only have to tap the pedal slightly and the brake lights are on. No more flashers and people with horns letting rip behind!! Cheers.
Many thanks Stan 24v for your great guide.
I failed my MOT over here in NI cos of the switch failing on me. Sod's law isn't it that you have an MOT and that day it decides to fail!
Anyway, headed down to GSF and got a 4 pin Brake Light Switch for my Leon Cupra 03. Fitted it without any problems and all works ok... well, except that one brake light has also actually blown lmao
Cheers mate
Eerhh ?!? Why did you all disassemble the complete dash / panels for this job ??!?? 
The switch is almost in plain sight !
( what do you think these inspection holes in the lower panel are meant for ? ... )
)
I Just replaced my switch ... in 10 seconds max.
My manual :
Put your head down and look under dash at the brake pedal ,
remove old switch by twisting left. Insert the new one and twist right ...
Done
I took some pictures while changing my switch, see below.
I can also confirm that the green colored 1C0945 511A RDW switch is the (currently)
correct part, superseding all other 1J0 945 511 [#] switches (where # = A to E)
Just be aware that the new 1C0945 511A RDW is selfadjusting in the opposite
way as the older switches! The older switches had to be installed with
the brake pedal down. This switch is simply installed with the brake pedal UP.
I did it wrong first and noted that once once the switch was locked (by twisting it in place) ,
the brake pedal wouldn't travel back up all the way ....
This results in apllied brakes while driving and a very short travel of the pedal ...
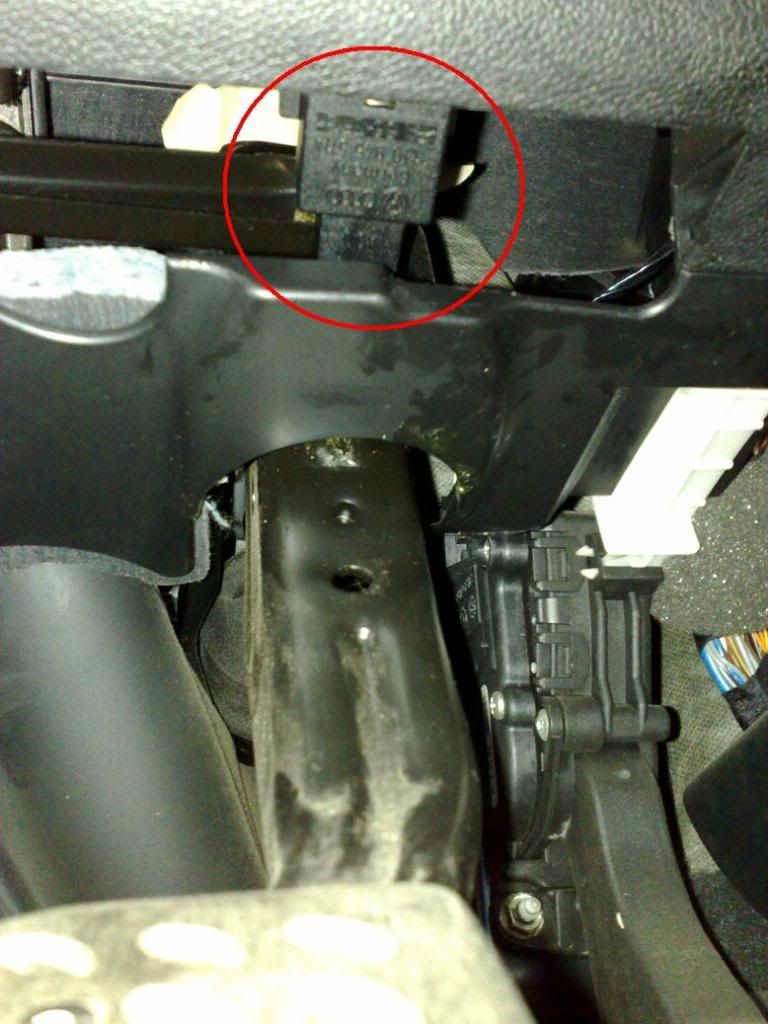
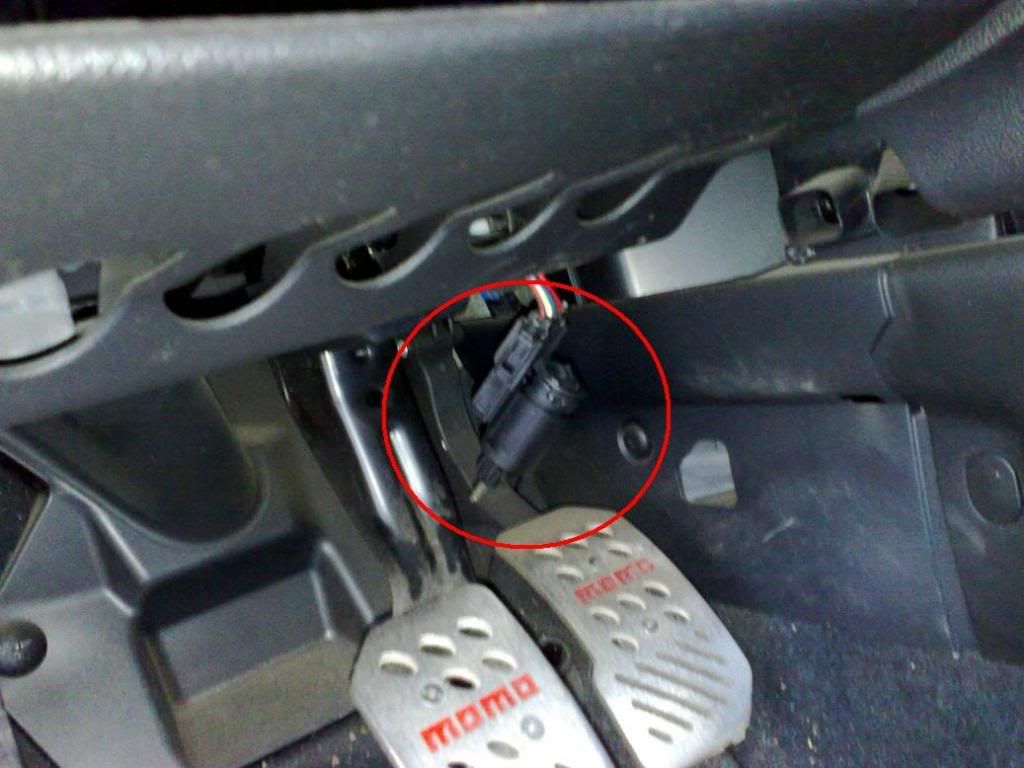

The switch is almost in plain sight !
( what do you think these inspection holes in the lower panel are meant for ? ...
 )
)I Just replaced my switch ... in 10 seconds max.
My manual :
Put your head down and look under dash at the brake pedal ,
remove old switch by twisting left. Insert the new one and twist right ...
Done
I took some pictures while changing my switch, see below.
I can also confirm that the green colored 1C0945 511A RDW switch is the (currently)
correct part, superseding all other 1J0 945 511 [#] switches (where # = A to E)
Just be aware that the new 1C0945 511A RDW is selfadjusting in the opposite
way as the older switches! The older switches had to be installed with
the brake pedal down. This switch is simply installed with the brake pedal UP.
I did it wrong first and noted that once once the switch was locked (by twisting it in place) ,
the brake pedal wouldn't travel back up all the way ....
This results in apllied brakes while driving and a very short travel of the pedal ...


Last edited:
Eerhh ?!? Why did you all disassemble the complete dash / panels for this job ??!??
The switch is almost in plain sight !
( what do you think these inspection holes in the lower panel are meant for ? ...)
I Just replaced my switch ... in 10 seconds max.
My manual :
Put your head down and look under dash at the brake pedal ,
remove old switch by twisting left. Insert the new one and twist right ...
Done
I took some pictures while changing my switch, see below.
I can also confirm that the green colored 1C0945 511A RDW switch is the (currently)
correct part, superseding all other 1J0 945 511 [#] switches (where # = A to E)
Just be aware that the new 1C0945 511A RDW is selfadjusting in the opposite
way as the older switches! The older switches had to be installed with
the brake pedal down. This switch is simply installed with the brake pedal UP.
I did it wrong first and noted that once once the switch was locked (by twisting it in place) ,
the brake pedal wouldn't travel back up all the way ....
This results in apllied brakes while driving and a very short travel of the pedal ...


Thanks for that, will be getting on today and fitting it this afternoon. Glad I don't have to take the lower dash off, it's a pain, i've done it about 5 times for other things and the screws are all a bit loose.
Similar threads
- Replies
- 9
- Views
- 364


